
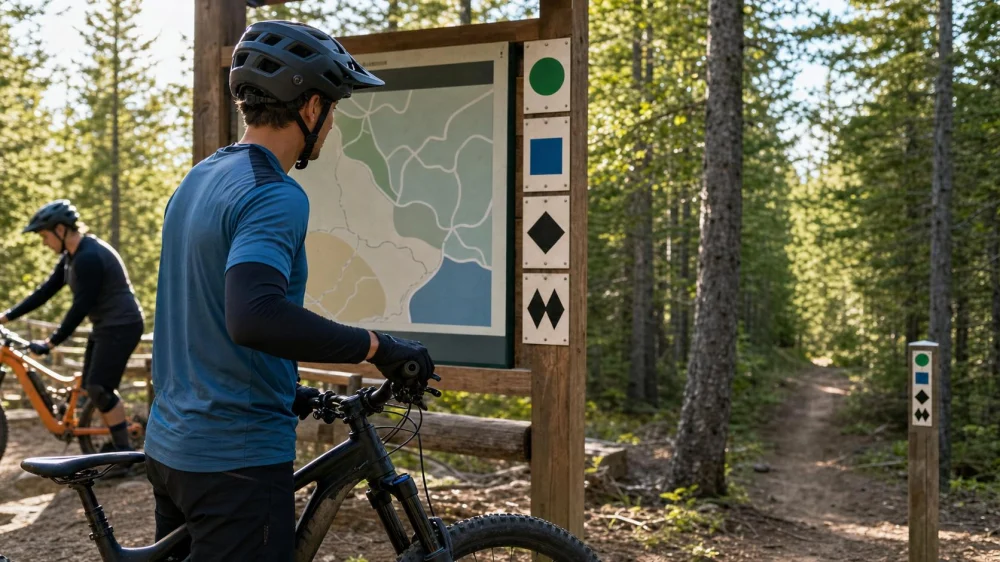
How to Read MTB Park Trail Ratings Before You Ride
On this page
Quick answer
MTB park trail ratings help riders estimate difficulty, but they are not universal promises. Green, blue, black, and double-black labels often signal increasing challenge, yet each park sets its own standards. Before riding, compare the rating with the trail map, feature signs, current conditions, closures, your bike, and your own comfort level.
What MTB park trail ratings mean
An MTB park trail rating is a park-specific difficulty label used to help mountain bikers choose routes that match their handling skills, fitness, equipment, and risk tolerance.
Many United States bike parks use familiar color or symbol cues:
- Green: usually easier trails with gentler grades, smoother surfaces, and fewer technical features.
- Blue: often intermediate trails with faster turns, moderate grade changes, small features, or tighter line choice.
- Black: generally advanced trails with steeper terrain, larger obstacles, technical sections, drops, jumps, or higher consequence mistakes.
- Double black or pro-line symbols: commonly reserved for expert terrain where speed control, air awareness, braking discipline, and feature inspection matter.
These labels are useful for sorting options, but they work best when read as a starting point, not as permission to ride every marked trail.
How to read trail signs and maps
At a bike park, read the difficulty rating together with the surrounding information. A simple color marker can hide important details that matter more than the label.
- Start with the official park map. Confirm the route name, direction of travel, lift access, return route, and whether the trail connects to harder terrain.
- Check the trailhead sign. Look for difficulty symbols, feature warnings, mandatory drops, jump lines, one-way rules, and closure notices.
- Look for progression language. Some parks separate flow trails, technical trails, jump trails, and freeride zones even when colors look similar.
- Scan for current-condition boards. Wet roots, loose dust, braking bumps, fresh maintenance, and storm damage can change how a trail rides.
- Ask staff or patrol when unsure. A short question at the rental shop, lift line, or patrol desk can prevent choosing the wrong first lap.
What ratings do not tell you
Trail ratings do not fully describe speed, exposure, surface grip, fatigue, rider traffic, braking zones, or whether a feature can be rolled instead of jumped. A blue flow trail at one park may feel easier than a green technical trail at another.
Ratings are best for quickly narrowing options, planning progression, and helping mixed-skill groups choose a safer shared route. They are not ideal for judging hidden features, poor weather, personal readiness, or whether a rental bike setup matches the trail.
How to choose your first run
For a first lap at an unfamiliar MTB park, choose a route one level easier than the hardest trail you normally ride. Use that lap to learn the dirt, braking feel, signage style, and feature scale.
- If you are new to park riding: start on green routes or beginner progression zones, even if you ride road or gravel often.
- If you ride intermediate trails at home: begin with an easier blue or green warm-up before moving to steeper or faster lines.
- If you plan to jump: inspect takeoffs, landings, speed requirements, and alternate lines before committing.
- If the group has mixed ability: pick the easiest rider’s comfort level, then split up later if needed.
Pre-ride checklist
Use this quick checklist before dropping into a trail you have not ridden before:
- Helmet is secure; eye protection, gloves, and appropriate pads are on.
- Brakes feel firm and tires have enough grip for the surface.
- Suspension, saddle height, and controls are set for descending.
- You know the trail direction, exits, intersections, and return route.
- You checked closures, wet-weather rules, and feature warnings.
- You can describe the hardest feature you expect to meet.
- You are willing to stop, walk, or session a feature before riding it.
Important safety notes
Trail rating systems vary by park. Always follow the park’s posted rules, current closures, lift instructions, and patrol guidance. Weather and maintenance can change trail difficulty during the day.
This guide is general cycling safety information, not a substitute for local park rules, professional coaching, or in-person instruction. Do not ride beyond your skill level to keep up with friends, cameras, or online videos.
FAQ
Are MTB park ratings the same everywhere?
No. Many parks use similar colors and symbols, but each park defines difficulty based on its own terrain, design, and risk standards. Always read the local map and trailhead signs.
Should beginners ride blue trails at a bike park?
Some beginners can progress to easier blue trails after warming up, but a true first-time park rider should usually begin on green routes or skills areas. Park trails can be faster and more feature-heavy than neighborhood paths.
What should I do if a feature looks too hard?
Stop in a safe place off the riding line, inspect the feature, watch experienced riders, and use a bypass if one exists. If you are still unsure, walk it or choose an easier route.
Do trail ratings account for weather?
Usually not in a precise way. Rain, dust, loose corners, roots, braking bumps, and low visibility can make a familiar rating feel harder. Check current conditions before each ride.
Evidence notes
This article is based on common bike park signage practices, general mountain bike safety principles, and broad rider progression guidance. Because parks set their own rating standards, the most reliable source for a specific trail is the official park map, posted trailhead sign, and current staff guidance.
Next steps
Before your next park day, pick two warm-up trails, one progression trail, and one bailout option. Read the signs at the trailhead, take the first lap slowly, and let the park’s real terrain confirm whether the rating matches your riding level.





 The Bikery Coffee & Bicycle Shop4.0 (632 reviews)
 Freewheelin' Community Bikes4.0 (132 reviews)
 The Bike Lane Bicycle Shop4.0 (969 reviews)
 Sunshine Bicycle Center4.0 (70 reviews)
 Pedego (Corporate Office - Not Open to Public)3.0 (19 reviews)
 Jenson USA4.0 (2110 reviews)
 How to Teach Kids to Ride a Bike: A Step-by-Step Guide for Parents
 Tips for Riding on Busy City Streets: Smart Strategies for Urban Cyclists
 Best US National Parks for Mountain Biking: Ride Epic Trails Across America
 Best Aero Helmets for Time Trials and Racing
 How to Clean and Lubricate Your Bike Chain Like a Pro
 10 Must-Have Items for Long-Distance Cycling Trips