
Tubeless Bike Tire Won’t Seal: Find the Leak Fast
On this page
- Quick answer
- What a tubeless seal requires
- Checks before adding more sealant
- Find where air is escaping
- Choose the fix by leak location
- Reseat, inflate, and test safely
- Decide whether to repair or use a tube
- Tubeless sealing checklist
- Limitations and important notes
- Sources and evidence notes
- Frequently asked questions
- Conclusion and next steps
Quick answer
A tubeless bike tire needs an airtight rim bed, a sealed valve, correctly seated beads, a compatible tire-and-rim combination, and enough usable sealant. Inflate only within the limits printed on the tire and rim. Listen or use soapy water to locate the leak, fix that specific path, then confirm the tire holds pressure before riding.
What a tubeless seal requires
A tubeless bicycle system uses the tire beads, rim shape, rim tape, valve, and liquid sealant to create and maintain an airtight chamber. Sealant can close many small pores and punctures, but it cannot reliably compensate for displaced tape, a damaged bead, an incompatible part, or a loose valve assembly.
This guide is for riders troubleshooting a tubeless-ready bicycle wheel in a home workshop or at a trailhead. It is not a substitute for the tire, rim, tape, valve, and sealant manufacturers’ instructions. Those instructions control compatibility, pressure limits, tape width, sealant quantity, and installation details.
Checks before adding more sealant
Do not assume every pressure loss means the tire needs more liquid. A newly installed tire may lose some pressure while sealant coats porous areas, but rapid deflation points to an active leak or assembly problem.
- Confirm compatibility. Check that the rim and tire are intended for tubeless use together. Hookless rims may have additional tire and pressure requirements.
- Read both pressure limits. Use the lower applicable maximum from the tire, rim, and system instructions. Never exceed a stated limit just to force the bead into place.
- Inspect the tire. Look for bead damage, cuts, exposed casing threads, dried sealant lumps, or debris at the bead seat.
- Check sealant age and amount. If the sealant has dried into a film or ball, adding air will not restore its sealing ability. Follow the sealant maker’s service guidance.
- Verify valve position. The valve base should sit squarely against the rim bed. The retaining nut should be secure by hand without crushing seals or damaging the rim.
Find where air is escaping
Work in a ventilated area and protect floors and brake surfaces from sealant. Install the wheel securely, add only enough air to test within the approved range, and listen near the bead, valve, tread, and sidewalls.
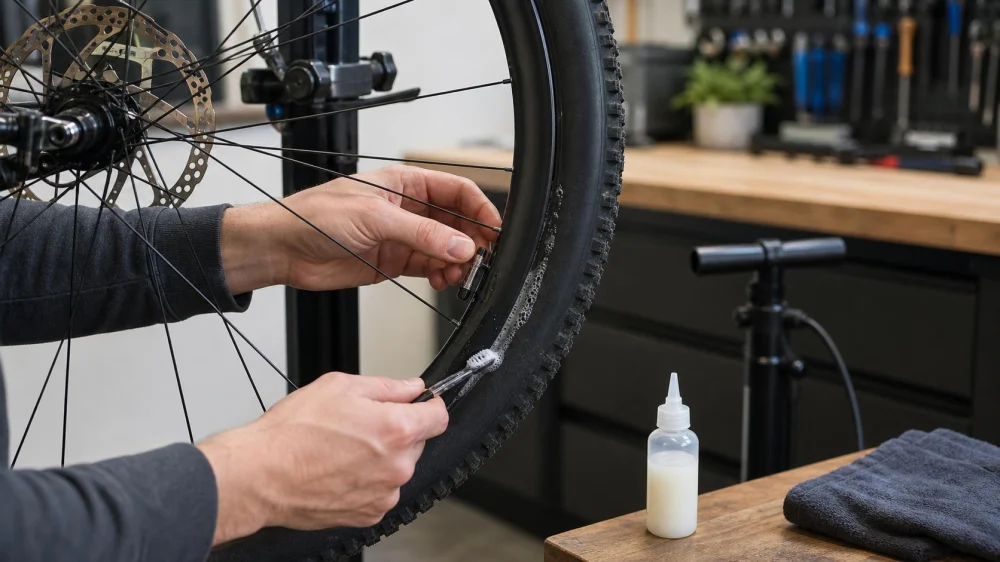
If sound does not reveal the leak, apply a small amount of mild soapy water to one area at a time. Growing bubbles identify escaping air. Keep the solution away from brake rotors and braking tracks, and clean the tire and rim according to manufacturer guidance afterward.
- Bubbles along one bead section: suspect debris, a folded bead, incomplete seating, bead damage, or compatibility.
- Bubbles at the valve opening: suspect the valve base, valve core, or a leak elsewhere under the tape that is escaping through the valve hole.
- Bubbles at a spoke hole: suspect rim-tape damage or poor adhesion.
- Fine bubbles through sidewalls: suspect casing porosity, insufficient active sealant, or tire damage.
- A focused tread leak: suspect a puncture that sealant has not closed.
Air heard at the valve does not prove the valve is the original leak. Air can enter the hollow rim through damaged tape and travel to the valve opening, so inspect the rim bed if tightening or servicing the valve does not solve the problem.
Choose the fix by leak location
Bead or bead-seat leak
Deflate the tire fully, keep the bead away from the rim edge, and inspect both surfaces. Remove only contamination that the component instructions allow you to clean. Lubricants not approved for the system can attack materials or allow movement. A visibly kinked, cut, stretched, or exposed bead is a stop condition: do not attempt to seal it with extra pressure or sealant.
Valve or valve-core leak
Check that the removable core, if fitted, is snug with the correct tool and that its tiny seal is undamaged. Inspect the valve base from inside the rim if the leak persists. A valve base that does not match the rim-bed shape may never seal consistently. Do not use pliers to overtighten the external nut.
Rim-tape leak
Remove the tire and inspect the entire tape path. Look for lifted edges, wrinkles, cuts, holes wider than the valve puncture, sealant underneath the tape, or tape that does not adequately cover the spoke holes. Replace damaged or contaminated tape using the specified width, overlap, layers, tension, and surface preparation. A patch over a dirty or wet rim bed is not a dependable repair.
Porous casing or small puncture
With active sealant inside, rotate and gently shake the wheel so liquid reaches the leaking area. Give the sealant the time specified by its maker, then retest. A tubeless plug may be appropriate for a repairable tread puncture when its instructions allow it. Sidewall cuts, bead damage, large holes, and exposed casing require a different decision and often tire replacement.
Reseat, inflate, and test safely
- Remove the valve core only if the system instructions recommend it for higher airflow.
- Center both beads in the rim channel so the tire has enough slack to seat evenly.
- Use a compatible floor pump, charge pump, or inflation device. Secure the wheel and keep your face and body away from the tire’s side.
- Stop immediately if the bead rises unevenly, the tire develops a bulge, or a component makes an abnormal movement.
- Confirm the molded bead-reference line is evenly spaced around both sides of the rim.
- Install and tighten the valve core correctly, add the specified sealant if needed, and inflate to an approved test pressure.
- Rotate and tilt the wheel to distribute sealant, then retest every previously leaking area.
A loud seating sound may occur, but it is not proof that both beads are correctly installed. Visual inspection around the entire circumference matters more than the sound.
Decide whether to repair or use a tube
A temporary inner tube can be useful when the tubeless system cannot be restored away from home, provided the tire and rim accept a tube and the damage does not make the tire unsafe. Before installing it, remove the tubeless valve and carefully inspect inside the tire for thorns or sharp debris that could puncture the tube.
A tube is not an appropriate workaround for a damaged bead, a major casing cut, a deformed rim, or another structural defect. When in doubt, stop riding and arrange transport or a qualified bike-shop inspection.
Tubeless sealing checklist
- Confirm tire, rim, valve, tape, and sealant compatibility
- Read the tire and rim pressure limits
- Check for bead, casing, and rim damage
- Verify that the sealant is active and correctly serviced
- Locate the leak with sound or controlled soapy-water testing
- Inspect the full rim bed when spoke holes or the valve opening bubble
- Seat both beads evenly without exceeding limits
- Keep sealant and cleaning products off braking surfaces
- Recheck pressure before a test ride and again afterward
Limitations and important notes
Pressure loss can also come from temperature change, a faulty gauge, a damaged rim, or multiple small leaks. This article cannot determine structural condition remotely. Carbon rims, hookless systems, high-volume tires, and unusual wheel designs deserve especially close adherence to current manufacturer instructions.
Do not ride a wheel with a deformed rim, exposed tire cords, damaged bead, unexplained bulge, repeated bead unseating, or pressure that falls rapidly after repair. Sudden air loss can cause a crash. A bike shop should inspect any system whose compatibility or damage is uncertain.
Sources and evidence notes
The troubleshooting order here reflects general bicycle service practice: verify compatibility and limits, identify the actual leak path, inspect the related sealing surface, and test the completed assembly. For exact values and procedures, use the current instructions from the tire, rim, tape, valve, sealant, and repair-product manufacturers. No universal sealant quantity, curing time, or pressure value is stated because those details vary by component.
Frequently asked questions
Why does air come out near the valve after I tighten it?
The valve core or base may leak, but damaged rim tape can let air enter the rim cavity and escape at the valve hole. If correct valve service does not stop the bubbles, remove the tire and inspect the full tape path.
Can I add more sealant without finding the leak?
More active sealant can help with casing porosity or a small puncture, but it will not repair a cut bead, displaced tape, incompatible components, or structural damage. Locate the leak first to avoid masking the real problem.
Why does the tire seal in the workshop but go flat overnight?
A slow tape, valve, bead, or casing leak may appear stable during a short test. Mark the starting pressure with a reliable gauge, allow temperature to stabilize, and recheck later. Persistent or rapid loss requires another inspection before riding.
Is a compressor the best way to seat every tubeless tire?
Not always. High airflow can help some compatible systems, but uncontrolled pressure adds risk and does not correct damaged or incompatible parts. Use only an approved inflation method, regulator, connector, and pressure range for the specific tire and rim.
Conclusion and next steps
Start with compatibility and pressure limits, then trace the air to the bead, valve, rim tape, casing, or puncture. Repair the identified path instead of repeatedly adding sealant or pressure. After the beads sit evenly and bubbles stop, confirm stable pressure before a cautious test ride. If damage, compatibility, or safe inflation remains uncertain, take the wheel to a qualified bicycle workshop.






 Bryan's Bikes Inc4.0 (133 reviews)
 Rad Power Bikes - Electric Bike Sales & Test Rides4.0 (139 reviews)
 Steiner's Sports4.0 (382 reviews)
 GGV Bicycles5.0 (1 reviews)
 BikePlace4.0 (104 reviews)
 BigCedarWildernessTrails/Dallas0.0 (0 reviews)
 How to Teach Kids to Ride a Bike: A Step-by-Step Guide for Parents
 Tips for Riding on Busy City Streets: Smart Strategies for Urban Cyclists
 Best US National Parks for Mountain Biking: Ride Epic Trails Across America
 Best Aero Helmets for Time Trials and Racing
 How to Clean and Lubricate Your Bike Chain Like a Pro
 10 Must-Have Items for Long-Distance Cycling Trips