
Bike Saddle Height: Starting Checks Before a Fit
On this page
Quick answer
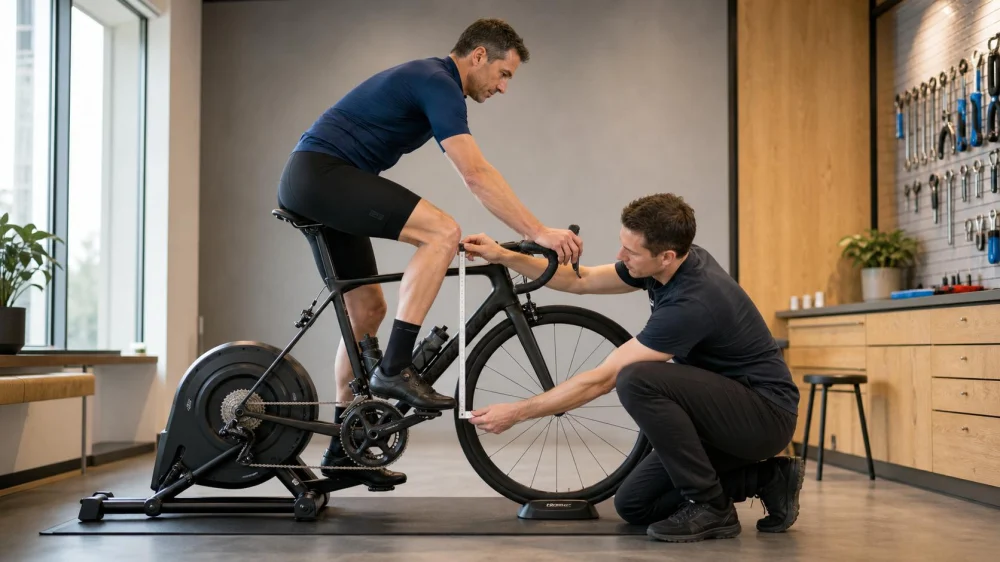
Start with the bicycle securely supported and set the saddle so your knee remains comfortably bent at the bottom of a normal pedal stroke. Keep the saddle within the post’s insertion limits, mark the starting position, and test in a traffic-free area. Change height only a few millimeters at a time. Stop and seek a bike fit or clinical advice for pain, numbness, persistent rocking, or a history of injury.
Saddle height is the vertical relationship between the saddle and pedals. It affects leg extension, hip stability, control, comfort, and how easily a rider can produce repeatable pedal strokes.
Why saddle height matters
A saddle that is far too low can keep the knee excessively bent and make pedaling feel cramped. A saddle that is too high can cause reaching, toe pointing, hip rocking, or loss of control when stopping. Height is only one part of fit; fore-aft position, saddle shape, crank length, shoes, cleats, handlebar reach, flexibility, and riding style also matter.
Set a conservative baseline
- Wear the shoes and clothing you normally use.
- Secure the bike in a stable trainer or have a qualified helper steady it.
- Level the saddle only as the bicycle or saddle maker recommends.
- Place the ball of the foot in the normal position on the pedal.
- At the bottom of the stroke, look for a comfortable knee bend without hip reaching.
- Mark the seatpost and record the measurement before changing anything.
A heel-on-pedal check can offer a rough starting point, but it is not a complete fit method and depends on stable support and correct body position.
Use a controlled test ride
- Choose a flat, empty, traffic-free area with predictable pavement.
- Start with easy gearing and low effort.
- Check whether your hips stay level and your feet remain stable.
- Practice starting and stopping; confirm you can control the bike.
- Ride long enough to notice a pattern, but stop before discomfort escalates.
Do not judge fit from one hard sprint or steep climb. Use ordinary seated pedaling first.
Signs it may be too high or low
Possible too-high signs: hips rock side to side, toes point excessively to reach the bottom, one leg feels longer, hamstrings or the back of the knee feel strained, or stopping feels insecure.
Possible too-low signs: knees remain deeply bent, the pedal stroke feels crowded, the front of the knee becomes uncomfortable, or the rider feels unable to use the leg through the stroke.
These signs do not prove the cause. Pain can come from training load, injury, cleat position, technique, bike size, or another fit variable.
Adjust in small steps
- Stop, dismount, and stabilize the bicycle.
- Use the correct tool and torque guidance.
- Keep the seatpost above its minimum-insertion mark and within frame limits.
- Move only a few millimeters, align the saddle, and tighten correctly.
- Repeat the same easy test route and record the result.
Change one variable at a time. Large simultaneous changes make it hard to identify what helped.
When to get a professional fit
Choose a qualified fit when discomfort persists, left and right sides feel different, you use clipless pedals or an adaptive setup, the bike size is uncertain, or you ride long distances or high training volume. Bring the bike, shoes, usual equipment, and a description of symptoms and goals.
Seek qualified medical assessment for ongoing pain, numbness, weakness, swelling, trauma, or symptoms that continue off the bike. A fitter should not diagnose a medical condition.
Limitations and important notes
This is general cycling information, not a universal fit formula. Body proportions, mobility, bicycle geometry, discipline, injury history, and equipment differ. Follow bicycle and component manufacturer limits.
An incorrectly tightened seatpost can slip or damage the frame. Carbon components and unusual clamps may require specific paste, tools, and torque procedures.
Sources and evidence notes
The approach reflects common bike-fitting practice: begin conservatively, observe joint extension and hip stability, change one variable in small increments, retest consistently, and escalate persistent symptoms. Manufacturer instructions and a qualified fitter are the primary sources for a specific bicycle and rider.
Frequently asked questions
Should I be able to put both feet flat on the ground?
Not necessarily while seated. Safe stopping technique and bike design matter. Beginners may prefer a more conservative setup while learning control.
Can I use an inseam formula?
A formula can provide a starting point, but it cannot account for all equipment, mobility, and riding differences.
Why do my hips rock?
The saddle may be high, but fatigue, mobility, leg-length differences, or technique can also contribute. Reduce effort and seek assessment if it persists.
Does changing shoes affect saddle height?
It can. Sole thickness, pedals, and cleats alter the foot-to-pedal relationship. Recheck fit after equipment changes.
How quickly should I adapt?
Small changes may feel different immediately. Avoid forcing adaptation through pain and reassess with a qualified professional when uncertain.
Conclusion and next steps
Mark your current position, establish a conservative knee bend, and test on a safe flat route. Change height only in small measured steps and keep hardware within manufacturer limits. If pain, numbness, rocking, or asymmetry remains, stop adjusting by guesswork and schedule a professional fit.






 Freedom E-Bike Inc4.0 (3 reviews)
 Burbank Bike Shop4.0 (117 reviews)
 Trek Bicycle Schererville4.0 (591 reviews)
 Beverly Bicycle Repair Shop4.0 (104 reviews)
 Surf-Wheels 'n E-Bikes4.0 (188 reviews)
 Bikesource Columbus4.0 (319 reviews)
 How to Teach Kids to Ride a Bike: A Step-by-Step Guide for Parents
 Tips for Riding on Busy City Streets: Smart Strategies for Urban Cyclists
 Best US National Parks for Mountain Biking: Ride Epic Trails Across America
 Best Aero Helmets for Time Trials and Racing
 How to Clean and Lubricate Your Bike Chain Like a Pro
 10 Must-Have Items for Long-Distance Cycling Trips