
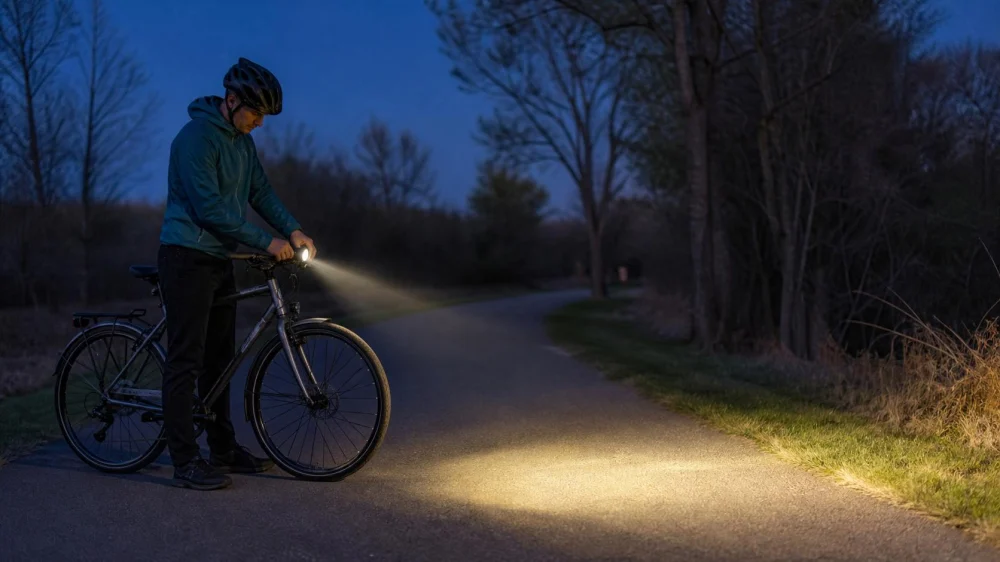
Bike Lights: Choose a Beam You Can Use Without Glare
On this page
Quick answer
Choose bike lights for two jobs: helping others detect you and illuminating the path far enough ahead for your speed. Look beyond maximum brightness to beam shape, side visibility, mounting security, runtime, and weather protection. Aim the front beam toward the riding surface, not into other road users' eyes, and carry enough power for the full ride plus delay.
Two different lighting jobs
A “be seen” light helps drivers, pedestrians, and other riders notice your presence. It can be compact and useful in daylight, urban lighting, or low-speed conditions. A “see the path” light projects a controlled beam onto pavement or trail so you can identify turns, debris, surface changes, and stopping space.
One product may serve both roles, but not in every setting. A small blinking light that is visible to others may not reveal an unlit road. A powerful round beam may illuminate a trail but create disabling glare when aimed at oncoming traffic.
Front and rear lights also have different tasks. The front needs useful forward distribution, while the rear needs clear detection from behind and often from off-axis angles. Local law may specify colors, reflectors, mounting, and times of use.
Beam shape, output, and modes
Maximum lumen output is only one specification. A focused beam puts more light in a smaller area; a broad beam reveals edges but may have less reach. A shaped cutoff can reduce upward glare on streets. Trail lights may prioritize a broader pattern, but they still need considerate aiming around other users.
Runtime claims depend on mode, temperature, battery age, and product testing. The brightest setting may run for much less time than a moderate one. Look for a battery indicator that you can understand while riding and a mode that meets the trip duration without using the final reserve.
Flashing patterns can attract attention, but a very intense or irregular flash can make distance harder to judge and bother others. Use legal, situation-appropriate modes. A steady front beam is often more useful for seeing a dark path.
Choose for your ride
- Lit city streets: prioritize a controlled beam, side visibility, secure mounts, and conspicuity among other lights.
- Dark roads: choose enough usable reach for speed, turns, and stopping distance, with a backup plan.
- Shared paths: use a lower, well-aimed beam around pedestrians and oncoming riders.
- Trails: match beam width and reach to terrain, speed, and local rules; avoid surprising wildlife or other users.
- Commuting: consider weather sealing, easy charging, theft-resistant removal, and reliable daily mounting.
- Long rides: plan real runtime, temperature, charging access, and a second independent light.
Install and aim the lights
- Use the specified mount. Confirm it fits the bar, fork, rack, helmet, or seatpost position approved by the manufacturer.
- Keep it clear. Bags, cables, hands, clothing, and fenders should not block the beam.
- Level the bike. Aim the front beam on a flat surface with normal load.
- Direct light downrange. Put the useful part of the beam on the path while limiting light above other users' eye line.
- Check from a distance. View the bike from ahead, behind, and the sides without staring into the beam.
- Test for movement. Gently confirm that bumps, cables, and button use do not rotate the light.
- Recheck after loading. A handlebar bag or changed bike angle can alter aim.
Pre-ride lighting checklist
- Charge or install batteries and confirm expected runtime.
- Turn on every required front, rear, and side visibility device.
- Verify mount security, lens cleanliness, and beam aim.
- Select a legal mode suitable for traffic and conditions.
- Pack the correct charging cable, spare battery, or backup light.
- Check weather and shorten or change the route if visibility will exceed the setup.
- Use reflectors and visible clothing as complements, not replacements, where appropriate.
Limits and safety boundaries
No light makes a rider automatically visible or makes excessive speed safe. Rain, fog, curves, dirty lenses, glare, traffic, and visual obstructions reduce useful sight distance. Slow down until you can stop within the area you can reliably see.
Do not look directly into high-output lights or aim them at people. Stop in a safe location before adjusting a loose mount. Damaged, swollen, leaking, or unusually hot batteries require isolation from use and manufacturer or qualified disposal guidance.
Lighting laws vary across United States jurisdictions and trails. Check current local rules and product instructions. This article is general equipment guidance, not a legal standard.
Sources and evidence notes
The guidance reflects common visibility principles: detection and path illumination are separate tasks, controlled beam placement reduces glare, and usable runtime matters more than peak output alone. Manufacturer instructions define safe mounting, charging, and weather use for a specific product.
Actual performance depends on speed, surface, ambient light, weather, eyesight, and traffic. Test conservatively in a low-risk setting.
Frequently asked questions
How bright should a bike light be?
There is no universal number. Choose usable beam reach and shape for your speed and darkness, while staying within local rules and avoiding glare.
Should the front light flash at night?
Rules and conditions vary. A steady beam helps illuminate the path; an additional permitted conspicuity mode may help detection. Avoid distracting patterns.
Is a helmet-mounted light enough?
It moves with your head and can shine into others' eyes. Many riders use a properly aimed bike-mounted primary light and reserve a helmet light for specific permitted uses.
Why does my light die sooner in cold weather?
Battery performance can drop with temperature. Follow product guidance, plan a larger runtime margin, and keep a backup.
Can I use a very bright trail light on the road?
Only if its beam, aim, mode, and use meet local rules and do not create glare. Peak output alone does not make it suitable.
Next steps
Describe your darkest route, normal speed, ride duration, weather, and traffic context. Choose a controlled front beam and detectable rear light, install them with approved mounts, test aim from another person's viewpoint, and carry independent backup power or lighting.






 Fox River Sports4.0 (40 reviews)
 Storrs Center Cycle4.0 (81 reviews)
 UrbanVolt Cycles Shop0.0 (0 reviews)
 Berkshire Bike and Board Hudson4.0 (14 reviews)
 In Gear Cycling & Fitness4.0 (92 reviews)
 Jenson USA4.0 (252 reviews)
 How to Teach Kids to Ride a Bike: A Step-by-Step Guide for Parents
 Tips for Riding on Busy City Streets: Smart Strategies for Urban Cyclists
 Best US National Parks for Mountain Biking: Ride Epic Trails Across America
 Best Aero Helmets for Time Trials and Racing
 How to Clean and Lubricate Your Bike Chain Like a Pro
 10 Must-Have Items for Long-Distance Cycling Trips