
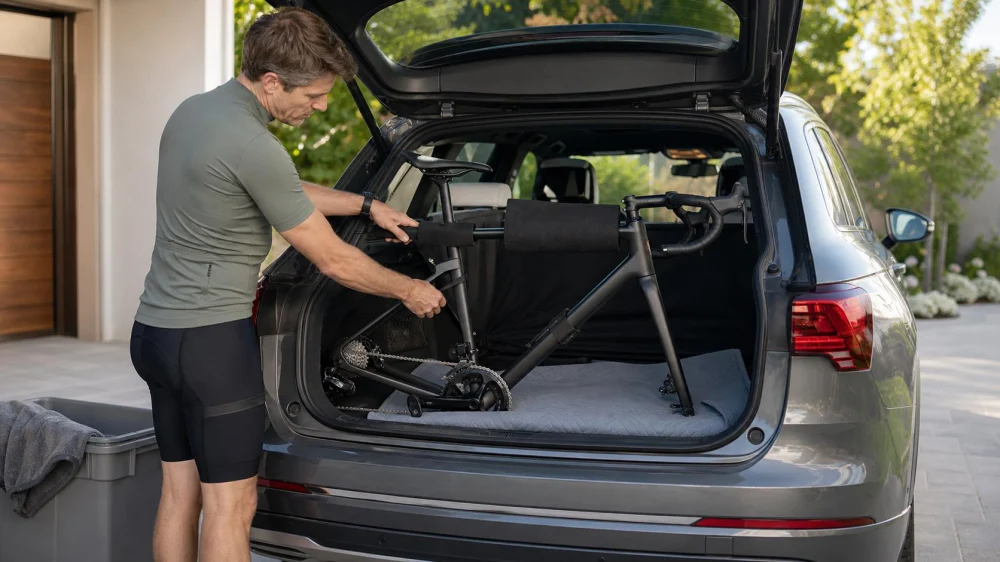
How to Carry a Bike Inside a Car Without Damage
On this page
Quick answer
To carry a bike inside a car, confirm that it fits without blocking the driver, protect the cargo floor, remove the front wheel if needed, keep hydraulic brake levers from being squeezed, and place the drivetrain away from upholstery. Pad contact points and secure the frame and loose wheel with soft straps so neither can move during braking or a turn. Reinstall and check the wheel before riding.
Inside-car bike transport means placing the bicycle in the passenger or cargo compartment rather than on an exterior rack. It can protect the bike from weather and road debris, but only when the bicycle, wheels, and other cargo are restrained and the driver retains a clear view and normal access to every vehicle control.
When inside-car transport works
Transporting a bike inside is best for a hatchback, wagon, SUV, minivan, or vehicle with folding rear seats and a cargo area long enough for the frame. It is also useful when you travel with one bike, want weather protection, and can keep dirty components away from passengers.
It is not ideal when the bike must be forced against the hatch, dashboard, glass, or front seats; when it obstructs mirrors or the driver’s shoulder check; or when passengers would share space with unsecured equipment. A suitable exterior rack or a larger vehicle is the better choice when the bike cannot lie or stand in a stable position.
Before loading, check the vehicle owner’s manual for seat-folding, cargo, tie-down, and airbag guidance. Confirm the hatch closes without pressing on the handlebar, derailleur, saddle, or fork. Local laws vary in the United States, so the driver is responsible for maintaining required visibility and securing cargo.
Prepare the car and bike
Test the fit while the bike is clean and the trip is not urgent. A rushed first attempt at a trailhead makes it easy to damage a cable, bend a rotor, or forget a wheel part.
- Clear the cargo area. Remove hard, sharp, or heavy objects that could strike the frame.
- Fold seats as instructed. Make sure each seatback is fully latched in its intended position.
- Protect the interior. Lay down a durable cargo mat or folded moving blanket that cannot slide into the pedals or hatch latch.
- Clean loose dirt. Wipe mud from tires and the drivetrain rather than sealing moisture and grit against upholstery.
- Remove accessories. Take off bottles, pumps, computers, lights, and loosely mounted bags that could detach.
- Lower or turn components only when appropriate. Mark the seatpost height before lowering it, and do not rotate a handlebar unless you know the correct fastener and torque procedure.
Gather two or more soft cam straps, clean padding, gloves for handling the drivetrain, and any axle or wheel tools your bike needs. Avoid open hooks and thin cords that concentrate force on the frame. Never use a strap that must be tightened against a brake hose, control cable, spoke, or carbon tube edge.
Remove a wheel correctly
Many bikes fit after removing only the front wheel. Shift the chain away from the largest rear sprocket before handling the bike so the rear derailleur sits slightly farther from potential contact. Turn off an e-bike before moving it.
For a quick-release front wheel, open the lever and loosen the adjusting nut enough to clear the fork retention features; do not simply spin the lever like a wing nut. For a thru-axle, support the wheel, unscrew the axle according to the manufacturer’s direction, and keep the clean axle where it cannot collect grit. Axle designs vary, so follow the bicycle or fork manufacturer’s instructions if the mechanism is unfamiliar.
If the bike has hydraulic disc brakes, insert the correct pad spacer after wheel removal. This prevents accidental lever pressure from pushing the brake pistons together. Do not touch the braking surface of a disc rotor, and do not rest weight on the rotor. Store small springs, adapters, and axles together in a labeled pouch or reinstall the axle in the empty fork only if the manufacturer permits it.
Put the detached wheel in a wheel bag or between clean padded layers. Secure it separately so the cassette or rotor cannot scratch the frame, car, or another wheel.
Load and secure the bike
Plan the orientation before lifting. For many cars, the bike fits with the drivetrain facing upward and the fork toward the front of the cargo area. This keeps vehicle weight off the rear derailleur and reduces the chance of chain grease touching the interior. The correct orientation depends on the car, so prioritize protecting delicate parts and preserving the driver’s space.
- Open the hatch fully. Check overhead clearance and keep the vehicle parked on stable, level ground.
- Use two hands and lift the frame. Do not lift by a brake hose, wheel, derailleur, or saddle bag.
- Guide the fork and handlebar through the opening. Keep fork ends away from glass, seat fabric, and electrical trim.
- Set the frame on padded structural areas. Avoid resting a carbon frame on a sharp seat hinge or concentrated metal edge.
- Protect every contact point. Add padding where the handlebar, pedal, fork, or frame could rub during vibration.
- Attach soft straps to vehicle cargo anchors. Restrain forward, backward, and side-to-side movement without crushing a tube.
- Secure the loose wheel and tools. They should not become projectiles during sudden braking.
- Close the hatch slowly by hand. Stop immediately if anything contacts the glass or seal.
Perform a movement test: push the bike gently in several directions. Small padding compression is normal; rolling, tipping, or sliding is not. Then sit in the driver’s seat and verify mirror views, head movement, steering, pedals, parking brake, gear selector, and access to essential controls. No part of the load should enter the driver’s footwell.
Checks for different bike types
- Carbon frames: use broad, soft contact surfaces and light restraint. Consult the frame maker if clamping or strap placement is uncertain.
- Disc-brake bikes: protect rotors from bending and contamination, and use brake pad spacers when the wheel is removed.
- E-bikes: their weight can make lifting hazardous. Follow manufacturer instructions for battery removal and transport; protect exposed contacts and never use a damaged battery.
- Full-suspension mountain bikes: keep suspension controls and the rear derailleur away from seat hinges and hard cargo.
- Fenders and racks: do not treat them as lifting points. Confirm they are not supporting the bicycle’s weight.
- Multiple bikes: separate frames, rotors, pedals, and drivetrains with padding, then restrain each bike rather than tying the group into one unstable bundle.
If removing both wheels, support the frame so chainrings, the rear derailleur, and fork ends do not carry the load. A compatible fork mount or manufacturer-approved transport support may make repeated travel more consistent.
Arrival and reassembly checklist
Park somewhere safe before opening the hatch. A shifted load can lean against the door after a rough trip, so open it gradually and control the bike as straps are released.
- Remove the frame with two hands and place it on stable ground or a stand.
- Inspect the frame, fork, brake hoses, cables, derailleur, and rotors for contact damage.
- Remove the brake pad spacer before installing the wheel.
- Seat the axle fully and tighten it using the manufacturer’s method and specified torque.
- Spin the wheel and check that it is centered, retained, and not rubbing abnormally.
- Squeeze each brake before riding to confirm normal lever feel and braking engagement.
- Return the seatpost or handlebar to marked settings and tighten fasteners correctly.
- Take a slow test ride away from traffic before committing to a route.
A loose wheel, missing axle part, bent rotor, unusual brake lever, or damaged carbon surface is a reason not to ride until the cause is resolved. A qualified bike shop can inspect a component when you are unsure.
Limitations and important notes
This guide provides general transport principles, not instructions for every vehicle or bicycle. Vehicle cargo anchors, airbag zones, folding seats, e-bike batteries, axle systems, and torque values differ. Manufacturer manuals are the controlling source for a specific product.
Never leave a bike visible in an unattended vehicle if theft risk is a concern, and never leave a person or animal in a parked car. Heat inside a vehicle can become dangerous and may also affect adhesives, electronics, pressurized items, and batteries. Keep lubricants, cleaners, and CO2 cartridges stored according to their labels.
Do not drive with an open hatch unless the vehicle maker and applicable law allow it and the load is secured accordingly. Exhaust gases can enter a vehicle, and a protruding load can create additional marking, lighting, and restraint requirements.
Frequently asked questions
Should the bike lie drivetrain-side up?
Usually, yes. Keeping the chain, cassette, and rear derailleur upward can reduce damage and grease transfer. The frame still needs padding and restraint, and no component should press against glass or a hard edge.
Can I squeeze disc brakes with the wheel removed?
Avoid it. On hydraulic systems, the pistons can move inward when no rotor is present. Install the correct pad spacer after removing the wheel. If the lever was squeezed and the wheel no longer fits, follow manufacturer guidance or ask a bike shop rather than forcing the pads apart with an unsuitable tool.
Is a blanket enough to secure a bike?
No. A blanket protects surfaces but does not reliably restrain the bicycle. Use appropriate soft straps attached to suitable vehicle cargo points, and secure detached wheels and tools separately.
Can I put an e-bike inside a car?
Only if the vehicle can carry its size and weight and you can lift and restrain it safely. Follow the e-bike and battery manufacturer’s transport instructions. Do not transport a battery that is swollen, cracked, unusually hot, leaking, or otherwise damaged.
What should I check before riding after transport?
Confirm wheel retention, brake function, tire condition, handlebar and seat position, drivetrain operation, and the absence of contact damage. Test the bike at low speed in a safe area before entering traffic or a trail.
Next steps
Measure the usable cargo length, read the vehicle and bike manuals, and perform a no-rush test load at home. Build a small transport kit with padding, soft straps, brake spacers, axle tools, and a parts pouch. A repeatable loading order protects the bike, the car, and everyone inside it.






 Panthers Cycling4.0 (43 reviews)
 No Xhaust4.0 (5 reviews)
 Maklin Bike Shop5.0 (159 reviews)
 Ken's ebikes5.0 (4 reviews)
 Bicycles of Ojai5.0 (73 reviews)
 Buy My Bikes4.0 (145 reviews)
 How to Teach Kids to Ride a Bike: A Step-by-Step Guide for Parents
 Tips for Riding on Busy City Streets: Smart Strategies for Urban Cyclists
 Best US National Parks for Mountain Biking: Ride Epic Trails Across America
 Best Aero Helmets for Time Trials and Racing
 How to Clean and Lubricate Your Bike Chain Like a Pro
 10 Must-Have Items for Long-Distance Cycling Trips