
Bike Parking Etiquette: Lock Up Without Blocking Access
Table of contents
Quick answer
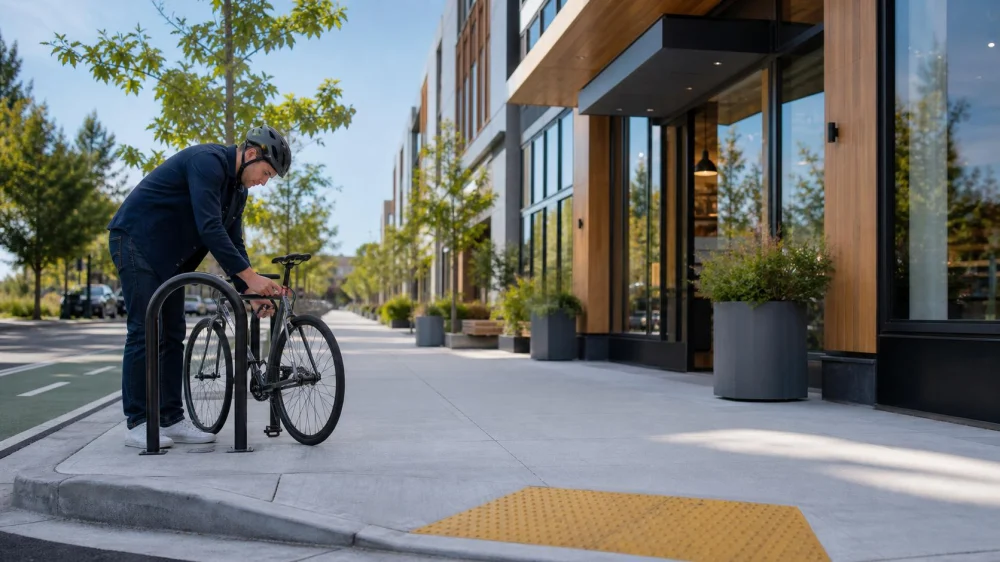
Use a designated, legal bicycle rack whenever available. Position the frame and both wheels inside the rack's footprint, leaving sidewalks, curb ramps, doors, accessible parking aisles, bus stops, fire equipment, railings, and storefront paths clear. Lock the frame and a wheel to the rack without creating a low cable or protruding handlebar hazard. If the rack is full, find another permitted location.
Choose a legal rack
Look for a rack that supports the frame, accepts your lock, and is firmly anchored in a visible area. Confirm that parking is permitted and that time limits or property rules do not require registration. Transit stations, campuses, apartments, and private businesses may have designated zones or prohibit attachment to other objects.
A signpost, tree, handrail, fence, parking meter, accessible sign, utility pipe, or street furniture is not automatically a legal substitute. The bicycle can damage the object, obstruct its use, or be removed. Never lock to emergency equipment or anything that can be lifted, cut, or unbolted easily.
Protect the accessible route
Step back and view the path from the perspective of a wheelchair user, person with a cane, parent with a stroller, delivery worker, or someone with low vision. Keep the entire accessible route continuous from sidewalk and parking to the entrance. Do not occupy curb ramps, tactile warning surfaces, loading zones, or accessible parking access aisles.
The ADA design standards describe accessible routes and require clear paths between site arrival points and accessible entrances. A bicycle parked across that route becomes a movable barrier. Do not rely on “people can squeeze past”; handlebars, pedals, trailers, baskets, and locks extend beyond the frame.
Position the whole bicycle
Roll fully into the rack rather than leaving the rear wheel in the travel path. Turn handlebars so they do not project into pedestrians, another parking space, or a roadway. Fold a folding bike, trailer arm, or cargo extension only when the design allows and secure it inside the footprint.
Leave usable space for adjacent bicycles and do not stack your bike on top of another. Avoid blocking shop windows, seating, trash cans, mailboxes, hydrants, building controls, and doors that swing outward. At night, check that the bike is not an unexpected dark obstacle.
Lock frame and wheels
Use a quality lock appropriate to local theft risk. Capture the frame and a wheel with the rack; secure the second wheel with another lock or cable when needed. Fill open space inside a U-lock so tools have less room, and keep the keyway accessible without resting it on the ground.
A cable should not cross a walking route at ankle height. Wrap excess length close to the frame. Remove quick-release components or lock them. Photograph the parked bike and note the rack location for a longer stop, but do not post a live location publicly.
Remove loose gear
Take lights, computer, battery, pump, bags, helmet, and other easily removed equipment with you when theft risk warrants. Locking a helmet through a thin strap can leave it exposed to weather, contamination, or strap cutting. Follow manufacturer instructions before removing an e-bike battery.
Close panniers and baskets so nothing spills into the path. Never leave a child, pet, food, or hazardous battery charging unattended on the bicycle. E-bike charging must use an approved location, compatible equipment, and property rules—not a cord stretched across a sidewalk.
Handle short stops and full racks
A stop of “only a minute” can still block access or invite theft. Use the rack and lock. If all spaces are occupied, check another entrance, a nearby public rack, staffed bike parking, or a permitted indoor option. Do not attach sideways across several bikes or trap someone else's lock.
If an abandoned bicycle occupies the rack, report it through the property or city process instead of moving, cutting, or damaging it. For a large cargo bike, trailer, adaptive cycle, or tandem, look for an oversized space and ask staff where it can fit without narrowing the route.
Check before riding away
Unlock without dropping a chain or cable into the path. Inspect tires, brakes, wheels, lights, steering, accessories, and e-bike battery for interference or tampering. Move the bicycle fully out of the rack area before loading bags or mounting.
Look for pedestrians and traffic, then walk to the legal riding area when sidewalk riding is prohibited or crowded. Do not mount from an accessible aisle, doorway, or curb ramp. Take every lock and accessory with you.
Parking checklist
- Use a legal, anchored bicycle rack.
- Keep curb ramps, doors, access aisles, and sidewalks clear.
- Fit wheels, bars, pedals, and cargo inside the footprint.
- Lock the frame and at least one wheel.
- Wrap cables so they do not cross walking space.
- Remove valuable or loose accessories.
- Use another rack when the first is full.
- Inspect the bike before departure.
Limitations and local rules
This article provides general guidance, not legal or security advice. Bicycle parking, sidewalk, abandoned-bike, e-bike battery, and property rules vary. Follow signs and local law. Accessibility depends on the entire site and may require more clearance than a rider expects; when uncertain, use a designated rack that does not interfere with the public route.
Frequently asked questions
Can I lock a bike to a handrail?
Usually avoid it. A handrail supports access and emergency movement, and local rules may prohibit attachment. Find a rack.
What if the rack is on an accessible route?
Position the bicycle inside the intended rack footprint. If any part blocks the route or access aisle, use another rack and report the layout concern.
Is a cable lock enough?
It depends on risk, but thin cables are generally easier to cut. Use a strong primary lock through the frame and rack, with a cable only as a secondary layer.
Can I lean the bike outside a store briefly?
Only where permitted and where it cannot fall or block access. Locking to a proper rack is safer even for a short stop.
Where should I park a cargo bike?
Use an oversized or on-street bike space where available. Ask property staff rather than placing the long frame or trailer across the sidewalk.
Sources and evidence
- U.S. Department of Justice: 2010 ADA Standards for Accessible Design — defines accessible routes connecting sidewalks, parking, loading zones, and entrances.
- U.S. Department of Transportation: Improving Safety for Walking, Biking, and Rolling — provides federal context for safe, accessible walking and bicycling environments.
Next steps
At your next stop, walk around the parked bike once before leaving. Confirm the full frame, bars, pedals, and lock stay inside the rack area and that a person can travel continuously from sidewalk or accessible parking to the entrance. If not, relocate the bike even when the lock is already attached.






 RecumbentPDX4.0 (146 reviews)
 Zone 3 Multisport LLC4.0 (46 reviews)
 SalmonBerry Cycle5.0 (1 reviews)
 Firmstrong4.0 (7 reviews)
 Vancouver Cyclery4.0 (296 reviews)
 RideTHISbike4.0 (66 reviews)
 How to Teach Kids to Ride a Bike: A Step-by-Step Guide for Parents
 Tips for Riding on Busy City Streets: Smart Strategies for Urban Cyclists
 Best US National Parks for Mountain Biking: Ride Epic Trails Across America
 Best Aero Helmets for Time Trials and Racing
 How to Clean and Lubricate Your Bike Chain Like a Pro
 10 Must-Have Items for Long-Distance Cycling Trips