
Bike Lane Ends: How to Merge Safely and Stay Visible
On this page
Quick answer
When a bike lane ends, look ahead for the taper, check behind early, signal clearly, and move into the next legal travel position only when there is a safe gap. Make a predictable, gradual move instead of waiting until the paint disappears. Ride far enough from the curb and parked cars to remain visible and avoid hazards, then reassess at every intersection or turn lane.
A bike-lane merge is the transition from a marked cycling space into a shared lane, another bicycle facility, or a different legal road position. It is not a single last-second swerve. The safest approach is usually a planned sequence of observation, communication, gap choice, and steady movement.
This guide is for adult riders using public streets in the United States. Traffic laws and bicycle-facility designs differ by state and locality. Follow signs, signals, pavement markings, and current local law; use the steps below as general risk-management guidance rather than a statement of right-of-way in every location.
Read the transition early
Look beyond the front wheel. A bike lane may end with a taper, dashed markings, a merge symbol, a shared-lane marking, a bus stop, a parking lane, a turn-only lane, construction, or no clear treatment at all. Each layout changes where conflicts are likely to occur.
Begin planning while you still have room to make small corrections. Identify:
- where the continuous bike-lane line becomes dashed or disappears;
- whether drivers must cross the bike lane to turn;
- whether parked cars create a door zone or hide driveways;
- whether the curb pinches the available space;
- whether a bus, delivery vehicle, or construction barrier blocks the transition;
- which lane continues toward your destination;
- where you can stop safely if the traffic gap never develops.
Avoid treating the last painted bicycle symbol as a target. Your useful decision point comes earlier: the place where you can still see, signal, adjust speed, and choose an alternative without an abrupt move.
The scan-signal-merge sequence
Use the same repeatable sequence each time. Predictability helps drivers understand your intention, while repeated observation helps you detect a vehicle that changes speed or position.
- Scan ahead. Check the lane ending, surface hazards, parked vehicles, intersection activity, and your escape options.
- Check behind. Glance over your shoulder while holding a steady line. A properly adjusted mirror can add information but should not replace a direct check when conditions allow.
- Choose a gap. Look for enough space to move gradually without forcing another road user to brake sharply or pass in a narrowing gap.
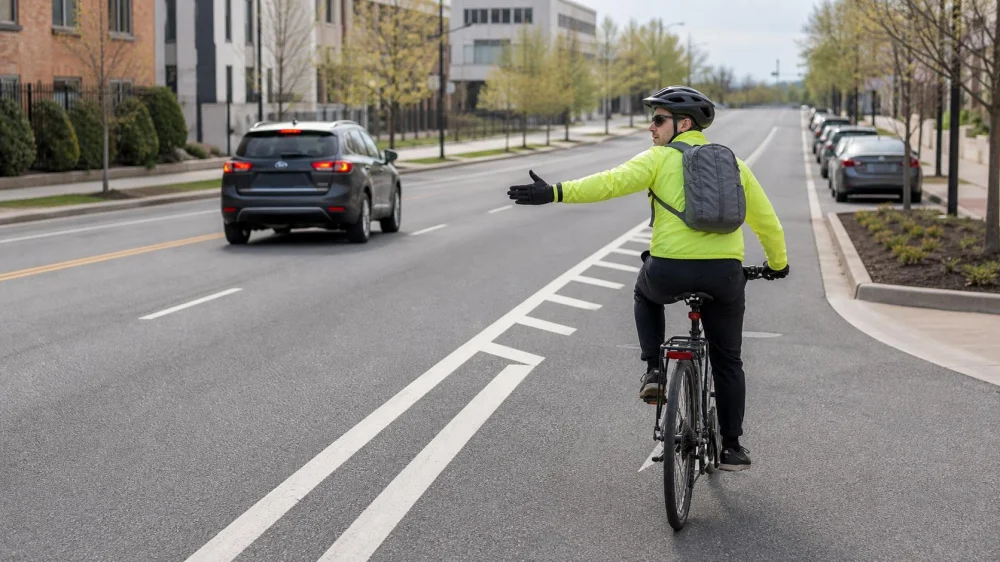
- Signal. Use the hand signal recognized where you ride. Signal long enough to be noticed, but keep control of the bicycle.
- Check again. A vehicle may have accelerated, turned, or entered from a driveway since the first look.
- Move predictably. Shift laterally at a shallow, steady angle. Do not dart, weave, or drift without finishing the observation.
- Establish position. Once merged, ride a stable line and leave useful space from curbs, drainage grates, debris, and opening doors.
A signal communicates intent; it does not create a safe gap. Continue to monitor traffic and be prepared to delay the move. Likewise, eye contact can be helpful but does not prove that a driver will yield or remain stopped.
Choose a visible road position
After the bike lane ends, the extreme edge of the roadway is not automatically the safest place. Riding too close to the curb can reduce room to avoid debris or poor pavement. Riding beside parked cars can place you within reach of an opening door and make you harder to see at driveways.
Choose a position that is legal locally, visible to approaching road users, and wide enough for a consistent line. When a lane is too narrow for a motor vehicle and bicycle to travel safely side by side, local law may allow or require a more central position. Check official state and local bicycle guidance rather than assuming one rule applies nationwide.
Best for a normal transition: merge before the squeeze point, match a manageable traffic rhythm, and hold a clear line.
Not ideal: remaining in a disappearing strip until a barrier forces you left, riding between active traffic and opening car doors, or moving repeatedly between the curb and travel lane. These patterns reduce reaction time and make your next position difficult to predict.
Handle intersections and turn lanes
A bike-lane ending near an intersection adds crossing paths. Drivers may turn across your line, enter from a side street, or move toward a turn-only lane. Reduce speed enough to observe wheels, vehicle position, signals, and sight lines without assuming that any single cue guarantees the driver’s action.
If the bike lane continues straight to the right of a right-turn lane, follow the marked design and local rules. If the bike lane itself ends before the turn lane, determine early whether you must merge left to continue straight. Do not pass a large vehicle on the inside where the driver may turn and have limited visibility.
For a left turn, riders may have more than one legal option: merging across lanes like a vehicle, using a marked bicycle turn facility, or making a two-stage turn. Choose the method supported by the road design, law, traffic speed, and your skill. Walking the bicycle through a legal pedestrian route can be a sensible fallback when the merge exceeds your comfort or sight distance.
When not to complete the merge
Delay or abandon the moving merge when you cannot see approaching traffic, the available gap is closing, a driver is passing rapidly, the surface is unstable, or the lane configuration is unclear. A missed turn is safer than a forced maneuver.
- Heavy or fast traffic: leave the roadway at a safe, legal point if available and reassess the route.
- Blind bend or hillcrest: avoid entering a lane where approaching road users lack stopping sight distance.
- Construction: obey temporary controls; walk only where pedestrian access is allowed.
- Bus or truck conflict: stay out of blind zones and do not squeeze beside a vehicle near a turn or stop.
- Poor balance while looking back: practice off-road first or stop in a safe place to assess traffic.
- Driver does not respond: do not rely on the signal alone; wait for a clearly usable gap.
If stopping is necessary, avoid halting in the travel path, on rail tracks, in an intersection, or where other road users cannot see you. Use a driveway apron, side street, path entrance, or other legal refuge only after checking for crossing traffic and pedestrians.
Visibility and equipment checklist
Equipment cannot replace a safe gap, but it can help others detect and interpret you. Before an urban ride, check:
- front and rear lights appropriate for the time, weather, and local legal requirements;
- reflectors and reflective details that are not blocked by bags or clothing;
- a securely fitted helmet in serviceable condition;
- a bell or voice available for alerting nearby cyclists and pedestrians where permitted;
- a mirror, if used, positioned so a shoulder or bag does not block the view;
- clothing and luggage that cannot enter the wheel or obscure signals;
- brakes and tires that respond predictably during speed adjustment.
Visibility includes position and timing, not just brightness. A rider directly beside a vehicle, behind a wide pillar, or hidden by parked cars can be difficult to detect even in high-visibility clothing. Move where you can see relevant road users and where they have a reasonable chance to see you.
A low-stress practice plan
Practice the component skills away from busy traffic before combining them at a real lane ending.
- On an empty paved area, ride a straight reference line and make brief shoulder checks without drifting.
- Add a clear hand signal while maintaining control and a steady speed.
- Practice changing position gradually after a look and signal.
- Move to a quiet neighborhood street with a simple, visible merge.
- Ride the same transition at a low-traffic time until the sequence feels routine.
- Increase complexity one factor at a time, such as parked cars, an intersection, or slightly heavier traffic.
A local cycling education course can provide supervised practice and location-specific rules. It is especially useful if looking behind affects balance, if traffic speed makes gap selection difficult, or if you are returning after a crash.
Limitations and important notes
Road design, traffic law, and official hand signals are not uniform across the United States. Consult the relevant state motor-vehicle or transportation agency and local authorities for current rules. Temporary signs and on-site traffic direction take priority over a generic guide.
No technique guarantees that another road user will see or yield to a cyclist. Weather, glare, darkness, vehicle size, speed, impairment, distraction, road damage, and construction can change an otherwise manageable transition. Choose another route or transportation option when conditions exceed your skills or the bicycle’s capabilities.
This article reflects general traffic-cycling practice: look early, communicate clearly, choose space conservatively, and maintain a predictable line. It does not replace in-person instruction, legal advice, or an assessment of a specific road.
Frequently asked questions
Do cyclists always have the right of way when a bike lane ends?
No single answer applies everywhere. Right-of-way depends on local law, signs, markings, signals, and how traffic paths intersect. Even when another road user must yield, verify that a safe gap actually exists before changing position.
Should I speed up to match traffic before merging?
A modest, controlled speed adjustment may help with gap timing, but do not sprint beyond your ability to scan, signal, steer, and brake. If traffic speed is far higher than yours, seek a larger gap or a safer alternative instead of trying to match it.
Is a bicycle mirror enough for checking behind?
A mirror can improve awareness, but it has blind areas and may shift. Use it as an additional source of information. Practice a brief shoulder check while holding a straight line, and stop safely if you cannot assess traffic while moving.
What if the bike lane ends beside parked cars?
Plan to leave enough space for an opening door and for people stepping between vehicles. Look for occupied cars, brake lights, moving wheels, and gaps in parking, but assume a door could open without warning. Merge early if the legal and traffic conditions allow.
Can I move onto the sidewalk instead?
Sidewalk cycling rules differ by location and sometimes by business district or rider age. Check local law. Where riding is prohibited or unsafe, dismount at a safe point and walk while yielding to pedestrians.
Next steps
Review your usual routes on the ground rather than relying only on a map. Identify where bike lanes end, where you can merge early, and where a low-stress alternative exists. Then practice the look-signal-check-move sequence in a quiet setting until you can keep a steady line while gathering information.






 Panthers Cycling4.0 (43 reviews)
 No Xhaust4.0 (5 reviews)
 Maklin Bike Shop5.0 (159 reviews)
 Ken's ebikes5.0 (4 reviews)
 Bicycles of Ojai5.0 (73 reviews)
 Buy My Bikes4.0 (145 reviews)
 How to Teach Kids to Ride a Bike: A Step-by-Step Guide for Parents
 Tips for Riding on Busy City Streets: Smart Strategies for Urban Cyclists
 Best US National Parks for Mountain Biking: Ride Epic Trails Across America
 Best Aero Helmets for Time Trials and Racing
 How to Clean and Lubricate Your Bike Chain Like a Pro
 10 Must-Have Items for Long-Distance Cycling Trips