
Cycling Route Plan: Water, Stops, Surface, and Bailouts
On this page
- Quick answer
- Match the route to the rider
- Check surface and traffic context
- Plan water, food, and stops
- Check weather and daylight
- Build bailout options
- Prepare navigation and communication
- Pre-ride route checklist
- Limitations and safety notes
- Sources and evidence notes
- Frequently asked questions
- Conclusion and next steps
Quick answer
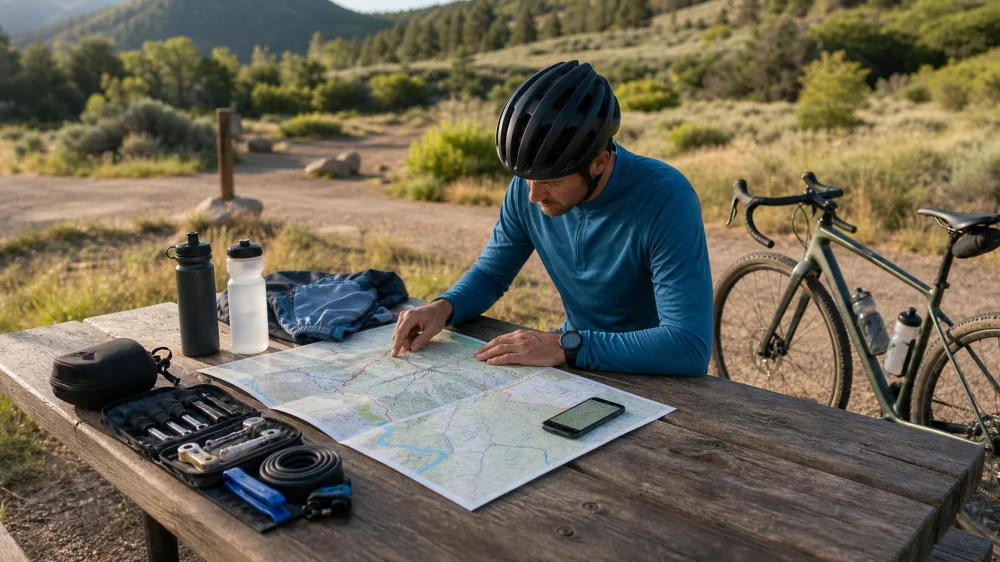
A safe cycling route plan connects distance and climbing with surface, traffic exposure, water, weather, daylight, communication, and exit options. Verify current conditions from authoritative sources, identify decision points before the hardest or most remote sections, download offline navigation, and share the plan. Shorten or cancel when conditions, equipment, or rider readiness no longer match the route.
Match the route to the rider
A cycling route plan is more than a line on a map. It estimates the effort, skill, equipment, time, and support required to complete a specific course under expected conditions.
Start with the least-prepared rider in the group. Review:
- recent riding distance and climbing rather than best-ever performance;
- comfort with traffic, descents, loose surfaces, narrow paths, and intersections;
- bicycle type, tire width and condition, gearing, lights, carrying capacity, and range;
- health, heat or cold tolerance, nutrition needs, and accessibility;
- group pace, regrouping rules, and whether anyone may ride alone.
Map distance does not measure effort by itself. Elevation gain, repeated short climbs, headwind, altitude, heat, surface resistance, stops, and loaded bags can transform a familiar distance. Use a conservative estimate for a first ride on the route.
Check surface and traffic context
Identify every surface segment: protected path, shared-use trail, bike lane, low-volume street, highway shoulder, gravel road, singletrack, or hike-a-bike section. A route labeled “paved” may include broken pavement, construction, debris, gates, steps, or seasonal closures.
Check current land-manager notices, transportation alerts, construction, bridge or tunnel restrictions, and event closures. Satellite images and user reports can add context but may be old. An official closure overrides a past ride report.
For roads, evaluate speed differences, shoulder width, sight distance, intersections, merge points, railroad tracks, and time-of-day traffic. For trails, confirm permitted bicycle type, direction rules, difficulty rating, surface conditions, and whether rain makes the trail closed or vulnerable to damage.
Choose tires and pressure using manufacturer limits, terrain, total load, and rider experience. If the route requires technical skill or equipment the rider does not have, select another route rather than treating the ride as an experiment.
Plan water, food, and stops
Mark reliable water sources and whether they are seasonal, treated, open at the expected time, and accessible with the bicycle. A fountain icon does not guarantee working water. Carry enough to reach the next confirmed source plus a margin suited to conditions.
Plan food around ride duration, intensity, individual needs, and availability. Bring familiar items that can be eaten safely and carried without leaking. Riders with medical nutrition requirements need an individualized plan.
Place stops before exposed climbs, remote segments, or long gaps—not only after them. Note toilets, shade, indoor shelter, bike shops, transit, food, and emergency access. Confirm business hours and whether bicycles can be secured or brought inside.
For groups, agree that a stop ends only after everyone has eaten, refilled, adjusted layers, and confirmed readiness. The fastest rider should not determine the shortest break.
Check weather and daylight
Review the forecast for the entire route and time window, including temperature, precipitation, wind direction and speed, lightning, air quality, visibility, and any alerts. Conditions can differ across elevation and open terrain.
Estimate moving time and stopped time separately. Add margin for navigation errors, flats, mechanical checks, photos, traffic, and a slower return. Set a turnaround time tied to daylight, weather, transport, or facility closure.
Carry layers and visibility equipment for plausible changes. Heat, cold, smoke, storms, flooding, ice, and strong wind may justify changing the route or not riding. A forecast is not a promise; reassess at each major decision point.
Build bailout options
A bailout is a planned way to shorten, exit, or pause a route before a problem becomes an emergency. Mark options on the map rather than assuming you will find one while tired.
- short loops that return to the start;
- crossroads leading to a known pickup point;
- transit stations that permit the bicycle at that time;
- open businesses or public facilities with phone access;
- turnaround points before remote, technical, or high-exposure sections;
- alternate routes avoiding a closed trail, unsafe road, or severe weather.
For each bailout, confirm distance, surface, hours, bicycle rules, cell coverage, and pickup access. A shortcut can be steeper, busier, or less rideable than the main route.
Agree on triggers: missed time cutoff, depleted water, worsening weather, repeated mechanical issue, pain, illness, rider separation, or route closure. Using a bailout is successful planning, not failure.
Prepare navigation and communication
Download the route and relevant map area for offline use. Carry a charged phone, backup power, and a second navigation method appropriate to remoteness. Do not rely on continuous cellular coverage.
Share the route, rider names, start time, expected finish, vehicle location, and overdue action with a trusted contact. For remote travel, consider communication equipment designed for the area and know how to use it before departure.
Within the group, set lead and sweep roles, regroup points, and a rule that no turn is passed without confirming the next rider sees it. Share emergency contacts and relevant medical information with consent.
Pre-ride route checklist
- Verify route access and current closures.
- Review distance, climbing, surface, and technical sections.
- Check forecast, alerts, air quality, and daylight.
- Confirm water, food, toilets, and opening hours.
- Mark bailouts and turnaround times.
- Download maps and charge devices.
- Share the plan and overdue instructions.
- Inspect bicycle, helmet, lights, tools, tube or repair system, and supplies.
- Reassess every rider at the start.
- Change the plan if assumptions are already wrong.
Limitations and safety notes
Maps, elevation profiles, route apps, weather forecasts, business listings, and crowd reports can be incomplete or outdated. Posted signs, official closures, and on-scene conditions control.
Do not enter closed areas, ride beyond legal access, or continue through floodwater, fire activity, severe storms, dangerous heat, or an unsafe mechanical condition. Contact emergency services for immediate danger and provide the clearest location available.
Route planning cannot eliminate crash, traffic, weather, wildlife, or medical risk. Skills instruction, first-aid training, local knowledge, and experienced guidance may be appropriate for remote or technical rides.
Sources and evidence notes
This framework follows broad outdoor risk-management principles: match challenge to capacity, verify current conditions, carry essential resources, establish communication, and decide exit triggers before pressure rises.
Transportation agencies and land managers are the primary sources for access and closures. Weather and emergency authorities provide current alerts. Manufacturers provide bicycle and equipment limits. Local qualified professionals can advise on technical routes and bike suitability.
Frequently asked questions
How much extra time should I add?
There is no universal percentage. Base the margin on group experience, route complexity, remoteness, weather, stop count, and daylight.
Can I trust a route app’s difficulty rating?
Use it as one clue. Compare distance, elevation, surface, technical features, traffic, and current reports with your own experience.
What is a good bailout point?
It is reachable before the highest-risk segment and leads to a verified safe destination, transport option, or shorter return.
Should I share my live location?
It can help when coverage and battery allow, but it is not a substitute for sharing the route and overdue plan in advance.
When should I turn around?
Use the pre-set triggers and turn around before depleted supplies, darkness, weather, pain, or mechanical trouble removes the safe margin.
Conclusion and next steps
A dependable cycling route plan makes the hidden demands visible: surface, climbing, traffic, water, weather, time, communication, and exits. It fits the least-prepared rider and includes decisions before remote or difficult sections.
Your next step is to mark the route in segments, verify current access, and add water and bailout points. Set a turnaround time, download the map, share the plan, and be willing to shorten the ride when reality differs from the forecast.






 Serious Cycles4.0 (75 reviews)
 Solé Bicycles (Coming Soon)0.0 (0 reviews)
 Highbridge Park Mountain Bike Trailhead3.0 (12 reviews)
 Rose City Recumbent Cycles5.0 (28 reviews)
 EaDo Bike Co4.0 (231 reviews)
 Shirk's Bike Shop4.0 (229 reviews)
 How to Teach Kids to Ride a Bike: A Step-by-Step Guide for Parents
 Tips for Riding on Busy City Streets: Smart Strategies for Urban Cyclists
 Best US National Parks for Mountain Biking: Ride Epic Trails Across America
 Best Aero Helmets for Time Trials and Racing
 How to Clean and Lubricate Your Bike Chain Like a Pro
 10 Must-Have Items for Long-Distance Cycling Trips