
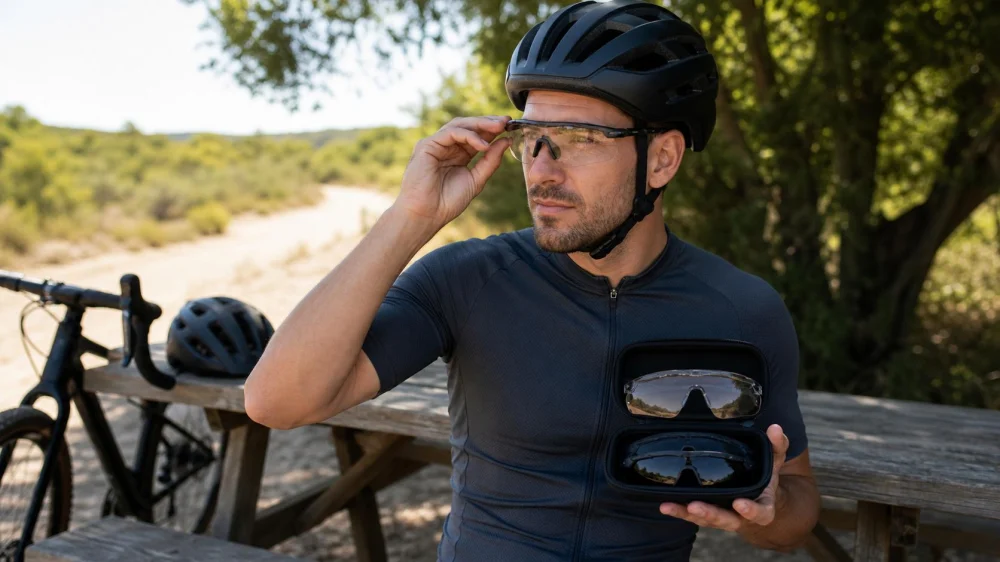
Cycling Eyewear for Sun, Dust, Wind, and Low Light
On this page
Quick answer
Choose cycling eyewear that protects against wind, dust, insects, debris, and ultraviolet exposure without reducing the vision you need. Match lens darkness and contrast to the route's brightest and darkest sections, confirm impact and UV information from the manufacturer, and test coverage with your helmet and riding position. Clear or low-light lenses can be safer than dark tint after sunset or under dense tree cover.
This guide is for adult recreational cyclists in the United States. It explains selection criteria but does not provide an eye prescription or certify a product. Riders with vision conditions, recent eye treatment, or specialized occupational needs should consult an eye-care professional.
Start with the protection goal
Cycling glasses are working equipment. They should reduce airflow and intercept small particles while preserving a wide, undistorted view of traffic, trail features, signals, and other riders. Fashion alone cannot establish protection.
Define the ride environment:
- Bright open roads with glare and long sun exposure
- Rapid transitions between sun and forest shade
- Low-light commuting or rides that may end after sunset
- Dusty gravel, insects, road spray, or wind
- Cold or humid conditions that encourage fogging
- Prescription vision needs and contact-lens comfort
No single lens is ideal for every situation. Interchangeable lenses, photochromic designs, or a second clear pair can cover a wider range, but each option has tradeoffs in transition speed, cost, optical quality, and convenience.
Choose a lens for the conditions
Tint and visible light
Dark tint can reduce brightness in full sun. Lighter amber, rose, or contrast-enhancing tints may make surface changes easier to notice for some riders, but color perception and comfort vary. Clear lenses prioritize maximum light transmission for night or very low light.
Do not judge darkness by mirror coating or lens color alone. Review the manufacturer's intended light category or transmission information. A lens that is comfortable in a parking lot may become too dark under trees, in a tunnel, or near dusk.
UV protection
UV protection and visible darkness are different properties. A dark lens is not proof of effective UV filtering. Look for clear manufacturer information about protection rather than assuming price, tint, or appearance guarantees it.
Polarization
Polarized lenses can reduce reflected glare, especially from water or some road surfaces. They may also change how certain displays, wet patches, ice, or material reflections appear. Test compatibility with your bike computer, phone, vehicle displays, and riding environment.
Photochromic lenses
Photochromic lenses change tint with light exposure and can suit mixed conditions. Transition range and speed vary with product, temperature, and UV exposure. They may not respond as expected behind some windshields, and rapid shade transitions can outpace the lens.
Check fit, coverage, and helmet compatibility
Put on the helmet first, then the glasses. Temples should not create painful pressure under retention points, and the frame should not lift the helmet or interfere with straps. The glasses should remain stable during shoulder checks and on rough surfaces.
Coverage should block useful amounts of side and downward airflow without touching eyelashes or cheeks uncomfortably. Large lenses can improve coverage but may trap heat or contact the helmet. Vents and frame shape can reduce fogging, but no design eliminates it in every condition.
Look through the upper portion while in your real riding posture. The frame should not hide signals, trail features, or riders. Scan side to side for distortion and blind areas. If the lens causes headache, visual swim, double images, or persistent discomfort, stop using it and seek appropriate advice.
Prescription and insert options
Options include prescription cycling lenses, optical inserts behind a shield, contact lenses with nonprescription protection, and conventional prescription sports frames. Lens curvature, prescription strength, peripheral optics, fogging, weight, and cost affect the choice.
An insert may be easier to update but can add surfaces that fog or reflect. A direct prescription shield may provide a wider field but may not support every prescription. Work with a qualified optical provider who understands your riding position and protection needs.
Buying and test checklist
- Confirm manufacturer statements for UV and impact performance.
- Choose tint for the darkest critical section, not only the brightest start.
- Test with the exact helmet, cap, and hearing or communication equipment you use.
- Check the view while bent into riding position.
- Look for distortion across the center and edges.
- Shake your head and perform shoulder checks.
- Test computer and phone displays without operating them while moving.
- Confirm lens-change instructions and whether replacement lenses are available.
- Use the first ride on a familiar low-consequence route.
Care and replacement
Rinse dust and grit before wiping so particles do not grind across the lens. Use the cleaning method and cloth specified by the manufacturer. Harsh household cleaners, high heat, and some solvents can damage coatings or frames.
Store glasses in a protective case away from loose tools. Replace or professionally evaluate lenses with cracks, deep scratches, coating failure, optical distortion, or impact damage. A frame that no longer holds the lens securely is not a reliable protective system.
Important limitations
Cycling eyewear reduces some hazards but cannot protect against every projectile, crash, branch, chemical, or high-energy impact. “Sports style” is not the same as verified protective performance. Use product documentation and standards information relevant to your activity.
Never use a tint that prevents you from seeing road users, surface hazards, or signals. Stop in a safe place before changing lenses or cleaning glasses. If sudden vision loss, eye injury, severe pain, flashes, or new floating spots occur, stop riding and seek prompt medical care.
Frequently asked questions
Are expensive cycling glasses always safer?
No. Price may reflect optics, fit, coatings, materials, brand, and accessories. Compare documented protection, optical quality, fit, coverage, and replacement support.
Can I ride at night with yellow lenses?
Any tint reduces some light. Verify the product's intended use and make sure it preserves the vision required for your route. Clear lenses are often the straightforward low-light choice.
Why do my glasses fog on climbs?
Heat, humidity, low airflow, face coverage, and fit can contribute. Improve ventilation, keep lenses clean, and use only manufacturer-compatible anti-fog products. Stop safely if visibility is impaired.
Can ordinary sunglasses work for cycling?
They may provide UV protection and comfort, but evaluate impact information, stability, coverage, peripheral vision, helmet compatibility, and whether the frame can become hazardous in a fall.
Should the glasses fit over helmet straps?
Follow the helmet and eyewear instructions. The key is that neither product shifts, compromises retention, creates pressure, or interferes with removal. Test the complete system.
Sources and evidence notes
This article reflects general cycling and protective-eyewear practice: match tint to light, verify UV and impact claims, preserve peripheral vision, test helmet compatibility, and replace damaged lenses. Product documentation and individualized optical guidance are the appropriate sources for a specific pair.
Next steps
Write down your brightest, darkest, windiest, and dustiest riding conditions. Try candidate glasses with your helmet, scan the full field of view, and check the riding-position fit. Confirm protection information before purchase and test the pair on a familiar short ride where you can stop easily if tint, fogging, pressure, or distortion becomes a problem.






 V5 Cycles4.0 (230 reviews)
 Alan's Bike Shop4.0 (134 reviews)
 RIDE BIKE SHOP4.0 (95 reviews)
 Taylor Bike Company5.0 (46 reviews)
 Trek Bicycle Houston West University4.0 (695 reviews)
 Trek Bicycle Allentown4.0 (553 reviews)
 How to Teach Kids to Ride a Bike: A Step-by-Step Guide for Parents
 Tips for Riding on Busy City Streets: Smart Strategies for Urban Cyclists
 Best US National Parks for Mountain Biking: Ride Epic Trails Across America
 Best Aero Helmets for Time Trials and Racing
 How to Clean and Lubricate Your Bike Chain Like a Pro
 10 Must-Have Items for Long-Distance Cycling Trips