
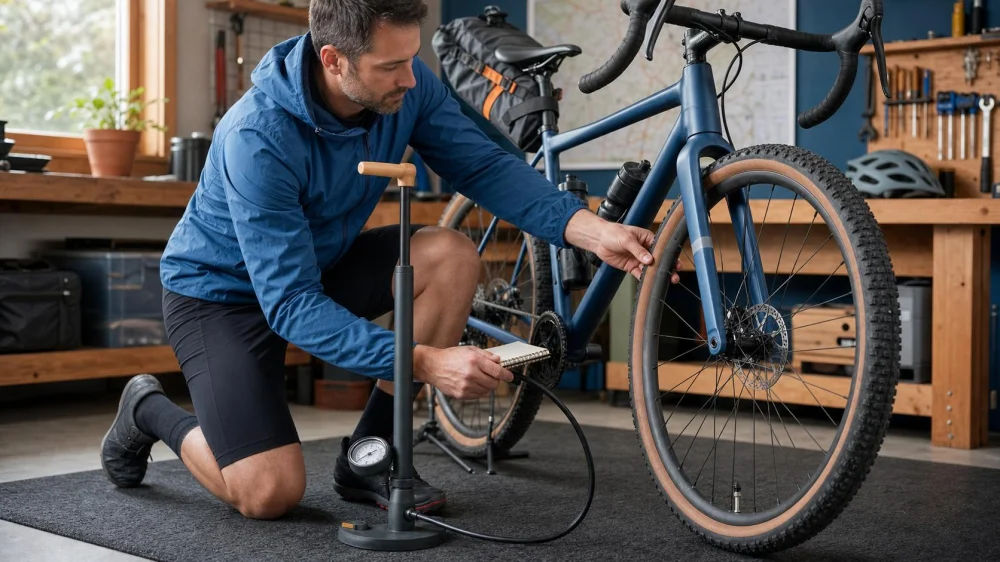
Bike Tire Pressure: Set It for Rider, Tire, and Route
On this page
Quick answer
Start inside the pressure limits printed by the tire and compatible rim, then adjust for total load, tire width, surface, and setup. The rear usually needs more pressure because it carries more weight. Use small changes, record the result, and stop lowering pressure if the tire squirms, bottoms on the rim, burps air, or feels unstable.
Why one pressure does not fit every ride
Bike tire pressure is the air pressure that supports the combined load of the bicycle, rider, and cargo. It affects grip, comfort, rolling behavior, rim protection, and puncture risk. A number that works for a light rider on smooth pavement may be unsuitable for a loaded commuter or a mountain bike on rocks.
Narrow tires generally need more pressure to support the same load than wide tires. Rough ground often rewards a modestly lower setting because the tire can conform to small bumps, while very low pressure can let the casing fold or the rim strike an obstacle. Tubes, tubeless systems, tire construction, and rim width also change the useful range.
Find the safe pressure range
Read the markings on the tire sidewall and the rim manufacturer’s limits. Treat them as boundaries, not a universal recommendation. The permitted range may be shown in psi, bar, or kPa. Never exceed the lowest applicable maximum among the tire, rim, and rim-tape system.
Confirm that the tire width is approved for the rim. Hookless rims can have specific tire compatibility and maximum-pressure requirements. If labels are missing, damaged, or contradictory, do not guess; ask the tire or rim maker or a qualified bike shop.
Set a practical starting pressure
- Add rider, bike, bags, water, and cargo to estimate the real riding load.
- Use the tire or wheel maker’s pressure chart or calculator when available.
- Set the rear slightly higher than the front when more weight rests on the rear wheel.
- Use a reliable gauge and inflate both tires while they are cool.
- Write down the pressure, tire size, load, surface, and weather.
For a new setup, stay comfortably inside the approved range. Make one change at a time, commonly in small increments, so you can tell what improved or worsened. The goal is not the lowest possible number; it is predictable support with useful grip and comfort.
Test and adjust on the route
Use a short, familiar loop with pavement seams, turns, braking, and the surface you normally ride. Keep speed conservative during the first test. Notice whether the bike chatters over small bumps, loses grip, feels vague in corners, or strikes the rim on edges.
If the ride is harsh and the wheel skips across rough ground, a small reduction may help, provided you remain above the safe lower boundary and the tire stays supported. If steering feels imprecise or the casing folds in turns, add pressure. Loaded touring and bikepacking require a new check after cargo changes.
Read the warning signs
- Too low: tire squirm, rim strikes, pinch flats with tubes, tubeless burping, or sidewall folding.
- Too high: excessive vibration, reduced grip on loose or broken surfaces, and a bouncing feel.
- Possible leak: a repeated drop over hours or days, sealant around a puncture, or a valve that will not hold pressure.
- Possible equipment problem: bulges, exposed casing, damaged bead, dented rim, or persistent air loss.
Stop riding when the tire bead is not evenly seated, the casing is damaged, or the rim has a significant defect. Adding air does not repair structural damage.
Pre-ride pressure checklist
- Inspect both tires for cuts, embedded debris, and uneven seating.
- Measure with the same gauge for repeatable comparisons.
- Account for added bags, a child seat, or other cargo.
- Check that valve cores are snug and caps are fitted.
- Recheck after major temperature or elevation changes.
- Carry the pump, inflator, tube, plugs, or tools appropriate to the setup.
Important notes and limits
This is general setup guidance, not a replacement for the instructions supplied with a specific tire, rim, insert, or tubeless system. Pressure gauges can disagree, temperature changes pressure, and damaged components can fail even when the gauge reading looks normal. Riders with unusual cargo, adaptive cycles, tandem bikes, or hookless wheels should follow the relevant manufacturer’s limits.
Evidence and source notes
The decision process reflects common tire and wheel manufacturer guidance: stay within component limits, account for load and tire volume, and validate settings through controlled testing. Exact numbers are intentionally omitted because they depend on the named tire, measured width, rim, casing, setup, and total load. The tire and rim manuals are the primary sources for a particular bicycle.
Frequently asked questions
Should front and rear bike tires use the same pressure?
Not always. The rear wheel commonly carries more load, so it often needs more support. Actual weight distribution varies with bicycle geometry, rider position, and cargo.
How often should I check tire pressure?
Check before rides often enough to notice a meaningful loss. High-volume and low-pressure setups may feel different after a small change, while all tires gradually lose air.
Is the maximum number on the sidewall the best pressure?
No. It is a limit for the tire, not a promise of the best ride. The rim may also specify a lower maximum. Choose a working setting within all applicable limits.
Can I use my fingers instead of a gauge?
A squeeze can reveal a nearly flat tire but is not precise enough for repeatable setup. Use a gauge, especially for tubeless, narrow road, cargo, and hookless systems.
Does cold weather lower tire pressure?
Pressure changes with temperature. Measure in the conditions where the bike will be used and avoid inflating past a component limit to compensate.
Next steps
Record today’s front and rear settings, ride a familiar loop, and change only one variable before the next test. A simple log will produce a more useful personal baseline than copying another rider’s number.






 Electric Bicycle Shop2.0 (3 reviews)
 Pedego Electric Bikes McDowell Mountain5.0 (2 reviews)
 Maverick Bikes4.0 (261 reviews)
 DD Cycles4.0 (25 reviews)
 Conte's Bike Shop4.0 (66 reviews)
 In Gear Cycling & Fitness4.0 (92 reviews)
 How to Teach Kids to Ride a Bike: A Step-by-Step Guide for Parents
 Tips for Riding on Busy City Streets: Smart Strategies for Urban Cyclists
 Best US National Parks for Mountain Biking: Ride Epic Trails Across America
 Best Aero Helmets for Time Trials and Racing
 How to Clean and Lubricate Your Bike Chain Like a Pro
 10 Must-Have Items for Long-Distance Cycling Trips