
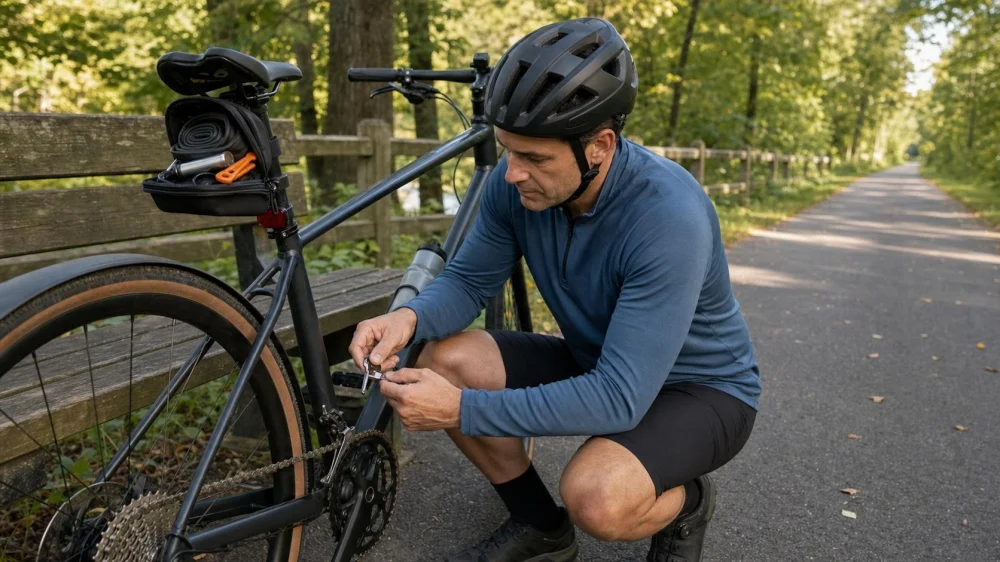
Bike Multi-Tools: What They Fix and What They Cannot
On this page
Quick answer
A bike multi-tool can tighten compatible bolts, make small position adjustments, and—if equipped with the right functions—help reconnect a chain or remove a tubeless valve core. It cannot inflate a tire, replace missing parts, straighten serious damage, or make every broken bike safe to ride. Match every bit to your bicycle, practice at home, and stop when a repair needs torque control, replacement parts, or a workshop.
This guide is for recreational riders in the United States building a practical on-bike kit. Component designs vary, so use the bicycle and component manufacturer’s instructions for exact fasteners, torque values, and repair procedures.
Match the tool to your bike
A useful bike multi-tool is a compact set whose bits and functions match the fasteners and likely field problems on the bicycle you actually ride. More functions do not automatically make a better tool.
Inspect the bike from the handlebars to the rear axle. Record the hex, Torx, and screwdriver sizes used on the stem, controls, seatpost, bottle cages, racks, fenders, cleats, and other rider-serviceable parts. Check whether the wheels use quick releases, thru-axles with a lever, or an axle that requires a separate tool.
If the tool includes a chain breaker, confirm that it is compatible with the chain type and width. Some chain systems also require a matching connecting link and link pliers. A chain breaker without the correct replacement link may not complete the repair.
Fit matters as much as the printed size. Test each required bit at home. It should seat fully without excessive play, while the tool body must have room to turn near frames, bags, spokes, and controls.
Realistic roadside fixes
- Tighten a loose accessory: secure a bottle cage, rack, fender, light mount, or similar item when the correct fastener is present and undamaged.
- Reposition a control: restore a brake lever or shifter that has rotated slightly after a minor bump, following the component instructions.
- Adjust saddle position: correct a seatpost or saddle that slipped, provided nothing is cracked and you know the safe insertion and torque requirements.
- Make a small indexing adjustment: some riders can use a compatible tool for a minor mechanical shifting correction after ruling out damage.
- Manage a broken chain: a compatible chain tool and connecting link can remove damaged links and create a rideable repair when the rider knows the process.
- Remove a wheel: the correct bit may operate a leverless thru-axle so a puncture can be repaired.
These are conditional fixes, not guarantees. Move completely away from traffic and trail flow, stabilize the bicycle, identify the cause, and make one small change at a time. Test brakes, steering, wheels, and shifting at walking speed before continuing.
What a multi-tool cannot solve
Stop and arrange transport or professional help when the bike has a cracked frame, fork, handlebar, stem, crank, rim, or other structural part; severe wheel damage; a loose component that will not hold; a stripped fastener; leaking hydraulic brakes; or damage that affects steering or braking.
A multi-tool also cannot replace these separate items:
- a pump or compatible inflator;
- tire levers when the tire cannot be removed safely by hand;
- a correct spare tube, tubeless plug, or patch material;
- replacement fasteners, connecting links, or valve parts;
- a torque wrench for critical installation and workshop checks;
- specialized tools for many bottom brackets, cassettes, bearings, suspension parts, and hydraulic systems.
Do not use the multi-tool as a hammer, pry bar, pedal wrench, or substitute for an incompatible bit. An improvised fit can round a fastener and turn a simple adjustment into a larger repair.
Practice before the ride
At home, identify every function without relying on tiny markings. Open the tool while wearing riding gloves, fit the key bits to the bike, and learn how the body of the tool limits access. Practice removing a wheel, opening the repair kit, and operating the pump.
For chain repair, practice on an old compatible chain or under guidance before depending on the tool remotely. Learn which damaged section to remove, how the connecting link is oriented, and how a shortened chain affects gear selection. Do not first discover the procedure beside a busy road or far into a trail.
After practice, return all fasteners to the correct manufacturer-specified condition with appropriate workshop tools. The roadside tool is for field readiness, not a replacement for regular maintenance.
Build the rest of the repair kit
Pair the multi-tool with equipment matched to the bike, route, and rider:
- inflation method compatible with the valves;
- spare tube in the correct diameter and useful width range;
- tire levers suitable for the wheel and tire;
- patches or tubeless repair supplies you know how to use;
- correct chain connecting link;
- small emergency items such as a boot for a damaged tire casing;
- contact method, identification, and a transport fallback.
Pack the kit where it stays dry, secure, and available on every ride. Check that sharp tools cannot abrade the spare tube. Replace used, corroded, damaged, or expired items during regular kit inspections.
Multi-tool checklist
- List the bike’s fasteners. Include cockpit, seat, axles, accessories, and cleats.
- Test every required bit. Confirm size, full engagement, and room to turn.
- Check special functions. Verify chain and valve compatibility instead of trusting a generic label.
- Inspect the tool. Look for corrosion, looseness, bent bits, or seized pivots.
- Add consumables. Pack compatible inflation, puncture, and chain supplies.
- Practice core repairs. Remove a wheel, inflate the tire, and learn the chain process before the ride.
- Plan the limit. Know which damage means walking, calling for pickup, or visiting a bike shop.
Limitations and important notes
- Overtightening can damage components; undertightening can allow movement. Use specified procedures and torque values.
- Carbon and lightweight components can be sensitive to clamping and damage. Do not guess at roadside adjustments.
- A bolt that repeatedly loosens may indicate damaged threads, a missing part, incorrect assembly, or another fault.
- Braking and steering problems deserve a conservative decision. Do not continue if either system remains uncertain.
- Roadside repairs occur in exposed places. Move away from traffic, avoid blocking trails, and never work where drivers or riders cannot see you.
Frequently asked questions
How many functions should a bike multi-tool have?
Enough to cover the important fasteners and field procedures on your bike. A smaller compatible tool is more useful than a larger one filled with functions that do not fit.
Do I need a chain breaker?
It is valuable on routes where a broken chain would leave you stranded, but only with compatible parts and practiced technique. Short local rides with easy pickup may justify a different kit.
Can I tighten bolts by feel?
A field adjustment may sometimes be necessary, but critical components have specified procedures and torque ranges. Avoid aggressive tightening and verify the repair later with appropriate tools or a qualified mechanic.
Can a multi-tool fix a flat tire?
Not by itself. You still need a compatible inflation method and puncture solution, and possibly tire levers or an axle tool.
When should I walk the bike?
Walk or arrange pickup whenever steering, braking, wheel retention, structural integrity, or repair quality is uncertain. Continuing can worsen damage or cause loss of control.
Sources and evidence notes
This guide reflects common bicycle maintenance practice: match tools to specific components, use manufacturer procedures, carry compatible consumables, test repairs conservatively, and stop when safety-critical damage exceeds field capability. Exact compatibility and torque information come from the bicycle and component manufacturers or a qualified bicycle mechanic.
Prepare for the next ride
Place your bike beside the repair kit and test every promised function. Remove tools that do not help, add the missing inflation or repair items, and practice one likely procedure. A multi-tool earns its space when it fits the bike, the rider knows how to use it, and both have a clear limit.






 Upland Pump Track5.0 (1 reviews)
 Lebo's Pedal Parlor4.0 (44 reviews)
 The Bicycle Co-Op of Williamsburg4.0 (31 reviews)
 Firmstrong4.0 (7 reviews)
 SCR Bicycle Frames5.0 (2 reviews)
 Pedego Electric Bikes Harrisburg4.0 (64 reviews)
 How to Teach Kids to Ride a Bike: A Step-by-Step Guide for Parents
 Tips for Riding on Busy City Streets: Smart Strategies for Urban Cyclists
 Best US National Parks for Mountain Biking: Ride Epic Trails Across America
 Best Aero Helmets for Time Trials and Racing
 How to Clean and Lubricate Your Bike Chain Like a Pro
 10 Must-Have Items for Long-Distance Cycling Trips