
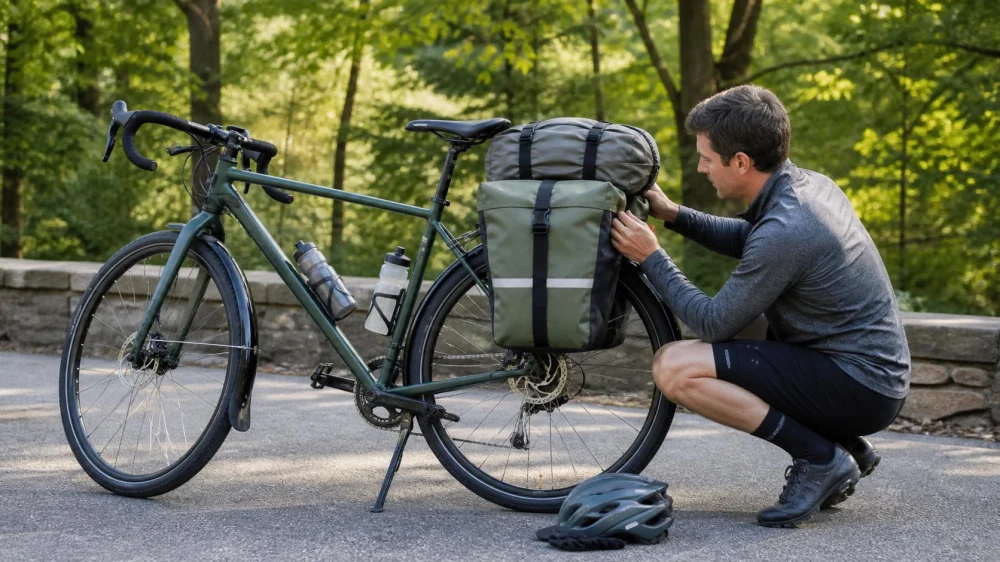
Bike Cargo Checklist: Balance, Attachment, and Test Ride
On this page
Quick answer
Carry bicycle cargo with a rack, pannier, basket, or bikepacking system that fits the bicycle and stays within every component’s load limit. Put dense items low and near the bike’s center, balance left and right, and secure all straps away from wheels, brakes, and drivetrain. Perform a stationary check, then a short low-speed test before entering traffic or a long route.
Choose a suitable system
A backpack works for small loads but puts weight on the rider. Rear racks and panniers suit commuting and errands; front racks and baskets keep some items visible but affect steering; frame and seat bags distribute bikepacking gear without a traditional rack. Each system must match the frame, attachment points, wheel clearance, and intended load.
Check the bicycle, rack, bag, and fastener limits. The lowest limit controls. Carbon frames, suspension bikes, small wheels, and e-bikes may require specific hardware or may prohibit some clamps. Ask a qualified bike shop when compatibility is uncertain.
Pack for stability
- Reduce the load. Remove unnecessary items before trying to make an overloaded system fit.
- Place dense items low. Keep weight close to the bicycle rather than stacked high or far behind the axle.
- Balance sides. Similar pannier weight helps prevent a constant steering correction.
- Contain small items. Nothing should bounce out or enter spokes, chain, brake, or suspension.
- Compress soft bags. Use the designed closures so contents cannot shift during braking or turns.
- Protect fragile cargo. Padding should not compromise secure attachment or ventilation needs.
- Preserve visibility. Do not cover required lights, reflectors, or identifying safety features.
Pre-ride inspection
- Rack and mounts have no looseness, cracks, bending, or missing hardware.
- Bags are fully latched and cannot lift off their rails.
- Every strap end is contained and clear of the wheel through its full rotation.
- Brakes, steering, pedals, chain, and suspension move freely.
- Tires are appropriate for the combined load and inflated according to reliable guidance.
- Lights and reflectors remain visible.
- The bicycle can be mounted and dismounted without kicking or tipping the cargo.
Walk the loaded bicycle first. Then ride slowly in a traffic-free area, testing starts, straight tracking, gentle turns, and progressive braking. Stop immediately if the load shifts or anything touches a moving part.
Adjust how you ride
Added mass increases stopping distance and changes handling. Start earlier, brake progressively, corner more slowly, avoid sudden steering, and allow more space. Stand over the bike carefully because a high load can tip it when stationary.
Recheck attachment after rough surfaces and early in the ride. For hills or long trips, plan a route that fits your control, battery or physical range, weather, and bailout options.
Limitations and safety notes
Do not hang bags from handlebars, carry loose items, exceed rated loads, or attach cargo where it can obstruct controls. Transporting a child, pet, hazardous material, or very large object requires purpose-built equipment and additional rules beyond this general guide.
Follow manufacturer instructions and applicable traffic law. Have damaged mounts, uncertain frame compatibility, or persistent handling problems inspected before riding.
Sources and evidence notes
The checklist follows common bicycle load practice: use compatible rated systems, keep mass low and centered, prevent movement into rotating parts, test handling, and increase stopping margin. Product manuals and a qualified bicycle technician govern the specific setup.
Frequently asked questions
Should heavy cargo go in front or back?
It depends on the bicycle and system. Keep within rated limits and distribute weight so steering and frame handling remain predictable.
Can I use bungee cords?
Only if the rack maker permits them and every hook and loose end is fully controlled. Purpose-designed straps often give more predictable containment.
Why does my bike wobble when loaded?
Stop riding. Shifting, high, asymmetric, incompatible, or excessive loads and mechanical issues can contribute. Repack or seek inspection.
Do I need more tire pressure?
Load affects pressure needs, but limits and recommendations vary by tire, rim, and bike. Use reliable manufacturer guidance rather than guessing.
Next steps
Confirm system compatibility and limits, reduce and balance the load, contain every strap, and perform a full mechanical-clearance check. Complete a low-speed test, then recheck after the first rough section or few minutes of riding.






 Bicycle One4.0 (227 reviews)
 RIZE Bikes | Distribution Centre4.0 (46 reviews)
 29ers Bike shop4.0 (51 reviews)
 Fly E-Bike Columbus Ave4.0 (95 reviews)
 WeeBikeShop Inc5.0 (20 reviews)
 Eazy E. Bikez4.0 (184 reviews)
 How to Teach Kids to Ride a Bike: A Step-by-Step Guide for Parents
 Tips for Riding on Busy City Streets: Smart Strategies for Urban Cyclists
 Best US National Parks for Mountain Biking: Ride Epic Trails Across America
 Best Aero Helmets for Time Trials and Racing
 How to Clean and Lubricate Your Bike Chain Like a Pro
 10 Must-Have Items for Long-Distance Cycling Trips