
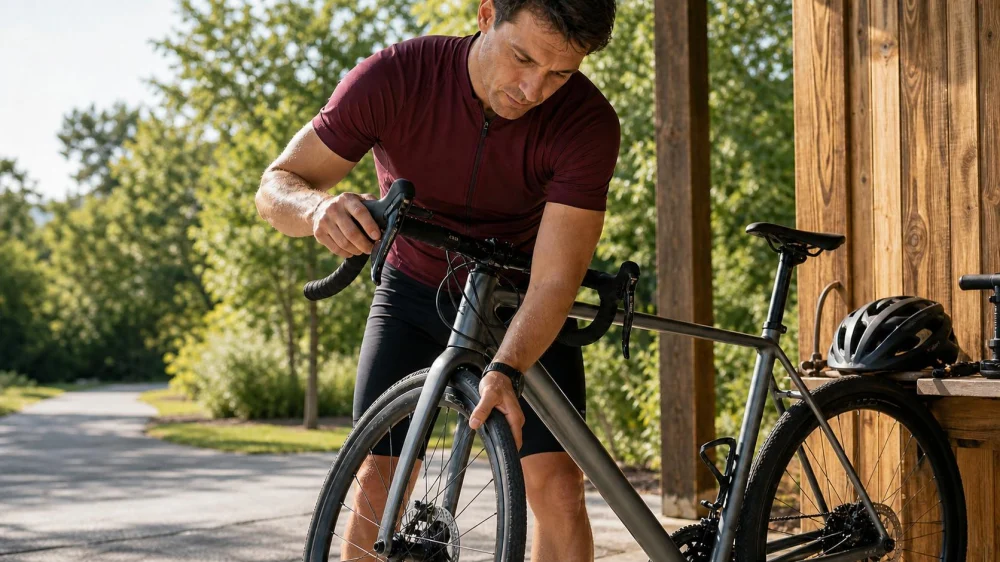
Bike Brake Lever Pull: Pre-Ride Checks Before You Go
On this page
Quick answer
Before every ride, squeeze each bike brake separately while stationary. The lever should engage predictably without touching the handlebar, leaking, sticking, or pulling excessive slack. Roll the bike and confirm each brake slows its wheel, then take a low-speed test in a traffic-free area. Do not ride if braking is weak, inconsistent, rubbing severely, contaminated, damaged, or unfamiliar after service.
This guide is for common adult bicycles in the United States. Brake designs and adjustment procedures vary. Follow the bicycle and brake manufacturer’s instructions; use a qualified bicycle mechanic when the system, tools, or safe limits are uncertain.
What normal lever feel should tell you
Brake lever pull is the distance and force from the lever’s rest position until the brake engages. A useful lever has comfortable reach, smooth movement, a clear engagement point, sufficient clearance from the grip, and consistent feel on repeated pulls.
“Firm” is not identical across systems. Hydraulic disc brakes may engage with short smooth travel. Cable disc or rim brakes can have more mechanical movement. Cantilever and mechanical systems depend on cable condition and setup. The key is the bicycle’s known correct baseline and the manufacturer’s specification.
The left and right levers may control front and rear brakes in different arrangements depending on market, setup, and rider preference. Confirm which is which before the test. Never assume after borrowing, renting, shipping, or service.
Some e-bikes add motor cut-off switches or electronic braking features. These do not replace functional mechanical service brakes. Power the system as directed and inspect all intended braking functions.
A stationary brake check
- Stabilize the bicycle. Stand over or beside it on level ground away from traffic. Keep fingers clear of rotors, spokes, and moving parts.
- Identify each brake. Squeeze one lever while gently rolling the bike. Confirm which wheel slows or locks.
- Check lever travel. Pull firmly using normal riding fingers. The lever should not touch the handlebar or trap other fingers against the grip.
- Repeat the pull. The engagement point should remain consistent. A hydraulic lever that pumps up, fades, or changes may have air, a leak, or another fault.
- Look at cables and hoses. Check for fraying, cracked housing, kinks, corrosion, fluid, loose fittings, rubbing, or sharp bends.
- Inspect pads and braking surfaces. Look for worn pads, uneven contact, embedded debris, damaged rims, contaminated rotors, or a rotor that is visibly bent.
- Check secure attachment. Levers, calipers, brake arms, cable anchors, rotors, and wheels should have no obvious looseness. Do not test fastener tightness by random over-tightening.
- Spin each wheel. Note severe rubbing, a dragging brake, side-to-side rim or rotor movement, or a wheel that is not seated correctly.
NHTSA’s pre-ride ABC guidance says to test brakes, check pad wear, inspect damaged or loose cables, confirm that brakes do not rub while the wheel spins, and verify wheel retention.
How to perform a controlled test
Only test-ride after the stationary check passes. Choose a flat, dry, open area free of traffic, pedestrians, gravel, leaves, ice, and obstacles. Wear a properly fitted helmet and closed secure footwear.
- Start at walking speed and apply the rear brake smoothly.
- Repeat with the front brake gently while keeping weight balanced and the bike upright.
- Use both brakes progressively and confirm a controlled stop.
- Listen for scraping, grinding, pulsing, clicking, or sudden silence after prior noise.
- Check that each lever returns freely and the wheel releases.
- Increase speed only slightly if every earlier stop is predictable.
Do not perform a hard maximum stop to diagnose questionable brakes. Do not test on a hill, in traffic, while carrying a child, or with a loaded cargo bike. A mechanic can use safer controlled procedures and measurements.
Common problem patterns
Lever pulls to the grip
Cable slack, pad wear, housing compression, air in a hydraulic line, fluid loss, incorrect adjustment, or component mismatch may be involved. Do not keep riding because the brake still “sort of works.”
Lever feels spongy or changes with repeated pulls
Hydraulic air or leaks, flexible housing, loose setup, or another system issue may cause changing engagement. Service is needed.
Brake rubs continuously
A wheel may be mis-seated, rotor bent, caliper misaligned, piston sticky, rim out of true, cable too tight, or return mechanism impaired. Severe drag can heat components and reduce control.
Brake squeals
Moisture can create temporary noise, but contamination, glazing, worn pads, misalignment, loose parts, or damaged braking surfaces may also be involved. Noise alone does not measure stopping power.
One brake is much weaker
Pad wear, contamination, cable or hose faults, setup, incompatible parts, or surface damage may explain it. Both required brakes should function properly before road use.
Brake stays applied
A stuck lever, corroded cable, kinked housing, seized pivot, piston issue, or misadjustment may prevent release. Stop and service the bike.
When the bike needs service
Do not ride and arrange service when:
- a lever reaches the handlebar or engagement changes unpredictably;
- hydraulic fluid appears at a lever, hose, fitting, or caliper;
- a cable is frayed, kinked, corroded, or pulling through an anchor;
- pads are at or beyond the manufacturer’s wear limit;
- a rim braking surface is cracked, deeply worn, or outside its wear indicator;
- a rotor is loose, severely bent, cracked, below minimum thickness, or contaminated;
- the wheel is loose or not retained correctly;
- parts shift under braking;
- stopping power is inadequate or inconsistent; or
- the brake changed after a crash, transport, wheel removal, or service.
Tell the shop what changed, which lever and wheel are affected, whether it occurs wet or dry, recent work, mileage since pad replacement, and any noise, heat, smell, leak, or impact.
Important limits and mistakes to avoid
Do not touch a disc rotor after braking; it can be hot. Keep chain lubricant, cleaner, sunscreen spray, and oily hands away from rotors and pads. Contaminated friction material may need replacement.
Do not squeeze a hydraulic brake lever with the wheel removed unless the manufacturer’s correct pad spacer is installed. Pistons can advance and make wheel installation or service difficult.
Do not tighten barrel adjusters indefinitely to compensate for worn pads, damaged housing, or incorrect setup. Adjustment range and pad advancement differ by system.
Do not change lever reach so far that braking force, reservoir function, or required clearance is compromised. Use the manufacturer’s range.
A working parking lock, regenerative system, coaster brake, or one functioning hand brake does not justify ignoring a failed required brake. Federal product requirements and state operating laws are not identical; the safe decision is to restore the intended system.
Frequently asked questions
Should the front and rear levers feel the same?
Not necessarily, especially with different brake types or hose lengths, but both should be predictable and within specification.
Can I ride if the lever touches the grip?
No. The system may have insufficient reserve travel or another fault. Have it adjusted or repaired before riding.
Is light disc-brake rub normal?
Brief light contact can occur, but persistent drag, heat, slowing, or a new change needs correction. Check wheel seating first.
Why did lever feel change after removing a wheel?
The wheel may be seated differently, the rotor may have been bumped, or hydraulic pistons may have advanced. Stop and inspect the setup.
Can I clean rotors with household cleaner?
Use only the brake manufacturer’s approved method and materials. Residue can reduce friction or contaminate pads.
How often should brakes be checked?
Perform a quick function check before every ride and a detailed inspection at intervals based on use, conditions, wear, and manufacturer guidance.
Sources and evidence notes
NHTSA advises riders to use a bicycle that works and to check brakes before riding. Its current pre-ride ABC check includes pad, cable, rub, and wheel-retention observations. See NHTSA’s pre-ride bicycle safety check and NHTSA bicycle safety guidance.
CPSC bicycle regulations establish new-product brake performance requirements, but they are not a do-it-yourself maintenance specification. See CPSC bicycle requirements FAQ. Use model-specific manufacturer service limits for maintenance.
Conclusion and next steps
Identify which lever controls each wheel, check travel and consistency, inspect pads, cables or hoses, spin the wheels, and complete a low-speed test only after the stationary check passes. Any lever-to-grip travel, leak, looseness, heavy rub, worn friction surface, or unpredictable stopping is a no-ride condition until correctly serviced.






 Truckawa Bicyles5.0 (3 reviews)
 Blue Mountain E-Bikes5.0 (28 reviews)
 BikeMax4.0 (104 reviews)
 Grand Performance4.0 (92 reviews)
 Mega Cycle4.0 (244 reviews)
 Brickwell Cycling and Multisports4.0 (51 reviews)
 How to Teach Kids to Ride a Bike: A Step-by-Step Guide for Parents
 Tips for Riding on Busy City Streets: Smart Strategies for Urban Cyclists
 Best US National Parks for Mountain Biking: Ride Epic Trails Across America
 Best Aero Helmets for Time Trials and Racing
 How to Clean and Lubricate Your Bike Chain Like a Pro
 10 Must-Have Items for Long-Distance Cycling Trips