
How to Fit a Bike Helmet and Know When to Replace It
On this page
Quick answer
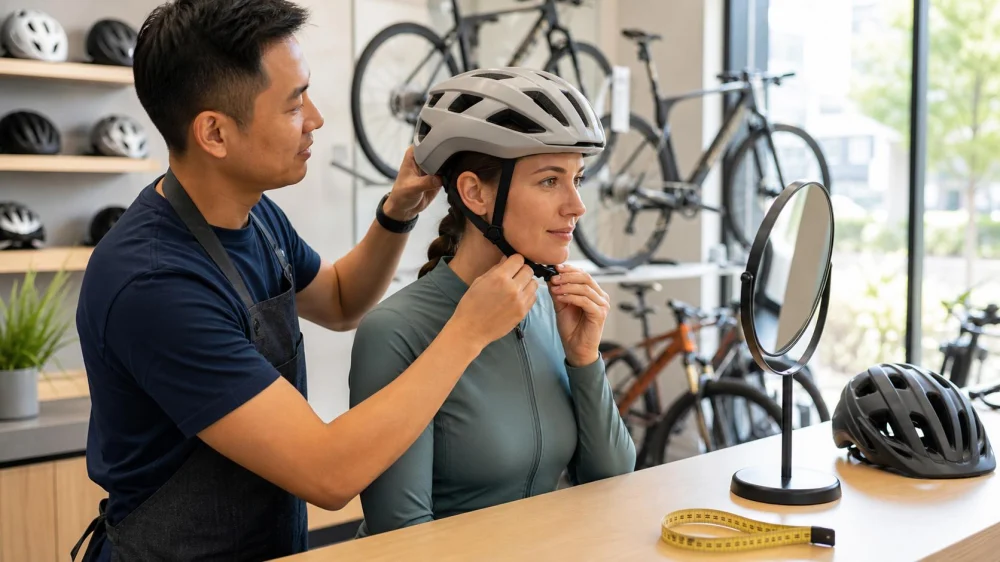
Choose a bicycle helmet with an inside label stating it complies with the U.S. CPSC bicycle helmet standard. It should sit level and low—about one or two finger-widths above the eyebrows—without rocking. Adjust each side strap into a V just under and slightly in front of the ear, then tighten the chin strap according to the maker's instructions. Replace a helmet after an impact, a recall, damaged parts, or the manufacturer's service-life guidance.
A properly fitted bike helmet is a certified helmet of the correct size that remains level and securely positioned during expected head movement with the retention system buckled.
Check certification and purpose
Look inside for the required label stating compliance with the CPSC bicycle helmet standard, along with model and manufacturing information. Check CPSC recall notices for the model. A marketplace listing or seller claim is not a substitute for the physical label and intact instructions.
Match the helmet to the activity. A bicycle helmet is designed and certified for bicycling, but other activities may require a different standard or greater coverage. Downhill mountain biking, BMX, speed e-bikes, skateboarding, motorsports, and snow sports can involve different helmet designs and requirements. Follow the activity, event, trail, bike, and manufacturer guidance.
Choose the correct size
- Measure head circumference around the widest part, passing above the eyebrows and ears.
- Compare the measurement with the specific manufacturer's size chart.
- Try the helmet with the hair, liner, or thin cap you normally ride with—only if allowed by the instructions.
- Place it level before tightening any rear cradle.
- Choose a different model if pressure points remain or the shell shape does not match your head.
A larger helmet tightened aggressively is not the same as a correct size. Padding should not be removed, doubled, or relocated except as the instructions allow. Children need a helmet that fits now, not one purchased to “grow into.”
Fit the helmet step by step
- Level: position the helmet flat on the head, not tilted back.
- Low: set the front edge roughly one or two finger-widths above the eyebrows, following the helmet instructions.
- Snug: adjust approved fit pads or the rear system evenly so the helmet is secure without painful pressure.
- Side straps: move the sliders so the straps form a V under and slightly in front of each ear.
- Chin strap: center and buckle it, then tighten to the manufacturer's specified clearance.
- Secure loose ends: use the provided keepers so straps do not flap or loosen.
Glasses should sit comfortably without pushing the helmet out of position. A ponytail, thick hat, headphones, or accessory can change fit; use only configurations permitted by the maker.
Run a movement test
- Shake the head gently side to side and nod; the helmet should not slide independently.
- Push the front edge upward and rear edge forward; it should resist significant movement.
- Open the mouth wide; the chin strap should feel engaged.
- Confirm the front does not block vision and the straps do not cover the ears.
- Check for painful pressure, numbness, loose buckles, twisted webbing, or unstable attachments.
Repeat the check before every ride, particularly after transport or sharing. Fit systems can loosen and strap sliders can move.
When to replace a helmet
- After a crash or impact: CPSC-required warnings explain that damage can be invisible; follow the instruction to replace, destroy, or return it to the manufacturer as directed.
- Recall: stop use and follow the CPSC/manufacturer remedy.
- Visible damage: replace for a cracked shell or liner, crushed foam, worn straps, broken buckle, missing pads, damaged fit system, or unauthorized modification.
- Unknown history: do not rely on a used helmet when you cannot verify impacts, storage, age, authenticity, and parts.
- Age and service life: follow the helmet manufacturer's replacement interval and instructions; materials and recommendations vary.
- Poor fit: replace or refit when the helmet no longer stays securely positioned.
Do not sell, donate, or continue using an impacted or recalled helmet unless the official remedy specifically makes it safe. Cut straps or dispose of it as recall instructions require so another rider does not reuse it.
Care and storage
Clean only with products and methods approved in the manual. CPSC labeling rules warn that cleaners such as ammonia, bleach, and some solvents can damage a helmet invisibly. Avoid paint, adhesive, stickers, bug spray, fuel, and accessories unless the maker approves them.
- Store away from heat, direct sun, chemicals, and heavy objects.
- Do not leave it on a hot vehicle dashboard or where it can fall.
- Air-dry removable pads according to instructions.
- Inspect the shell, liner, straps, buckle, anchors, and adjustment system regularly.
- Use only compatible manufacturer parts.
New and used buying checklist
- Verify the physical CPSC compliance label.
- Check model, lot, and manufacturing date against CPSC recalls.
- Confirm the helmet is intended for the activity.
- Try the size and head shape; do not assume one brand's size matches another.
- Inspect every strap, buckle, pad, and adjustment point.
- Read replacement, cleaning, and impact instructions before purchase.
- Prefer known impact history and complete parts; a new helmet generally provides clearer history than a used one.
Higher price does not compensate for poor fit. Choose the certified helmet that stays level, secure, comfortable, and compatible with the ride.
Limitations and safety notes
No helmet can prevent every head or brain injury. A helmet complements—not replaces—safe speed, visible riding, legal road behavior, bicycle maintenance, lights, and route selection.
This guide cannot confirm a particular model, damage, or fit. Follow the exact helmet instructions and consult the manufacturer or a knowledgeable bike shop. After a crash with head impact or symptoms such as loss of consciousness, worsening headache, repeated vomiting, confusion, weakness, seizure, or unusual behavior, seek emergency medical evaluation.
Frequently asked questions
Can I wear a beanie under my helmet?
Only if the helmet instructions permit it and fit remains secure. Thick layers can change position and strap tension.
Should the helmet cover my eyebrows?
It should sit low on the forehead, commonly about one or two finger-widths above the eyebrows, without obstructing vision.
Can I reuse a helmet after a small fall?
If the helmet received an impact, hidden damage is possible. Follow the maker's crash-replacement instruction rather than judging by appearance.
Is a used helmet a good bargain?
Only when certification, fit, age, parts, storage, and impact history can be verified. Unknown history makes safety evaluation difficult.
Do I need a different helmet for mountain biking?
Trail type, speed, coverage, and event rules matter. Use a helmet certified and designed for the specific riding activity.
Sources and evidence notes
- U.S. Consumer Product Safety Commission: Bicycle Helmet Guidance explains federal labeling, fit instructions, impact warnings, and certification.
- NHTSA: Learn to Bike Safely illustrates level forehead placement and V-shaped side straps.
- CPSC Bicycle Helmet Recalls provides current model-specific safety actions.
Conclusion and next steps
Check the inside CPSC label and recall status, measure your head, and follow the model's instructions. Set the helmet level and low, form V-shaped side straps, buckle and secure the chin strap, then test movement. Inspect before every ride and replace after impact, recall, damaged components, poor fit, or the manufacturer's stated service-life limit.






 Bombshell Parts Inc3.0 (18 reviews)
 Valley Bike & Ski4.0 (220 reviews)
 Trek Bicycle Henderson4.0 (669 reviews)
 Bernie's Bicycle4.0 (120 reviews)
 Bike Shop Inc4.0 (110 reviews)
 SAFETY CYCLE4.0 (171 reviews)
 How to Teach Kids to Ride a Bike: A Step-by-Step Guide for Parents
 Tips for Riding on Busy City Streets: Smart Strategies for Urban Cyclists
 Best US National Parks for Mountain Biking: Ride Epic Trails Across America
 Best Aero Helmets for Time Trials and Racing
 How to Clean and Lubricate Your Bike Chain Like a Pro
 10 Must-Have Items for Long-Distance Cycling Trips