
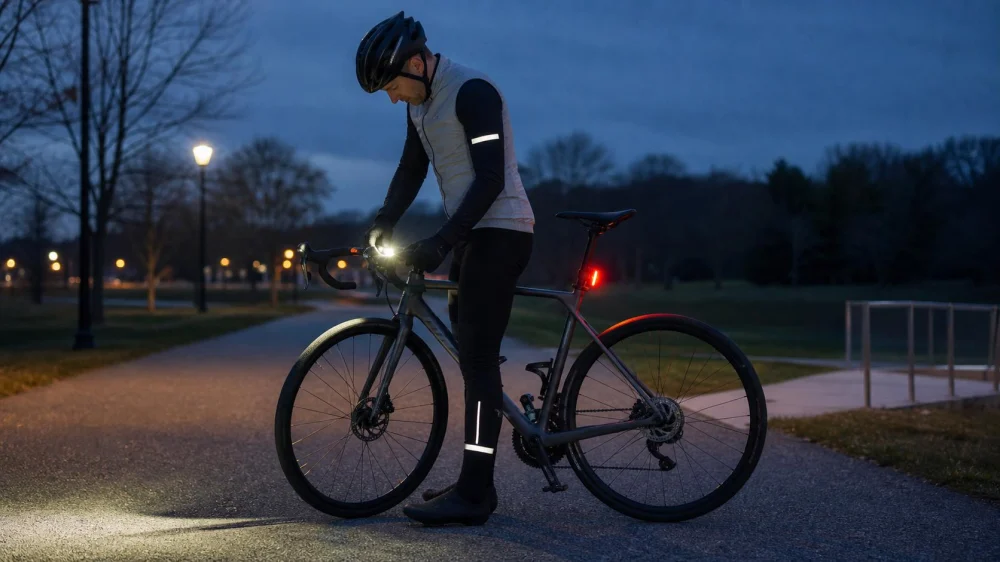
How to Choose and Check Bike Lights for Night Riding
On this page
Quick answer
For night riding, use a secure white front light and a visible red rear light, then add reflectors or reflective gear as a backup layer. Choose the front beam for your route, aim it so it helps without dazzling others, confirm both lights remain visible around bags and clothing, and test charge, modes, mounts, and controls before every ride.
The two jobs bike lights must do
A bicycle lighting system is the combination of active lights and passive reflectors used to help a rider see the route and be noticed by other road users. Those are related but different jobs.
- Being seen: A front and rear light help drivers, pedestrians, and other riders detect your position and direction of travel.
- Seeing the route: On an unlit street or trail, the front beam must also reveal pavement edges, surface damage, turns, debris, and other hazards early enough to respond.
A small visibility light may suit a well-lit urban route but may not reveal hazards on an unlit road. A powerful trail light may provide useful reach, but poor aiming can create glare. Match the system to the darkest and fastest part of the planned ride, not merely the starting point.
Check local lighting rules
Most U.S. states require active lights or reflectors for some nighttime bicycle use, but the details are not uniform. Requirements can differ by state and may cover light color, reflectors, visibility distance, or when lights must be used.
- Read the bicycle section of the current state driver handbook or transportation agency website.
- Check city, park, campus, and trail rules when riding on managed property.
- Confirm whether a steady light, reflector, or particular visibility distance is required.
- Treat legal minimums as a starting point; route conditions may justify additional lighting or reflective equipment.
Choose a front light
Start with route conditions rather than a single brightness number. Product ratings are not always measured or presented in the same way, so beam pattern, runtime, mounting stability, and usable modes matter alongside output.
- Best for lit streets: A compact white light with a clear visibility mode, dependable mount, and enough runtime for the trip plus a reserve.
- Best for dark roads or paths: A broader, controlled beam that reveals the riding line and reaches far enough ahead for the rider's speed.
- Best for technical night trails: A bike-mounted beam for the main line, with an additional compatible light only when needed for looking through turns. Follow trail access rules and product guidance.
- Not ideal: A narrow hot spot that hides the road edges, an uncontrolled beam that shines into others' eyes, or a light whose highest setting cannot last for the planned ride.
Controls should be usable with gloves if needed. A battery indicator that can be checked while stopped is more useful than discovering a low battery after entering a dark section.
Choose a rear light
A red rear light should remain visible from behind without being blocked by a saddle bag, rack load, long jacket, or the rear wheel. Favor a secure mount and a mode appropriate for the environment.
Very intense or rapid flashing can distract or make distance harder to judge in close groups. Follow local rules and event guidance, and consider a steady or less aggressive setting when riding in a paceline or shared space. Reflectors and reflective ankle or clothing details provide passive visibility if a battery fails, but they do not replace required active lights.
Mounting and aiming
- Attach each mount to a clean, compatible surface and tighten it according to the manufacturer's instructions.
- Confirm the front light points forward and the rear light points rearward rather than toward the ground or sky.
- Aim the front beam at the riding surface ahead. Check from another person's eye level to identify glare.
- Push and twist each housing gently. It should not rotate, slide, or release during normal vibration.
- Load all bags and put on riding clothing, then walk around the bicycle to check that neither light is obscured.
- After the first rough section, stop safely and recheck the aim.
Power and backups
Estimate runtime using the mode you will actually ride with, not only the longest advertised low-power mode. Cold conditions, battery age, frequent high-output use, and charging habits can reduce the practical margin.
- Charge early enough to verify that the cable, port, and indicator work.
- Carry a small backup front or rear light when loss of lighting would leave no safe way to finish.
- Keep charging ports sealed as the manufacturer directs and inspect for corrosion or damage.
- Do not charge a swollen, damaged, unusually hot, or wet battery. Stop using it and follow the maker's safety and disposal instructions.
- For replaceable cells, carry the correct type in a protective case rather than loose with metal objects.
Pre-ride light checklist
- Front light turns on, shows adequate charge, and produces a consistent white beam.
- Rear light turns on, shows adequate charge, and is clearly visible from behind.
- Required reflectors are clean, present, and not hidden.
- Mounts are tight; lenses are clean; housings and charging ports are undamaged.
- Beam aim suits the route and does not shine directly into other people's eyes.
- Bags, jacket hems, and cargo do not cover either light.
- Expected runtime exceeds the full ride with a reasonable reserve.
- Backup light or a safe exit plan is available for a dark route.
- The route and selected modes comply with current local rules.
Important limits and safety notes
Lights improve visibility but cannot ensure that another road user has seen you. Ride predictably, scan for turning vehicles and opening doors, obey traffic controls, and choose lower-traffic or separated routes when practical. Slow down when the beam does not provide enough information for the surface or stopping distance.
Do not ride with a failing mount, damaged battery, intermittent wiring, or a beam that goes dark over bumps. Ask a qualified bicycle shop to inspect unfamiliar electrical faults, dynamo wiring, or a mount that cannot be secured. Children and inexperienced riders may need adult supervision and a route that avoids night riding altogether.
Frequently asked questions
Do I need both a front and rear bike light?
For night or low-visibility riding, a white front light and red rear light are a practical baseline and may be legally required. Check current rules for the state and locality where you ride; reflectors may also be required.
How bright should a bicycle headlight be?
There is no single output suitable for every route. A lit street mainly calls for conspicuity, while an unlit route requires a usable beam pattern and reach for the rider's speed. Compare the manufacturer's beam, tested runtime, and intended use, then verify performance in a safe area.
Should the rear light flash or stay steady?
Use a legal mode that is noticeable without creating unnecessary glare or distraction. A steady mode can make position easier to track, while some riders use a pulse mode for conspicuity. Local laws, group-ride rules, traffic density, and battery runtime should guide the choice.
Can reflectors replace bike lights?
Reflectors depend on an outside light source and viewing angle. They are a useful backup layer, but they should not be treated as a substitute for active lighting where lights are required or route conditions demand them.
When should a bike light be replaced?
Replace or professionally assess it when the mount no longer holds, the housing or lens is cracked, water has entered, the battery is damaged or swollen, charging is unreliable, or output cuts out during vibration.
Sources and evidence notes
This guide applies general U.S. bicycle safety practice. The National Highway Traffic Safety Administration bicycle safety guidance recommends reflective gear plus a white front light, red rear light, and reflectors at night or when visibility is poor. NHTSA's overview of active-lighting laws notes that requirements vary among states. Product installation, charging, weather protection, and runtime claims should be checked against the light manufacturer's current instructions.
Next steps
Identify the darkest part of your usual route, check the applicable lighting law, and choose a front and rear system with secure mounts and sufficient practical runtime. Install and aim the lights in daylight, then perform the complete checklist in a low-traffic area before relying on them for a night ride.






 Bombshell Parts Inc3.0 (18 reviews)
 Valley Bike & Ski4.0 (220 reviews)
 Trek Bicycle Henderson4.0 (669 reviews)
 Bernie's Bicycle4.0 (120 reviews)
 Bike Shop Inc4.0 (110 reviews)
 SAFETY CYCLE4.0 (171 reviews)
 How to Teach Kids to Ride a Bike: A Step-by-Step Guide for Parents
 Tips for Riding on Busy City Streets: Smart Strategies for Urban Cyclists
 Best US National Parks for Mountain Biking: Ride Epic Trails Across America
 Best Aero Helmets for Time Trials and Racing
 How to Clean and Lubricate Your Bike Chain Like a Pro
 10 Must-Have Items for Long-Distance Cycling Trips