
How to Check Bike Saddle Height Without Guessing
On this page
Quick answer
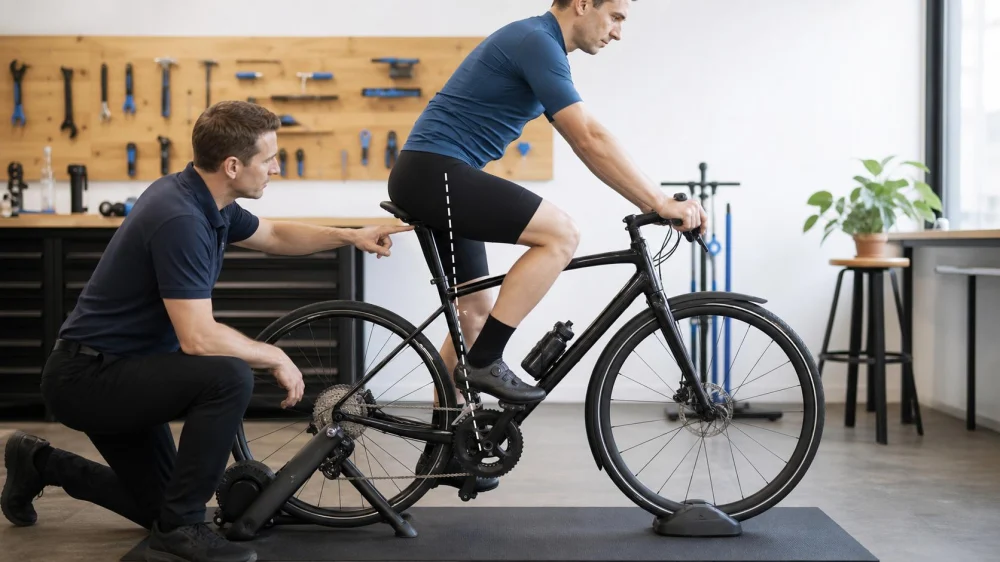
Start with the bike supported securely and set the saddle so your knee remains slightly bent at the bottom of a normal pedal stroke, without pointing the toes or rocking the hips. Mark the original position, change only a few millimeters at a time, and test briefly in normal shoes and pedals. Stop if pain, numbness, instability, or loss of control appears.
What saddle height controls
Saddle height is the vertical position of the seat relative to the bike’s crank and pedals. It affects knee extension, hip movement, foot angle, pedaling control, and how easily a rider can start or stop. It does not work independently of saddle fore-aft position, tilt, crank length, shoes, pedals, flexibility, riding style, and frame fit.
A rider does not generally need both feet flat on the ground while seated in a normal efficient riding position. At stops, many riders move forward off the saddle or lean the bike. Beginners who need extra confidence may temporarily choose a lower position, but should understand the pedaling tradeoff and practice stopping in a safe area.
Create a safe baseline
- Record the current setting. Measure from a repeatable frame point and mark the seatpost with removable tape.
- Check hardware limits. Never raise a seatpost beyond its minimum-insertion mark; confirm the clamp and frame are undamaged.
- Wear normal riding equipment. Shoe sole and pedal system change effective leg reach.
- Use support. Have a helper hold the bike or use an appropriate stable trainer; do not balance against an unstable object.
- Place the ball of the foot normally. Pedal backward slowly and observe the knee at the bottom without reaching through the ankle.
- Watch the pelvis. The hips should remain reasonably level instead of dropping side to side to reach the pedal.
A common rough screen uses the heel on the pedal with the leg nearly straight at the bottom, then returns the foot to its normal position to create knee bend. It is only a starting point, not a precision fit method.
Use a short riding check
Test in a traffic-free, level area. Start with easy gearing and a normal cadence. Ask a helper to observe from behind and the side, or record a brief video from a safe fixed position.
- Possible too high: hips rock, toes reach downward, the rider shifts side to side, or control at stops worsens.
- Possible too low: knee remains markedly compressed through the bottom of the stroke or pedaling feels crowded.
- Needs broader assessment: one-sided asymmetry, numbness, persistent knee or hip pain, saddle discomfort, or symptoms that change with hand position or effort.
These are clues, not diagnoses. Pain location alone cannot prove that saddle height is the cause.
Adjustment rules
- Change one variable at a time.
- Move the saddle in small increments rather than centimeters.
- Use the manufacturer’s clamp procedure and torque specification.
- Keep within seatpost and frame insertion limits.
- Retest starting, stopping, cornering, and easy pedaling.
- Keep notes on position, comfort, and symptoms.
- Return to the marked baseline if control or comfort worsens.
Best for self-adjustment: a healthy rider making a minor correction on a compatible bike with sound hardware. Not ideal for trial and error: acute pain, recent injury or surgery, significant leg-length difference, adaptive cycling needs, damaged carbon parts, or uncertainty about clamp specifications.
Fit checklist
- Original saddle position documented
- Minimum-insertion mark remains hidden
- Saddle clamp and rails visually sound
- Normal footwear and pedals used
- Slight knee bend without toe reaching
- Hips reasonably stable during easy pedaling
- Safe starts and stops confirmed
- No new pain, numbness, or loss of control
Limitations and important notes
This article provides general cycling guidance, not medical advice or a complete bike fit. Different bicycles and disciplines use different positions. Suspension movement, dropper posts, recumbent designs, children’s bikes, and adaptive cycles require different methods.
Stop riding for severe pain, sudden weakness, loss of sensation, chest symptoms, faintness, or inability to control the bike. Seek a qualified bike fitter, mechanic, physical therapist, or healthcare professional as appropriate when symptoms persist or the correct position cannot be achieved within hardware limits.
Sources and evidence notes
This guide reflects common bike-fitting practice: preserve a baseline, observe knee extension and pelvic stability, make small isolated changes, respect component limits, and test in the rider’s normal equipment. No universal angle or formula is claimed.
Frequently asked questions
Should my leg be completely straight?
No. With the foot in its normal pedaling position, the knee should retain some bend at the bottom rather than lock out.
Can I set height by inseam formula?
A formula can offer a starting estimate, but it does not capture shoes, pedals, crank length, anatomy, mobility, or riding goals.
Why do my hips rock?
The saddle may be too high, but reach, mobility, asymmetry, fatigue, gearing, or technique may also contribute. Reduce the variable and seek assessment if it persists.
Does saddle height fix knee pain?
Sometimes fit contributes, but pain has many possible causes. Do not use position changes as a diagnosis or continue riding through worsening symptoms.
How often should I recheck it?
Recheck after transport, a crash, seatpost removal, component changes, unusual slipping, or a change in shoes or pedals.
Next steps
Mark your current height, perform the supported baseline check, and make at most one small adjustment. Test on a quiet level surface; if hip motion, pain, numbness, or control problems remain, book a professional fit or mechanical inspection.






 Mr Bill's Bicycles4.0 (115 reviews)
 Momentum Ride Shop4.0 (81 reviews)
 Foy's Bike Shop4.0 (65 reviews)
 Cherry Blossom Cycles4.0 (48 reviews)
 Beacon Bikes4.0 (80 reviews)
 Shocking Rides Electric Bikes4.0 (7 reviews)
 How to Teach Kids to Ride a Bike: A Step-by-Step Guide for Parents
 Tips for Riding on Busy City Streets: Smart Strategies for Urban Cyclists
 Best US National Parks for Mountain Biking: Ride Epic Trails Across America
 Best Aero Helmets for Time Trials and Racing
 How to Clean and Lubricate Your Bike Chain Like a Pro
 10 Must-Have Items for Long-Distance Cycling Trips