
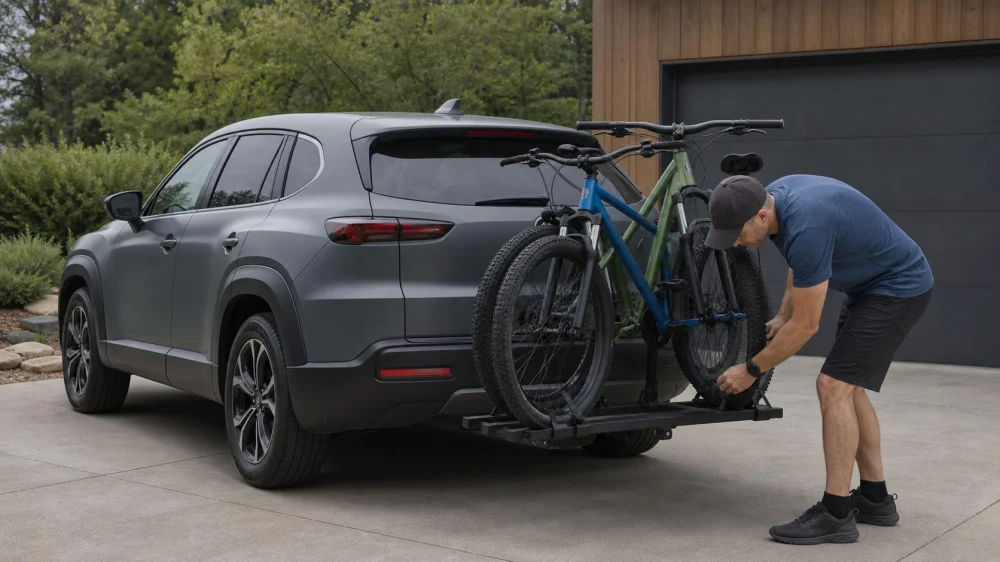
Bike Rack Safety Check Before You Drive Away
On this page
Quick answer
Before driving with a bike rack, verify that the rack fits the vehicle, hitch, roof bars, trunk, and bicycle; stay within every weight and capacity limit; secure all contact points; prevent wheels and handlebars from moving; and confirm lights, plate, camera, exhaust, doors, and driver visibility remain safe and legal. Push and pull each bike, then recheck straps after the first short drive.
Know the rack system
A vehicle bike rack is a load-carrying system attached to a hitch receiver, roof-bar system, trunk or hatch, truck bed, or another manufacturer-approved mounting point. The safe capacity is limited by the lowest-rated component, not by the rack’s largest advertised number.
Match the rack to bicycle weight, wheelbase, tire width, frame shape, and approved contact method. E-bikes can exceed rack or vehicle limits even after a removable battery is taken off. Carbon frames, fenders, step-through frames, and unusual wheels may require specific adapters or a different rack.
Load the bike correctly
- Install the empty rack first. Follow the current manual, use all required pins, locks, straps, feet, and torque settings, and confirm no part contacts fragile trim.
- Load in the specified order. Put bicycles only in approved positions and orientations; observe per-tray as well as total capacity.
- Secure primary retention. Attach wheel hooks, frame arms, cradles, or fork mounts exactly where the maker allows.
- Control movement. Secure wheels and handlebars so they cannot spin, strike another bike, contact the vehicle, or enter an exhaust stream.
- Remove loose items. Take off bottles, pumps, bags, computers, child seats, and accessories that are not approved to remain during transport.
- Perform a shake test. Push and pull the rack and each bicycle independently; investigate unusual play rather than adding random straps.
Best for a heavy e-bike: a rack specifically rated for its actual loaded weight and dimensions, often with a loading ramp. Not ideal: lifting beyond your control, clamping an unapproved frame area, or assuming a security cable is a structural tie-down.
Check the vehicle
- Confirm the license plate and required lights remain visible or use an approved auxiliary solution where needed.
- Check rear camera and sensor behavior without relying on them for clearance.
- Verify the rack cannot touch exhaust outlets or trap hot gases near tires, rims, batteries, or straps.
- Open the hatch or trunk only if the rack manual permits it in the loaded configuration.
- Measure or remember added height, width, and rear overhang.
- Test slow turns and driveway transitions for ground clearance.
- Make sure pedals, bars, and wheels cannot contact bodywork.
Roof racks require particular height awareness at garages, drive-throughs, low branches, and covered parking. Rear racks change vehicle length and may reduce departure clearance on steep slopes.
Recheck on the road
Drive smoothly and follow the rack manufacturer’s speed, road-surface, and weather limitations. Crosswinds, rough roads, sudden steering, and hard braking place dynamic loads on mounts and bikes.
Stop in a safe place after the first short segment and check all mounts, pins, wheel straps, arms, and bike-to-bike clearance. Recheck periodically and after rough pavement, strong wind, a stop, or a suspected strike. Do not inspect or adjust a load on a traffic shoulder when a safer location is available.
Departure checklist
- Vehicle, hitch or bars, rack, and bike compatibility confirmed
- Lowest capacity and each bicycle’s actual weight checked
- All pins, knobs, straps, clamps, and locks engaged
- Wheels, handlebars, and loose accessories controlled
- Plate, lights, visibility, sensors, and exhaust checked
- Added height and length understood
- Shake test passed without unusual movement
- First-stop recheck location planned
Limitations and important notes
Rack rules, plate and light requirements, allowable overhang, and load limits vary by vehicle, rack, state, and road. The vehicle owner’s manual, hitch or bar rating, rack manual, bicycle guidance, and applicable law take priority.
Stop driving if the rack shifts, a strap loosens, a bike contacts the road or vehicle, visibility becomes unsafe, a light or plate is obstructed unlawfully, or any component bends or cracks. Move to a safe location and unload or obtain professional help; do not improvise a roadside structural repair.
Sources and evidence notes
This guide reflects common load-securement and rack-manufacturer practice: verify compatibility, obey the lowest capacity, use designated retention points, control loose parts, inspect before travel, and recheck after initial settling. It does not provide model-specific torque or legal requirements.
Frequently asked questions
Can I exceed one tray’s limit if the total is under capacity?
No. Per-bike, per-tray, rack, hitch, bar, tongue-weight, and vehicle limits all apply.
Should I use extra bungee cords?
Only as permitted for secondary control. Elastic cords can loosen or damage parts and do not replace the rack’s required retention system.
Can I leave an e-bike battery installed?
Follow the bike and rack manufacturers. Removal may reduce weight and protect the battery, but exposed contacts and battery transport still need proper handling.
Why recheck after a short drive?
Straps and contact points may settle, revealing movement that was not obvious during loading.
Can I take the rack through an automatic car wash?
Usually it should be removed, but follow the rack, vehicle, and wash-facility rules. Brushes and machinery can catch protruding equipment.
Next steps
Find the manuals and ratings for the vehicle, mounting system, rack, and bikes. Load once at home, perform the complete checklist, photograph the correct setup for reference, and schedule a safe early recheck on every trip.






 Mr Bill's Bicycles4.0 (115 reviews)
 Momentum Ride Shop4.0 (81 reviews)
 Foy's Bike Shop4.0 (65 reviews)
 Cherry Blossom Cycles4.0 (48 reviews)
 Beacon Bikes4.0 (80 reviews)
 Shocking Rides Electric Bikes4.0 (7 reviews)
 How to Teach Kids to Ride a Bike: A Step-by-Step Guide for Parents
 Tips for Riding on Busy City Streets: Smart Strategies for Urban Cyclists
 Best US National Parks for Mountain Biking: Ride Epic Trails Across America
 Best Aero Helmets for Time Trials and Racing
 How to Clean and Lubricate Your Bike Chain Like a Pro
 10 Must-Have Items for Long-Distance Cycling Trips