
Bike Hand Signals: Plan Turns and Stops Without Surprises
On this page
- Quick answer
- What a hand signal can do
- Learn the common signals
- Build control before signaling
- Use a scan-signal-position sequence
- Handle intersections and lane changes
- Separate legal signals from group calls
- Visibility, weather, and night riding
- Limitations and important notes
- Sources and evidence notes
- Frequently asked questions
- Next steps
Quick answer
Use a clear hand signal before turning, changing lane position, slowing, or stopping—but only after checking that you can maintain bicycle control. Scan behind, identify a safe gap, signal long enough to be understood, return your hand to the handlebar when needed for steering or braking, then make the maneuver predictably. A signal communicates intent; it does not create the right-of-way or prove that another road user saw you.
This guide explains common U.S. bicycle communication practice. State and local laws can define required signals, timing, exceptions, lane use, and acceptable right-turn methods differently. Review the current vehicle or bicycle code and official rider guide where you ride.
What a hand signal can do
A bicycle hand signal is a visible advance notice of a rider’s intended change in direction or speed. It helps drivers, other riders, and pedestrians predict what may happen next.
A signal works best when it matches the rider’s position, speed, and later action. Signaling left while drifting right, pointing without checking traffic, or holding an arm out after the turn begins creates confusion.
A signal cannot:
- force a driver or pedestrian to yield;
- replace a shoulder check or traffic scan;
- make an unsafe gap safe;
- override a traffic signal, sign, lane marking, or local law;
- guarantee visibility in darkness, glare, rain, or blocked sight lines; or
- replace brakes, lights, reflectors, and predictable lane position.
Learn the common signals
Common U.S. bicycle signals include:
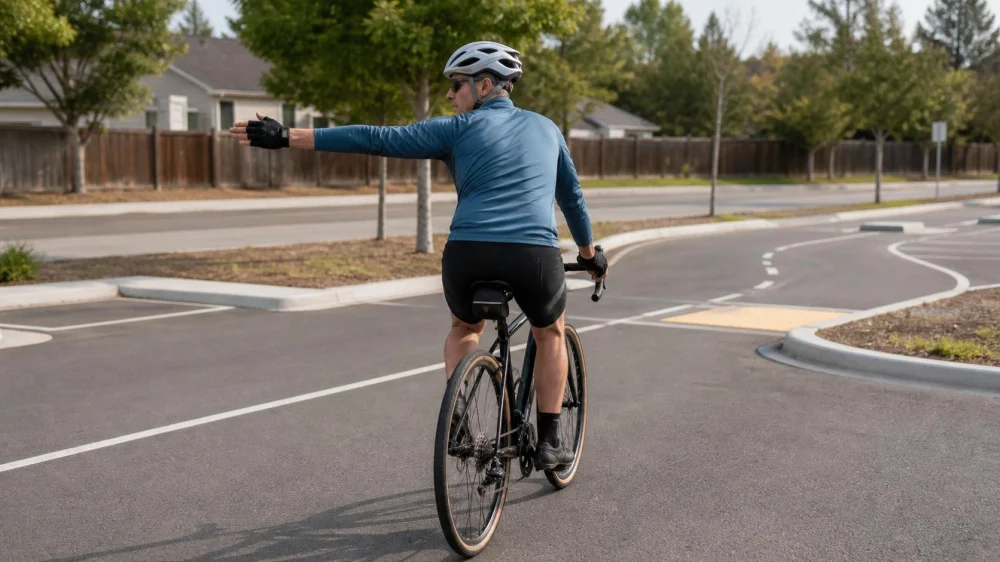
- Left turn: extend the left arm straight out to the side.
- Right turn: extend the right arm straight out to the side where local law permits; an alternative uses the left upper arm out with the elbow bent upward.
- Slow or stop: extend an arm to the side with the elbow bent downward and the palm facing back.
Use a flat, deliberate arm position rather than a quick finger point that can look accidental. Keep clothing, bags, and sleeves from hiding the signal.
The straight right-arm signal is often easy for following road users to interpret, while some vehicle codes also recognize the bent-left-arm version. Learn both so you can understand other riders, then use the method recognized where you ride and safest for your control.
Build control before signaling
Practice off-street in a flat, open area away from traffic. You should be able to ride a straight line, look over each shoulder, remove either hand briefly, brake smoothly, and return the hand without wobbling.
A practice progression:
- Ride straight with both hands relaxed on the bars.
- Glance over one shoulder while holding the line.
- Lift one hand slightly for one second, then replace it.
- Extend the arm into the full signal while looking ahead.
- Return the hand and make a controlled stop.
- Combine shoulder check, signal, hand return, and a gentle turn.
If the bike swerves, the front wheel shakes, or braking becomes uncertain, keep both hands on the handlebar and continue practicing in a safer setting. A bicycle that does not fit, has unstable steering, or has brake problems needs correction before road signaling practice.
Use a scan-signal-position sequence
Make communication part of a full maneuver:
- Plan: Identify the turn, lane change, stop, driveway, or obstacle early.
- Scan: Look ahead, to the sides, and behind without drifting.
- Judge: Wait for a safe gap and account for vehicle speed, surface conditions, and sight distance.
- Signal: Give a clear advance signal while maintaining control.
- Position: Move predictably into the lawful lane position only when safe.
- Control: Return the hand when needed to steer or brake.
- Confirm: Check again before crossing another path of travel.
- Complete: Turn, merge, slow, or stop smoothly and predictably.
Do not stare behind while continuing toward an intersection or obstacle. Use a quick scan, look forward again, and repeat if needed. A mirror can add information but does not replace a direct check of the relevant blind area.
Handle intersections and lane changes
Signal before entering the conflict area, not after the bicycle has already moved across a lane. Watch for turning vehicles, opening doors, pedestrians, driveway traffic, and drivers who may pass while you are preparing to turn.
For a left turn, use the method permitted by local law and appropriate to your skills. That may involve a vehicular left from the proper lane position or a two-stage crossing completed like a pedestrian. Signaling does not authorize a sudden move from the curb across multiple lanes.
For a right turn, watch for a vehicle beside or behind you that may turn across your path. A driver can see your signal and still misjudge your speed. Maintain a position that is visible and lawful, and be prepared to stop.
Before slowing or stopping unexpectedly, signal when control and time allow, then put both hands in position to brake. Do not keep an arm extended if you need that hand for a safe stop.
Separate legal signals from group calls
Group rides often use additional gestures or spoken calls for potholes, debris, parked cars, riders slowing, or changes in formation. Those are group conventions, not necessarily traffic-law signals.
At the ride briefing, confirm:
- which legal turn and stop signals everyone will use;
- which obstacle gestures are expected;
- whether calls should be repeated down the group;
- who makes route decisions; and
- what to do when a rider cannot safely remove a hand.
Do not point at an obstacle if doing so makes you ride into it or another rider. Call it verbally, hold your line, and let following riders maintain enough spacing to respond.
Visibility, weather, and night riding
Rain, cold, wind, loose surfaces, heavy steering loads, and poor visibility can reduce the time or control available for signaling. Slow earlier and make lane decisions sooner.
At night, use the lights and reflectors required by law. Reflective gloves or sleeves can make an arm more visible, but they do not replace bicycle lighting. Avoid signaling against glare or a visually busy background when you can change timing or position safely.
Keep both hands on the bars when a gust, pothole, gravel, rail track, braking demand, or another hazard makes one-handed control unsafe. Predictable slowing and positioning may communicate more effectively than an unstable signal.
Limitations and important notes
- Never assume eye contact means a driver will yield.
- Do not wave a vehicle through when another road user may be hidden.
- A hand signal does not excuse failure to yield where required.
- Children and new riders need control and scanning practice before signaling in traffic.
- Adaptive cycles, cargo bikes, recumbents, tricycles, and riders with limited arm movement may need other lawful communication strategies.
Seek local instruction when traffic speed, multi-lane turns, disability access, or bike design makes standard signaling difficult. A qualified cycling instructor can help adapt practice without placing the rider in traffic too soon.
Sources and evidence notes
NHTSA guidance emphasizes predictable riding, looking over the shoulder, signaling before changing lane position or turning, and practicing control away from traffic. Its hand-signal materials show common left, right, alternative right, and slowing or stopping signals.
Local vehicle codes remain the source for legally required signal form and timing.
Frequently asked questions
How long should I hold a bike hand signal?
Long enough to be understood while preserving control and following local law. Signal in advance, then return your hand when needed for steering or braking.
Which right-turn signal should I use?
Check local law. Many riders use the right arm straight out; some jurisdictions also recognize the left arm bent upward. Use a clear lawful signal you can perform safely.
Do I signal if no cars are visible?
Follow local law and use predictable habits. A pedestrian, rider, or vehicle may be outside your current view, and consistent practice helps make signaling automatic.
What if I cannot ride one-handed?
Practice in a protected area or work with an instructor. In traffic, prioritize control, slow early, and use another lawful strategy appropriate to your bike and abilities.
Does pointing at a pothole count as a turn signal?
No. Obstacle pointing is a group communication gesture and can be misunderstood by traffic. Keep legal turn and stop signals distinct.
Next steps
Review the hand-signal rules for your state and city, then practice shoulder checks, straight-line riding, one-handed control, signals, and braking in an empty protected area. On the road, plan early, scan, signal, position, return your hand for control, check again, and complete the maneuver predictably.






 Beach E-Bikes Rentals & Sales4.0 (32 reviews)
 Trek Bicycle Murfreesboro5.0 (289 reviews)
 Albabici4.0 (12 reviews)
 Pops Bike Shop4.0 (143 reviews)
 PEV Connection, LLC5.0 (31 reviews)
 Trek Bicycle Allentown4.0 (553 reviews)
 How to Teach Kids to Ride a Bike: A Step-by-Step Guide for Parents
 Tips for Riding on Busy City Streets: Smart Strategies for Urban Cyclists
 Best US National Parks for Mountain Biking: Ride Epic Trails Across America
 Best Aero Helmets for Time Trials and Racing
 How to Clean and Lubricate Your Bike Chain Like a Pro
 10 Must-Have Items for Long-Distance Cycling Trips