
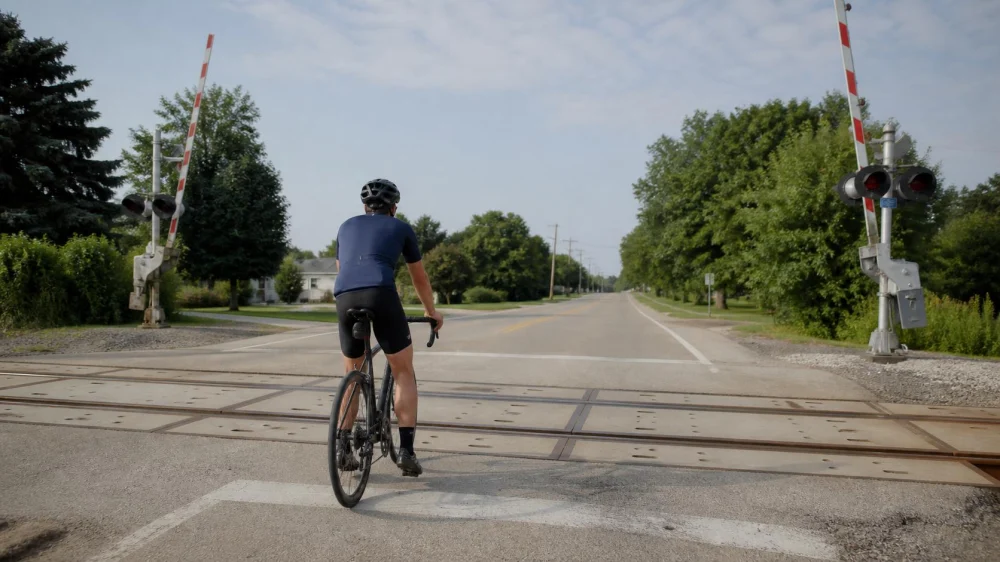
Railroad Crossings by Bike: Slow, Square Up, and Scan
On this page
Quick answer
Approach railroad tracks slowly, scan for trains and traffic, and cross only when signals and conditions allow. Position the bicycle so the front wheel meets the rail as close to perpendicular as practical, especially when rails are wet or angled. Avoid sudden braking or turning on the rail, leave space from other riders, and walk the bike if alignment or surface conditions are unsafe.
Why it matters
A bicycle railroad-crossing plan reduces the risk that a narrow tire slips on a smooth rail or drops into the flangeway beside it. The key is combining legal train awareness, traffic control, speed reduction, and a stable crossing angle.
This guide is for U.S. road and path riders. Crossing geometry, traffic, pavement, signals, and local laws vary. Trains always require substantial stopping distance; never ride around lowered gates or ignore active warnings.
Practical checklist
- Look and listen early for trains, gates, lights, bells, vehicles, pedestrians, and riders.
- Reduce speed before the tracks while the tires are still on predictable pavement.
- Check behind before changing lane position to create a safer crossing angle.
- Aim to meet each rail near a right angle without swerving into traffic.
- Keep the bicycle upright, pedals level when helpful, and steering inputs smooth over the rail.
- Allow extra caution for rain, ice, debris, broken pavement, multiple tracks, trailers, or narrow tires.
- Dismount and walk only when you can do so in a safe place without lingering on the tracks.
Step-by-step plan
- Read the crossing before entering. Identify rail angle, surface gaps, lane width, traffic controls, and an escape-free route all the way across.
- Obey every active warning. Stop at gates, lights, bells, flaggers, or approaching trains and wait until the crossing is fully open and safe.
- Communicate your line. Signal and check traffic before moving laterally; riders behind need space to adjust without overlapping wheels.
- Set speed and angle on the approach. Brake before the rail, then cross with a stable posture and minimal steering or braking on the slick surface.
- Cross each track deliberately. Multiple rails may have different angles. Keep scanning and do not stop between them.
- Use the walking option early. If traffic, gaps, wet rails, or alignment make a controlled ride uncertain, dismount before the hazard and use a lawful route.
- Report serious defects. Use the posted crossing information or appropriate local authority when damaged pavement or a dangerous gap needs attention; do not attempt repairs.
For recurring routes, note the crossing direction, rail angle, traffic volume, surface condition, and a safer alternate route. Conditions can change after roadwork or weather, so reassess every visit.
Limits and warning signs
A perpendicular angle reduces common wheel-capture and slip risk but cannot make a crossing safe during an active train warning, heavy traffic, poor visibility, or severe surface damage. Some bicycles, trailers, adaptive cycles, and mobility needs require more space and planning.
Never enter when gates are lowering, warnings are active, a train is visible or audible, or there is not enough clear space beyond the tracks. Call emergency services for an immediate hazard or crash and use posted railroad emergency contacts for crossing-specific dangers when appropriate.
Frequently asked questions
Why is a shallow angle risky?
A tire can slide along the smooth rail or enter the adjacent gap. A more perpendicular approach helps the tire roll across instead.
Should I brake while crossing the rail?
Set a controlled speed beforehand. Sudden braking or steering on a wet or smooth rail can reduce traction.
Can I ride around a gate if no train is visible?
No. Active crossing controls must be obeyed. A train may be closer or faster than it appears, or another train may be hidden.
What should a group do?
Increase spacing, communicate the hazard, and let each rider choose a safe line. Do not force riders to cross side by side.
Sources and evidence
This guidance reflects common bicycle handling and railroad-crossing safety principles: obey train controls, reduce speed before the hazard, cross rails near perpendicular, avoid abrupt inputs, and walk when conditions exceed the rider's control.
Conclusion and next steps
On your next route review, identify every angled rail crossing and plan lane position before reaching it. Slow early, check traffic, square the wheel, and keep a walking alternative. The safest decision always begins before the front tire reaches the rail.






 E Life Cycles4.0 (17 reviews)
 Bay Head Bikes5.0 (8 reviews)
 Bicycle Sport Uptown4.0 (122 reviews)
 Mission Hills Bicycle Shop3.0 (86 reviews)
 Last Mile Marin4.0 (45 reviews)
 Loam Roamer5.0 (1 reviews)
 How to Teach Kids to Ride a Bike: A Step-by-Step Guide for Parents
 Tips for Riding on Busy City Streets: Smart Strategies for Urban Cyclists
 Best US National Parks for Mountain Biking: Ride Epic Trails Across America
 Best Aero Helmets for Time Trials and Racing
 How to Clean and Lubricate Your Bike Chain Like a Pro
 10 Must-Have Items for Long-Distance Cycling Trips