
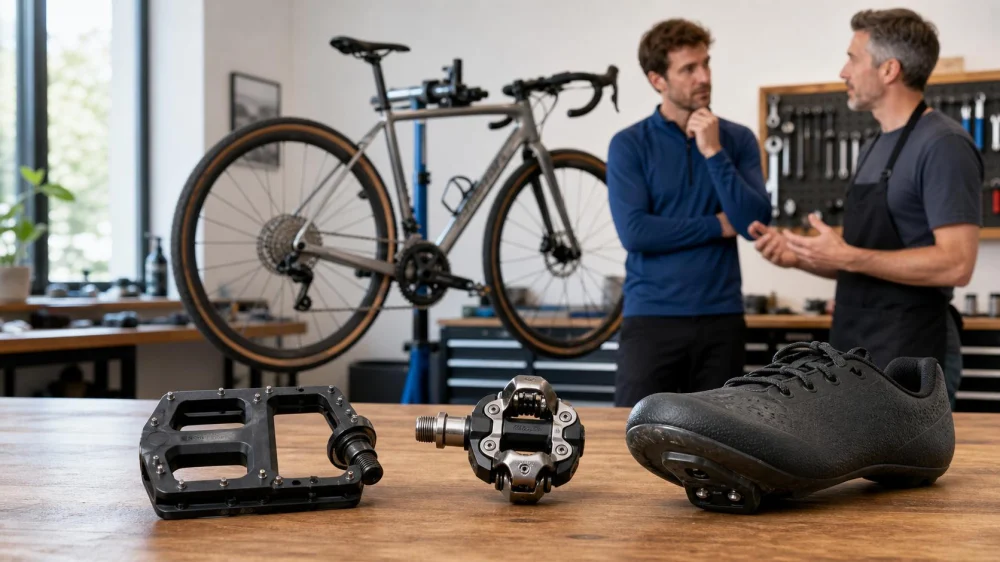
Flat vs. Clipless Pedals: Choose for Your Ride and Skills
On this page
Quick answer
Choose flat pedals when easy foot removal, ordinary shoes, frequent stops, walking, or learning confidence matter most. Consider clipless pedals when you want a secure shoe-to-pedal connection and are willing to buy a compatible shoe-cleat-pedal system and practice releasing before riding in traffic or technical terrain. Neither design is automatically best for every cyclist.
Make the choice around your actual route, surfaces, stop frequency, off-bike walking, skill, mobility, footwear, and maintenance habits. A bike shop can confirm compatibility, install cleats, check pedal threads, and help with initial positioning.
How the two systems work
Flat platform pedals
A flat pedal supports a shoe on a platform without mechanically attaching it. Size, shape, pins or molded traction, and the shoe’s rubber compound affect grip. You can lift or place a foot without a release motion, but a wet, muddy, worn, or poorly matched shoe-pedal combination may slip.
Good flat-pedal shoes usually have a stable sole and useful grip on the pedal. Long laces, loose straps, and wide trouser cuffs should be secured away from the crank, chain, and wheel. Very soft running shoes may flex around a small pedal and feel less stable on long rides.
Clipless pedals
Despite the name, a clipless system connects a cleat on a cycling shoe to a spring-loaded pedal mechanism. Most systems engage by pressing the cleat into the pedal and release through a defined heel or foot movement. The exact movement, adjustment, cleat, and maintenance requirements come from the manufacturer.
Two-bolt systems commonly use a recessed cleat and a treaded shoe that is easier to walk in. Three-bolt road systems commonly use a larger cleat that projects below a stiff, smooth sole. These categories are helpful, but compatibility is model-specific rather than guaranteed by bolt count alone.
Hybrid and dual-sided options
Some pedals provide a flat platform on one side and a clipless mechanism on the other. They can support mixed use, but the desired side may not face up when you start. Practice locating it without looking down for long periods. Other pedals have clipless engagement on both sides for faster access.
Compare the factors that matter
Stops and foot removal
Flat pedals allow a direct step off. This can be valuable for stop-and-go commuting, casual rides, skill sessions, or riders who are still building balance and starting confidence. Clipless pedals require an intentional release before the stop. That action can become familiar with practice, but it still adds a system to manage.
Foot security
A clipless mechanism holds the foot in a repeatable relationship to the pedal and can reduce unintended separation over bumps. Flat pedals rely on platform, pins, shoe grip, foot pressure, and technique. Aggressive pins can grip well but may also injure a shin during a missed pedal, so protective equipment and careful handling matter.
Walking and destination use
If a ride includes work, shopping, transit, stairs, hike-a-bike sections, or long café stops, compare off-bike use. Recessed two-bolt shoes are often easier to walk in than protruding three-bolt road cleats. Ordinary shoes used with flats may be simplest, provided their soles grip and laces are controlled.
Weather and contamination
Mud, grit, ice, and debris can affect cleat engagement and release. Wet surfaces can reduce walking traction, especially with exposed road cleats. Flat-pedal grip also changes with water, mud, worn pins, and footwear. Inspect and clean the system according to its manual rather than assuming either design is weather-proof.
Fit and movement
A fixed cleat position influences where the foot meets the pedal. Some systems allow rotational movement called float, but its amount and direction vary. Poorly positioned cleats or unsuitable shoes can create discomfort. New or persistent foot, ankle, knee, or hip symptoms deserve attention rather than being treated as a normal adjustment period.
Cost and upkeep
Flats may work with existing shoes, although cycling-specific shoes can improve grip and support. Clipless use normally requires compatible pedals, cleats, and shoes plus periodic cleat inspection and replacement. Include installation, fitting, maintenance, and spare-cleat availability in the budget.
Match pedals to your riding
Casual paths and family rides
Flats are often practical when rides are short, stops are frequent, speeds are moderate, and riders want ordinary footwear. Choose a broad platform with secure bearings and enough traction for the intended shoe.
Urban commuting
Count intersections, dismounts, stairs, office walking, and weather exposure. Flats or recessed-cleat systems may suit these mixed demands. A dual-sided pedal can offer flexibility, but practice finding the appropriate face before using it in traffic.
Road training and events
Many road riders prefer three-bolt clipless systems and stiff shoes for a stable connection. Others use two-bolt systems for easier walking or flats for simplicity. Event rules, aid-station walking, travel logistics, and your ability to release under fatigue should influence the choice.
Gravel and bikepacking
Expect dirt, water crossings, hike-a-bike sections, and long hours. Compare recessed cleats with flat shoes for walking grip, mud shedding, repair options, and foot comfort. A system that works on a dry test ride may behave differently after contamination.
Mountain biking
Both designs are used successfully. Flats allow immediate foot repositioning and can support learning some skills. Clipless systems provide a consistent connection through rough terrain but require reliable release habits. Trail difficulty, riding style, weather, and coaching matter more than identity labels such as “beginner” or “serious rider.”
Indoor cycling
Ask the studio for the exact pedal and cleat standard before class. A shoe that fits one indoor-bike brand or one face of a dual pedal may not fit another. Arrive early so staff can confirm setup and release technique.
Check shoe, cleat, and pedal compatibility
Do not buy by appearance alone. Treat clipless equipment as a complete system:
- Identify the exact pedal make and model.
- Read its current user manual and approved-cleat list.
- Confirm the shoe has the correct mounting pattern and enough sole clearance.
- Use the specified bolts, washers, adapters, torque, and thread treatment.
- Check whether the cleat offers the intended release behavior and float.
- Verify that the installed cleat engages and releases on both pedals.
A two-bolt shoe is not proof that every two-bolt cleat will work with a selected pedal. Look-alike cleats may have different geometry or release behavior. Do not mix components unless the manufacturers explicitly approve the combination.
Check flat-pedal compatibility too
- Does the shoe outsole make broad contact with the platform?
- Do pins engage the rubber without trapping the foot unpredictably?
- Is the platform wide enough for stable support without creating a new ground-strike concern?
- Can laces and clothing be contained?
- Does the pedal spin smoothly without side play or damage?
A safer clipless transition plan
Do not make the first clipless ride a crowded commute, group event, steep trail, or long route. Learn the mechanism in stages and follow the manufacturer’s manual.
- Get the system installed and checked. Have a qualified mechanic confirm pedal installation, cleat hardware, and starting position.
- Learn the release motion off the road. Use a stable trainer or another manufacturer-approved setup with assistance if needed.
- Practice both feet. Engage and release repeatedly without looking down.
- Choose a consistent stop foot. Then also learn to release the other side for unexpected situations.
- Move to a traffic-free, level area. Practice starts, planned stops, slow turns, and emergency stops.
- Release early. Unclip before reaching an intersection, obstacle, steep start, or uncertain surface.
- Add complexity gradually. Introduce light traffic, hills, groups, or uneven terrain only after release is reliable.
Some systems allow spring-tension adjustment. Use only the documented range and method. Lighter retention may help learning in some systems, but too little or an incompatible cleat can lead to unintended release. Test after any adjustment.
Plan the first routes
Select quiet loops with few intersections, predictable pavement, easy turnaround points, and no requirement to rush. Avoid carrying unfamiliar loads. Tell a companion you are learning the system, and keep enough distance to stop early.
Setup and maintenance checks
Before each ride, make a quick visual and functional check:
- Pedals are secure, undamaged, and rotate as expected.
- Cleat bolts are present and the cleat has not shifted.
- Cleats, pedal mechanisms, flat platforms, and shoe soles are free of interfering debris.
- Release and engagement feel normal on both sides.
- Flat-pedal pins are present and not dangerously loose or damaged.
- Shoes close securely, with laces and straps away from moving parts.
Cleats and pins wear. A changed release feel, excessive movement, difficulty engaging, unexpected release, damaged hardware, bearing play, or a crack requires inspection before the next ride. Follow replacement indicators and service intervals in the product documentation.
After a fall or pedal strike
Check the pedal body, axle, cleat, shoe sole, crank threads, and closure before riding again. A component can be damaged without an obvious break. Seek professional inspection if engagement, release, alignment, or pedal rotation has changed.
Limitations and safety notes
Marketing claims about efficiency and control do not determine what is safest or fastest for an individual. Fitness, technique, route, confidence, shoe fit, system setup, and practice all influence the result. This guide does not rank specific brands or substitute for the current manual.
Changing pedals or cleat position can affect bike fit and movement. Make small, documented adjustments and test them in a controlled environment. Seek qualified bike-fit or healthcare input for persistent pain, numbness, weakness, or repeated loss of control.
Wear a properly fitted bicycle helmet and use the lights, reflectors, visibility equipment, and other gear required for the route and law. Pedal choice does not replace braking, scanning, signaling, speed control, or defensive riding.
Frequently asked questions
Are clipless pedals only for experienced cyclists?
No. Riders can learn them at different stages, but the release motion requires practice. Start in a controlled setting and do not add traffic or technical terrain until starting and stopping are reliable.
Are flat pedals less efficient?
The answer depends on the rider, task, cadence, technique, shoe, and measurement. Clipless systems create a secure connection that many riders value, but that does not make flats unsuitable for commuting, training, mountain biking, or long rides.
Can I use ordinary sneakers on flat pedals?
Often yes, if the sole grips the platform and the shoe is secure. Avoid loose laces, very slippery soles, and footwear that cannot stay stable on the pedal. Test in a low-risk area.
Can one cycling shoe work with every clipless pedal?
No. Mounting pattern, cleat model, pedal mechanism, adapters, and sole clearance must all be compatible. Verify the exact combination in the manuals or with a bike shop.
Why do clipless pedals have that confusing name?
The term distinguished them from older pedals with toe clips and straps. Modern clipless systems still “clip in” through a cleat and binding mechanism.
Should I switch pedals just before an event?
Avoid introducing an unfamiliar system immediately before a high-demand ride. Allow time for installation, fit adjustment, repeated release practice, short test rides, and any needed changes.
Sources and evidence notes
- Shimano SPD pedal user manual provides model-specific safety, engagement, release, cleat, inspection, and adjustment instructions.
- Cycling UK guide to clipless pedals and cleats explains common system formats, road and off-road use, and walking considerations.
- REI Expert Advice: How to choose bike pedals compares flat, clipless, and hybrid systems and emphasizes shoe-cleat-pedal compatibility and practice.
Manufacturer instructions control installation and use for a specific product. General guides help frame the decision but cannot confirm an individual component combination.
Next steps
Write down your three most common ride types, the number of stops, how far you walk, and the surfaces you encounter. Take that list and your bike to a qualified shop. If you choose clipless, confirm the complete compatibility chain and schedule controlled release practice before the first real route.






 Bike Alley4.0 (87 reviews)
 AL's Bike Shop4.0 (211 reviews)
 e-RYDE4.0 (77 reviews)
 Brooklyn Bikery4.0 (189 reviews)
 Edgartown Bicycles (Sales, Repairs & Rentals)4.0 (86 reviews)
 Bike Mart4.0 (946 reviews)
 How to Teach Kids to Ride a Bike: A Step-by-Step Guide for Parents
 Tips for Riding on Busy City Streets: Smart Strategies for Urban Cyclists
 Best US National Parks for Mountain Biking: Ride Epic Trails Across America
 Best Aero Helmets for Time Trials and Racing
 How to Clean and Lubricate Your Bike Chain Like a Pro
 10 Must-Have Items for Long-Distance Cycling Trips