
Cycling Water Bottle Setup: Fit, Clean, and Carry
On this page
- Quick answer
- Treat the bottle and cage as one system
- Choose a bottle you can use and clean
- Mount the cage without stressing the frame
- Test retention and reach while stationary
- Clean and dry the bottle completely
- Reach for a bottle only when control is stable
- Limits and important notes
- Frequently asked questions
- Sources and evidence notes
- Conclusion and next steps
Quick answer
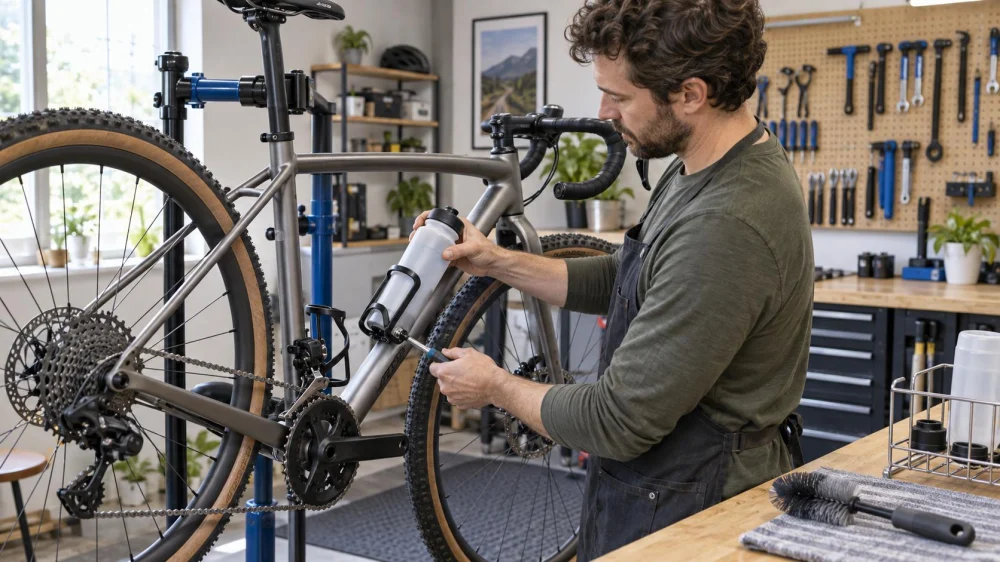
Use a bottle and cage combination that holds securely without interfering with the frame, cables, suspension, pedaling, or steering. Confirm bolts are tightened to the bicycle or cage specification, then test removal and replacement while stationary. Clean bottles after use, inspect caps and valves, and replace damaged items. On the ride, reach only when conditions allow stable control, or stop before drinking.
Treat the bottle and cage as one system
A bicycle bottle setup includes the bottle, cap or valve, cage, mounting hardware, frame location, and the rider's reach. Secure retention matters because a dropped bottle can interfere with the bicycle or create a hazard for others.
This guide is for adult riders using common frame-mounted bottles in the United States. Bicycle, cage, and bottle designs vary. Follow the frame and component instructions, especially for carbon frames, unusual mounts, adapters, and rough terrain.
Choose a bottle you can use and clean
- Pick a food-contact bottle intended for repeated drinking use.
- Confirm that the diameter and shape match the cage.
- Choose a size that clears the frame and can be removed along the available path.
- Check that the cap closes securely and the valve can be cleaned or replaced.
- Avoid bottles with cracks, persistent odors, damaged threads, or surfaces that cannot be cleaned.
- Use insulation only when the additional diameter and weight still fit the cage and frame.
Mount the cage without stressing the frame
- Clean the mounting area and inspect the threaded inserts.
- Use the correct bolts and washers specified for the frame and cage.
- Start bolts by hand to avoid cross-threading.
- Position the cage for bottle clearance and cable or suspension movement.
- Tighten hardware evenly to the specified torque; do not guess or overtighten.
- Recheck the cage after the first rides and after rough transport.
Stop if an insert spins, a bolt will not thread smoothly, or the mount is cracked or loose. A bicycle technician should assess the repair.
Test retention and reach while stationary
Insert the full bottle and shake the bicycle gently over a soft surface. Confirm that the bottle cannot move into a crank, wheel, cable, suspension unit, or steering path. Check the fit with any frame bag or pump installed.
Practice removing and replacing the bottle while the bicycle is supported and you are not moving. If the reach twists your torso excessively or the opening is too tight, try a side-entry cage, different bottle size, or another approved mount.
Clean and dry the bottle completely
- Empty the bottle after the ride instead of repeatedly topping it up.
- Disassemble the cap and valve only as the manufacturer directs.
- Wash with the permitted tools, detergent, water temperature, or dishwasher setting.
- Rinse thoroughly and let every part dry with airflow.
- Inspect hidden valve channels, threads, seals, and the bottom for residue or damage.
- Store the bottle open and dry rather than sealed with trapped moisture.
Reach for a bottle only when control is stable
Look ahead and choose a straight, predictable section with adequate space before moving one hand. Avoid drinking during turns, descents, technical terrain, traffic interactions, poor surfaces, group changes, or strong gusts. Keep the bottle low and close to the frame during replacement.
If you are not confident holding the line, stop in a safe place. Hydration planning does not require drinking while moving; a planned stop is a valid choice.
Limits and important notes
This article does not prescribe how much or what to drink. Fluid needs depend on the rider, weather, duration, intensity, food, health, and medical advice. Bottles also do not keep liquids safe indefinitely; follow product guidance and appropriate food-safety practice for water or mixed drinks.
Replace a cage that is cracked, badly bent, or unable to retain a compatible bottle. End the ride to retrieve a dropped bottle only when you can stop without creating a hazard.
Frequently asked questions
Why does my bottle eject on rough roads?
The cage may not match the bottle, may be worn or damaged, or may lack enough retention for the terrain. Check compatibility and mount condition rather than bending components blindly.
Can I mount a bottle cage anywhere on the frame?
Use approved mounting points or a system specifically allowed by the frame and accessory manufacturer. Improvised clamps can damage the frame or interfere with moving parts.
How often should I replace a cycling bottle?
Replace it when it is cracked, deeply scratched, deformed, persistently odorous, leaking, or no longer cleanable according to its instructions. Time alone is not the only factor.
Sources and evidence notes
This article uses general bicycle accessory and reusable bottle care principles: verify compatibility, tighten to specification, test stationary, clean all parts, and maintain control before reaching. The frame, cage, bottle, and cleaning instructions plus a qualified bicycle technician govern a specific setup.
Conclusion and next steps
Fill the bottle, fit it to the cage, and check every clearance before the next ride. Practice the motion while stationary and choose a safe stop if the route does not allow stable one-handed control. After the ride, empty, clean, inspect, and fully dry the system so it is ready rather than merely refilled.






 Kirk's Bike Shop4.0 (189 reviews)
 Hardin's Bicycle Shop4.0 (61 reviews)
 Greenway 500 Bike Shop5.0 (66 reviews)
 Poynter Brothers Pro Bike and Skate Shop4.0 (75 reviews)
 Buckskin Bikes4.0 (115 reviews)
 STS Bicycles5.0 (2 reviews)
 How to Teach Kids to Ride a Bike: A Step-by-Step Guide for Parents
 Tips for Riding on Busy City Streets: Smart Strategies for Urban Cyclists
 Best US National Parks for Mountain Biking: Ride Epic Trails Across America
 Best Aero Helmets for Time Trials and Racing
 How to Clean and Lubricate Your Bike Chain Like a Pro
 10 Must-Have Items for Long-Distance Cycling Trips