
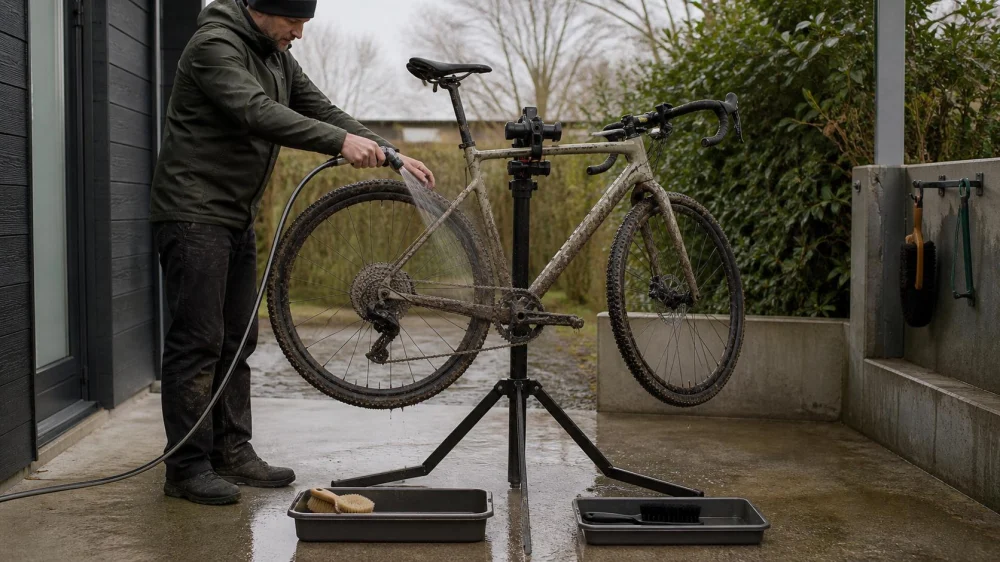
How to Clean a Bicycle After a Wet or Muddy Ride
On this page
Quick answer
After a wet or muddy ride, remove bottles and electronics, rinse loose dirt with low-pressure water, wash from the clean upper areas toward the dirty drivetrain, rinse, and dry the bicycle. Clean and lubricate the chain with products suited to the bike, keeping all lubricant and residue away from brake rotors, rims, and pads. Finish with a damage and function check before the next ride.
This routine is for conventional bicycles and many e-bikes used in the United States, but component instructions vary. Check the bicycle, motor, battery, suspension, brake, and finish manufacturers' cleaning guidance before applying water, chemicals, or lubricant.
Inspect before cleaning
Do a quick inspection while the evidence of the ride is still visible. Note impacts, fresh scratches, bent parts, tire damage, unusual noises, or a component that shifted. Heavy mud can hide damage, but washing immediately without looking can remove clues about where a leak or rub began.
- Stop using a bicycle with a cracked frame or fork, loose wheel, damaged tire, leaking hydraulic component, unreliable brake, or visibly bent structural part.
- For an e-bike, turn the system off and follow its battery-removal or port-cover instructions. Do not assume electrical parts are pressure-wash safe.
- Let hot brakes, motors, and other parts cool before adding water.
- Photograph uncertain damage and contact a qualified bike shop when the correct inspection is unclear.
Use bike-safe cleaning supplies
- Low-pressure hose, gentle spray bottle, or buckets of clean water
- Bicycle-compatible cleaner mixed as directed
- Soft frame sponge or mitt that never touches the drivetrain
- Separate brushes for tires, cassette, chainring, and derailleur areas
- Clean absorbent towels
- Chain cleaner or degreaser approved for the drivetrain when needed
- Correct chain lubricant for the riding conditions and component
- Work stand when available, or a stable method approved for the bike
Avoid household solvents, abrasive pads, stiff metal brushes, and cleaners that the finish or component maker does not approve. Keep one set of tools for braking components and another for oily parts to reduce contamination.
Step-by-step post-ride cleaning
- Choose a safe work area. Use stable ground with suitable drainage and follow local rules for water and chemical runoff.
- Remove accessories. Take off bottles, bags, lights, computers, pumps, and removable batteries as instructed. Clean them separately according to their guidance.
- Remove heavy debris gently. Let thick mud soften with low-pressure water. Do not scrape the frame with a dirty tool.
- Rinse from a distance. Direct a gentle stream from top to bottom. Avoid forcing water at bearing seals, suspension wipers, motor interfaces, charging ports, cable openings, and electronic controls.
- Wash the frame and fork. Use clean solution and a soft tool, working from cleaner areas toward the lower frame. Include the underside of tubes, fork crown, and areas behind the wheels.
- Wash wheels and tires. Rotate each wheel, clean tread and sidewalls with an appropriate tool, and inspect for embedded debris or damage.
- Clean the drivetrain separately. Use dedicated brushes and only the amount of degreaser needed.
- Rinse completely. Remove cleaner before it dries, again avoiding concentrated pressure.
- Dry immediately. Use clean towels and allow water to drain from frame openings in the orientation recommended for the bike.
Clean and relubricate the drivetrain
A muddy chain can carry grit through the chainring, cassette, and derailleur pulleys. Wipe away surface contamination first. When a deeper clean is needed, apply a compatible product to the drivetrain rather than spraying across the bicycle. Follow dwell and rinse instructions.
Let the chain become appropriately dry before lubricating. Apply the specified lubricant to the chain rollers according to its directions, rotate the drivetrain by hand in a safe setup, allow any required set time, and wipe excess from the chain's outer surfaces. More lubricant is not better; excess attracts dirt and can migrate.
Do not spray lubricant near the rear brake, wheel, or tire. If a chain is rusty, stiff, damaged, excessively worn, or still skips after correct cleaning, stop and have the drivetrain inspected.
Protect braking surfaces
Brake rotors, pads, and rim-brake tracks require clean tools and products specifically approved for them. Never use the drivetrain sponge, oily towel, polish, or general lubricant on braking surfaces. Covering a rotor during drivetrain cleaning may reduce splatter, but remove any cover before turning or riding the wheel.
After washing, verify braking response in a safe stationary check and then at very low speed in a clear area. Some systems may feel different while wet, but persistent noise, weak braking, pulsing, rubbing, or suspected contamination requires inspection. Do not attempt to “burn off” contamination through aggressive riding.
Dry and inspect the bicycle
- Check frame and fork surfaces for cracks, dents, deep gouges, or paint disturbance around joints.
- Spin both wheels and look for damage, rubbing, wobble, or debris in the tread.
- Squeeze tires and use a gauge before the next ride; washing is not a pressure check.
- Check that axles or retention systems remain correctly secured.
- Move the steering, pedals, and suspension through normal unloaded travel, listening for grinding or binding.
- Inspect cables, hoses, controls, and accessories for movement or damage.
- For e-bikes, reconnect the dry battery or ports only as directed and check the system before riding.
Compressed air can drive water and grit into seals or damage components. Use it only when the equipment and component instructions provide a suitable method, pressure, and distance.
Store it for the next ride
Store the bicycle in a dry, ventilated location after it has drained and dried. Do not cover a wet bicycle with an airtight tarp. Keep it away from corrosive chemicals, salt residue, direct heater output, and areas where it can fall.
Record any service item while it is fresh: tire replacement, brake check, loose accessory, suspension service, or drivetrain wear. The next pre-ride check should still verify tires, wheels, brakes, steering, and secure parts; a clean appearance is not proof of mechanical readiness.
Limitations and important notes
- High-pressure washing can bypass seals, move grease, damage electronics, lift decals, and force contamination into parts.
- Some suspension, internal-gear, electronic-shifting, and motor systems have specific post-wet service requirements.
- Saltwater, road salt, fine abrasive mud, or submersion may require prompt professional service beyond routine cleaning.
- Do not turn pedals or wheels where fingers, hair, clothing, or cleaning tools can be caught.
- Cleaning cannot repair wear, impact damage, corrosion, or a failed seal.
Frequently asked questions
Can I use a pressure washer on a bike?
Low-pressure water is the safer general approach. Use powered equipment only when the bicycle and component makers permit it and you can maintain the specified nozzle, pressure, angle, and distance.
Do I need to clean the bike after every wet ride?
At minimum, remove damaging contamination, dry the bike, inspect it, and maintain the chain. The depth of cleaning depends on mud, salt, grit, component guidance, and how soon the next ride occurs.
Can dish soap clean a bicycle?
A bicycle-compatible cleaner avoids guessing about finish, coating, seal, and lubricant compatibility. Follow the bike and product guidance rather than assuming a household detergent is suitable.
Why does my brake make noise after washing?
Moisture, dirt, alignment, wear, or contamination can cause noise. If it persists after controlled low-speed drying checks or braking is reduced, stop riding and have the brake inspected.
Should I lubricate a wet chain?
Follow the lubricant instructions. Many products need a clean, suitably dry chain and time to distribute or set. Applying lubricant over water and grit can trap contamination and reduce performance.
Evidence notes
This routine reflects common bicycle-service practice: inspect first, soften and remove abrasive dirt, avoid concentrated water at seals and electronics, separate oily and brake-cleaning tools, dry the bike, lubricate correctly, and verify function. Manufacturer guidance controls the exact method.
Next steps
Set up separate frame, drivetrain, and brake-safe tools before the next muddy ride. After returning, photograph any damage, follow the low-pressure cleaning sequence, dry and lubricate as required, then add unresolved findings to a service list before the next pre-ride check.






 Whittier Bicycle Swap Meet5.0 (1 reviews)
 Sea Sports Cyclery & Outdoor4.0 (67 reviews)
 Super X Star0.0 (0 reviews)
 Guy's Bicycles4.0 (298 reviews)
 FLY WING E-BIKE3.0 (69 reviews)
 Phat Tire Bike Shop4.0 (286 reviews)
 How to Teach Kids to Ride a Bike: A Step-by-Step Guide for Parents
 Tips for Riding on Busy City Streets: Smart Strategies for Urban Cyclists
 Best US National Parks for Mountain Biking: Ride Epic Trails Across America
 Best Aero Helmets for Time Trials and Racing
 How to Clean and Lubricate Your Bike Chain Like a Pro
 10 Must-Have Items for Long-Distance Cycling Trips