
Bike Tool Kit Checklist for Short and Long Rides
On this page
Quick answer
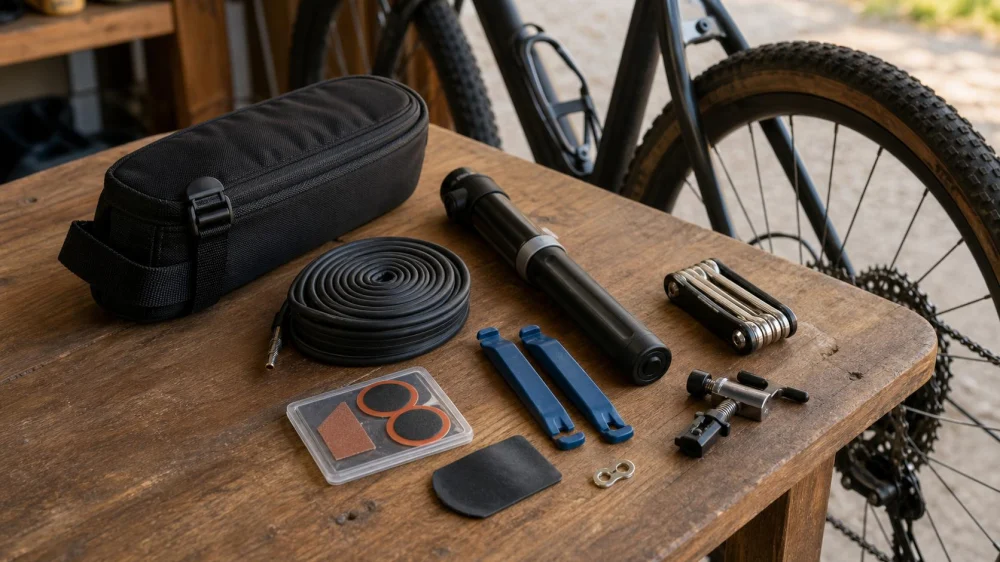
For most short rides, carry a correctly sized spare tube, tire levers, an inflation method, a compact multi-tool, identification, and a charged phone. Add a patch kit, tire boot, chain tool, quick link, extra food, weather protection, and navigation backup as distance and remoteness increase. The best bike tool kit is one that fits your bicycle and that you have practiced using before the ride.
This checklist is for recreational road, gravel, mountain, and commuter riders in the United States who want to handle common roadside problems without carrying a workshop. It is not a substitute for mechanical training, a professional inspection, or an emergency plan. If your route has weak mobile coverage, long gaps between services, severe weather, or difficult terrain, increase your margin rather than relying on a minimalist kit.
Match the kit to the ride
A bike ride repair kit is a compact set of bicycle-specific tools and supplies intended to solve likely, field-repairable problems. It should be chosen by consequence, not just mileage. A five-mile trail loop with no phone signal may require more self-sufficiency than a 30-mile urban ride that passes open bike shops and transit stops.
Before packing, ask five questions:
- How far will I be from help? Note bike shops, public transit, staffed facilities, and road access.
- What surface will I ride? Sharp gravel, thorns, rocks, mud, and rough trails change the most likely failures.
- What is specific to my bike? Check axle type, tire and tube size, valve type, fastener sizes, chain speed, and any proprietary components.
- What conditions are expected? Heat, cold, rain, darkness, and large temperature swings affect water, clothing, lights, and battery planning.
- Can I use every item? A tool you cannot operate safely is weight without much value.
A practical decision rule is to start with puncture repair and basic fastener tools, then add equipment for problems that are plausible on your route and would otherwise end the ride. Avoid packing heavy tools for repairs that cannot be completed safely at the roadside.
Core repair items for most rides
The following compact kit covers many routine rides. Confirm compatibility rather than buying only by product name.
- Spare inner tube: It must match the wheel diameter, suitable tire-width range, and valve type. Tubeless riders often carry a tube as a backup for damage that sealant and plugs cannot close.
- Two tire levers: Choose bicycle tire levers that can remove your tire without damaging the rim or tube. Some tire-and-rim combinations are tight enough to require practice.
- Inflation method: A compact pump can be reused and lets you add pressure gradually. A CO2 inflator is fast and small but has limited attempts; understand its operation and carry the correct cartridge.
- Compact multi-tool: Match its hex, Torx, and screwdriver fittings to fasteners actually present on your bicycle. More functions do not help if the needed size is absent.
- Patch kit: A patch can save the ride after a second puncture. Follow its instructions and check adhesive condition periodically.
- Tire boot: A purpose-made boot supports a cut tire casing temporarily. It is an emergency measure, not a permanent tire repair.
- Small essentials: Carry identification, an emergency contact, payment, required medication, and a charged phone protected from weather.
For a tubeless setup, consider a compatible plug tool and plugs. Plugs are generally for qualifying tread punctures, not sidewall cuts, damaged rims, or a tire that will not stay seated. Follow the tire, rim, sealant, and repair-tool manufacturers' instructions because procedures and limits vary.
Additions for long or remote rides
When a ride moves farther from services, add redundancy and supplies that address predictable wear. The right additions depend on your bicycle and route.
- Second tube or additional repair material: Useful where puncture risk is high or help is far away.
- Chain tool and compatible quick link: These may allow removal of a damaged link and a careful ride out. Confirm chain speed and quick-link compatibility before departure.
- Spare derailleur hanger: A model-specific hanger can be difficult to find away from home, but installing and aligning drivetrain parts may require skill and additional tools.
- Valve core tool and spare core: Consider these only if they fit your valve system and you know when removal is appropriate.
- Small amount of approved chain lubricant: It may help after prolonged rain or water exposure. Keep it sealed and apply it according to the lubricant maker's guidance.
- Navigation backup: Save an offline map, write down key turns, and carry enough battery capacity for the planned duration.
- Weather and exposure items: Add a compact layer, rain shell, sun protection, or insulation according to forecast and route exposure.
- Food, water, and access plan: Carry a reserve beyond the expected need, and verify refill points rather than assuming they will be open.
Mountain bike and gravel routes may justify stronger tire-repair options and more water. Road riders may prioritize compactness and a reliable inflation plan. Commuters may benefit more from weather protection, lights, transit alternatives, and a secure way to carry work essentials.
How to pack and test your kit
- Inventory the bicycle. Record tire size and valve type, identify axle-release requirements, and test the multi-tool on the relevant fasteners without changing their adjustment.
- Practice at home. Remove and reinstall a wheel, replace or patch a tube, inflate the tire, and operate the chain tool or plug tool under controlled conditions.
- Protect soft and sharp items. Keep a spare tube away from sharp tool edges. Lightly wrap it or place it in a small pouch so vibration does not abrade it.
- Separate emergency supplies. Keep identification, medication, cash or card, and the phone accessible even if a packed saddle bag is difficult to open.
- Secure the load. Confirm that the bag cannot rub the tire, interfere with suspension or pedals, cover lights, or loosen on rough surfaces.
- Run a real test. Take a local shakedown ride, listen for movement, and confirm that you can reach essential items with cold or wet hands.
- Refresh the kit. After use, replace tubes, patches, cartridges, food, batteries, and other consumables. Periodically inspect for corrosion, leakage, expired adhesive, and damaged packaging.
Keep a simple checklist with the bag. If you move the kit between bikes, re-check every compatibility item; tube size, valve length, axle tools, fasteners, and quick links may differ.
Important limits and safety notes
Roadside work should restore safe function, not merely make the bicycle move. Stop riding and arrange transport when you find a cracked frame or fork, damaged wheel or rim, unreliable brake, loose component that will not stay secured, major tire casing damage, severe drivetrain damage, or any condition you cannot confidently assess.
Do not attempt repairs in traffic, on an unstable shoulder, or where other trail users cannot see you. Move to a safe location if possible. Tell someone your route and expected return time for remote rides, and know how to contact local emergency services. If a crash may have caused a head, neck, or other serious injury, prioritize medical assessment over bicycle repair.
Torque-sensitive carbon parts, hydraulic brakes, suspension systems, electronic components, and wheel damage often require manufacturer procedures and professional tools. A compact multi-tool is not ideal for diagnosing hidden damage or proving that a safety-critical repair is correct.
Sources and evidence notes
This checklist reflects common bicycle touring, shop, and rider-preparedness practice: plan for punctures, match tools to the bicycle, add redundancy as access to help decreases, and test equipment before relying on it. Exact repair limits, pressure ranges, torque values, quick-link reuse rules, and component procedures are product-specific. Use the current instructions from your bicycle, tire, rim, drivetrain, brake, pump, and repair-tool manufacturers, and consult a qualified bicycle mechanic when those instructions are unavailable or the damage is uncertain.
Frequently asked questions
Should I carry a pump or CO2 inflator?
A pump is reusable and supports several inflation attempts, making it a dependable choice for many riders. CO2 is compact and quick but finite, and cartridge handling requires care. Some riders carry both on long or remote routes. Whichever you choose, make sure the pump head or inflator matches your valve and practice before the ride.
Do tubeless riders still need a spare tube?
A spare tube can provide a backup when sealant or a plug cannot repair the damage. Installing one may require removing a tubeless valve and dealing with remaining sealant, so practice at home. A tube will not make a severely damaged tire casing, rim, or wheel safe.
How large should a saddle bag be?
Choose the smallest bag that holds your verified kit without crushing the tube or forcing sharp tools against it. The bag must remain clear of the tire, legs, suspension, and lights throughout the bicycle's full range of movement. Test it loaded on the surface you expect to ride.
Is a bike multi-tool enough for every repair?
No. A multi-tool is best for compatible fasteners and limited adjustments. It may lack leverage, an accurate torque reference, or bicycle-specific fittings. Problems involving brakes, structural damage, wheel integrity, or uncertain component alignment may require a mechanic and should not be improvised roadside.
How often should I inspect the kit?
Check it after every use and before an important or remote ride. Also inspect it periodically for tube abrasion, rusty tools, damaged pump seals, leaking supplies, expired patch adhesive, discharged batteries, and missing consumables.
Next steps
Lay out your current kit beside the bicycle and verify every item against the actual components. Practice one puncture repair at home, pack the tube so it cannot rub against tools, and complete a short shakedown ride. Before a longer adventure, review the route, service access, weather, mobile coverage, water sources, and exit options. If the bicycle has an unresolved safety issue, schedule a professional inspection before departure.






 Brickyard Bicycles5.0 (45 reviews)
 Around Town Bicycles Inc4.0 (70 reviews)
 J-Town Bicycle4.0 (104 reviews)
 North Road Bicycle Imports4.0 (4 reviews)
 Crowley Cycles5.0 (5 reviews)
 Fernandina Beach Cycling & Fitness4.0 (112 reviews)
 How to Teach Kids to Ride a Bike: A Step-by-Step Guide for Parents
 Tips for Riding on Busy City Streets: Smart Strategies for Urban Cyclists
 Best US National Parks for Mountain Biking: Ride Epic Trails Across America
 Best Aero Helmets for Time Trials and Racing
 How to Clean and Lubricate Your Bike Chain Like a Pro
 10 Must-Have Items for Long-Distance Cycling Trips