
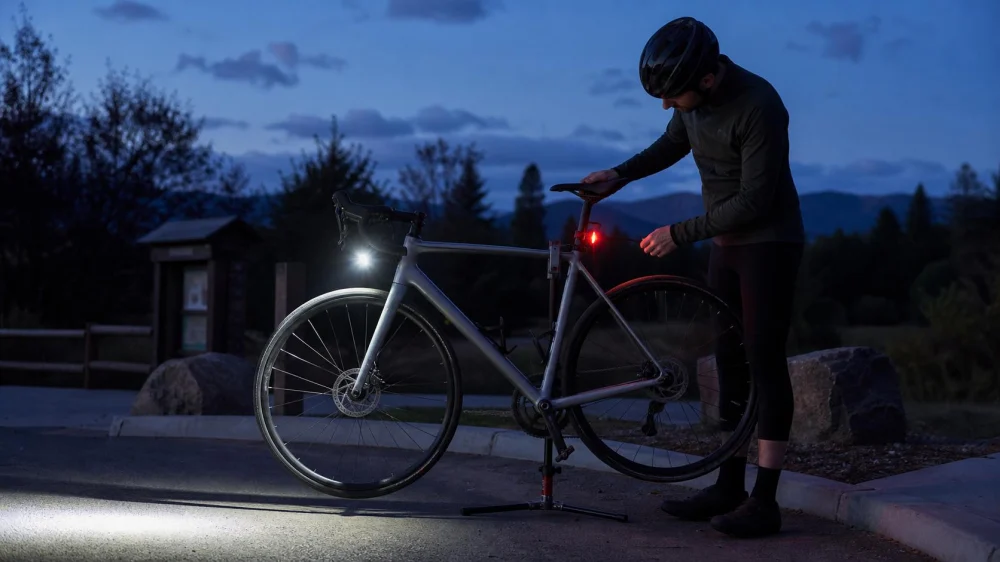
Bike Light Check: Beam, Mount, Battery, and Backup
On this page
Quick answer
Before a low-light bike ride, confirm a working white front light and red rear light, then check reflectors and any additional lights required locally. Aim the front beam at the road or trail rather than into other people's eyes. Shake-test each mount, clean the lenses, verify runtime for the whole route, and carry a usable backup.
This guide is for adult cyclists riding in the United States. Lighting and reflector laws vary by state and locality, while trail systems and events may add their own equipment rules.
Give each light a clear job
A bicycle lighting system needs to help you see and help other road or trail users detect your position and movement.
- Front light: A white light identifies the front of the bicycle. On unlit routes, it also needs a usable beam for surface hazards and turns.
- Rear light: A red light makes the rider's rear orientation visible to approaching traffic and other cyclists.
- Reflectors: Passive reflectors return light from another source and remain useful when a battery fails, but they do not replace active lights where lights are required.
- Side visibility: Wheel, pedal, tire, frame, or clothing reflectivity can help others recognize a bicycle crossing their view.
- Backup light: A small second front or rear light can preserve basic visibility after a failure.
Choose equipment for the darkest and fastest section of the route, not only the bright starting point. A light adequate under streetlights may be insufficient on an unlit descent or trail.
Aim the front beam without glare
A powerful light aimed too high can reduce another person's ability to see. Set the beam in darkness on a quiet, level area before entering traffic.
- Mount the light near the centerline of the bike or in the position the manufacturer recommends.
- Place the bike upright with normal riding load and tire pressure.
- Aim the brightest part of the beam toward the riding surface ahead, not horizontally into faces or windshields.
- Check the beam from another cyclist's and driver's approximate eye level while the bicycle remains stationary.
- Ride a short test loop and confirm you can see braking distance, corners, potholes, debris, and trail features without outrunning the light.
Use an appropriate lower or shaped-beam setting around oncoming people and better-lit streets. For fast or technical night riding, choose equipment and speed that preserve visibility and control rather than compensating with an upward beam.
Secure mounts and keep lights visible
A bright light is ineffective when it rotates downward, points sideways, is covered by cargo, or falls off.
- Shake the bicycle and press each light gently to check for rotation or play.
- Confirm straps, clamps, bolts, rails, and quick releases are fully seated.
- Keep cables, clothing, handlebar bags, baskets, racks, and brake housings out of the beam.
- Mount the rear light where it is not hidden by a jacket, saddle bag, child seat, trailer, or cargo.
- Check visibility from directly behind and from useful side angles.
- Use the manufacturer's tether or secondary retention where supplied.
- Recheck after rough roads, folding the bike, loading a vehicle rack, or adjusting the saddle.
Do not attach a light to a moving or flexible surface unless the product is designed for it. A light on a loose bag or clothing may point away from traffic.
Build a battery and backup plan
Manufacturer runtime claims depend on mode, battery age, temperature, charging, and use. Plan with a margin rather than matching the route duration exactly.
- Charge rechargeable lights early enough to verify they hold power.
- Install fresh batteries in replaceable-battery units and carry compatible spares.
- Know how the low-battery indicator behaves and when output automatically drops.
- Select a mode that lasts beyond the planned ride plus delays.
- Keep a backup front and rear light accessible, not buried beneath cargo.
- Protect charging ports and battery packs from rain according to their stated rating.
- Do not use a swollen, leaking, overheated, damaged, or recalled battery.
Cold conditions can reduce usable runtime. Test the real setup and bring more capacity when a failure would leave you far from safe shelter or transportation.
Pre-ride light checklist
- White front light turns on and stays on.
- Red rear light turns on and is visible from behind.
- Lenses are clean and not cracked or fogged.
- Front beam is aimed at the riding surface without glare.
- Mounts pass a shake and rotation test.
- Cargo and clothing do not block either light.
- Reflectors are clean, present, and unobstructed.
- Battery capacity exceeds route time with a delay margin.
- Backup lights work and are easy to reach.
- Local legal and route-specific requirements are met.
Best for commuting: reliable fixed positions, simple controls, frequent charging, and a backup. Best for dark trails: sufficient beam coverage, secure mounts, longer runtime, and route-appropriate redundancy. Not ideal: one high-output light with no power margin.
Limitations and important notes
This article does not specify legally required brightness, visibility distance, flash pattern, reflector placement, or color because those requirements vary. Check current state, local, trail, and event rules for the route.
Lights improve visibility but cannot guarantee that a driver or other rider sees you. Use predictable road position, signaling, speed control, reflective equipment, and defensive riding appropriate to conditions.
Follow battery charging, storage, disposal, and recall guidance. Stop using equipment that overheats, swells, leaks, emits an unusual odor, or has damaged wiring.
Frequently asked questions
Should a bike headlight flash at night?
Rules and best modes vary. A steady beam helps illuminate the route, while some flash patterns improve notice but can create glare or make distance harder to judge. Use a legal, considerate setting for conditions.
Can a helmet light replace a handlebar light?
Do not assume so. A helmet light moves with your head and can shine into faces. Many riders use a properly aimed bicycle-mounted front light as the stable primary beam and a helmet light only where appropriate.
How bright should my light be?
Choose output and beam shape for speed, ambient light, surface, weather, and traffic. The useful test is whether the beam reveals hazards in time without blinding others.
Why does the light die sooner in winter?
Battery performance can fall in cold conditions. Use a larger runtime margin, keep spare batteries protected, and verify actual performance before a long ride.
Are reflectors enough?
Reflectors are valuable passive backup but depend on another light source and may not satisfy active-light requirements. Use them as part of the system, not a universal substitute.
Sources and evidence notes
The use of a white front light, red rear light, reflectors, and visible equipment in low light reflects current NHTSA bicycle-safety guidance. Beam aiming, mount checks, runtime margin, and backups reflect common cycling-equipment and night-riding practice. Current local rules remain controlling.
Conclusion and next steps
Test your front and rear lights in darkness before the ride. Aim the white beam down the route, secure every mount, uncover the red rear light, clean reflectors, and confirm battery life with extra margin. Pack working backups and verify current legal and route requirements.






 AS Bicycle Center0.0 (0 reviews)
 Buddy Bike (Corporate Office)5.0 (4 reviews)
 Pedal Driven Cycles4.0 (29 reviews)
 Two Wheels One Planet4.0 (508 reviews)
 Rainbow Bicycle4.0 (99 reviews)
 Monkey bike sale y repair#24.0 (59 reviews)
 How to Teach Kids to Ride a Bike: A Step-by-Step Guide for Parents
 Tips for Riding on Busy City Streets: Smart Strategies for Urban Cyclists
 Best US National Parks for Mountain Biking: Ride Epic Trails Across America
 Best Aero Helmets for Time Trials and Racing
 How to Clean and Lubricate Your Bike Chain Like a Pro
 10 Must-Have Items for Long-Distance Cycling Trips