
Bicycle Flat Tire: Safe Stop, Inspection, and Repair
On this page
Quick answer
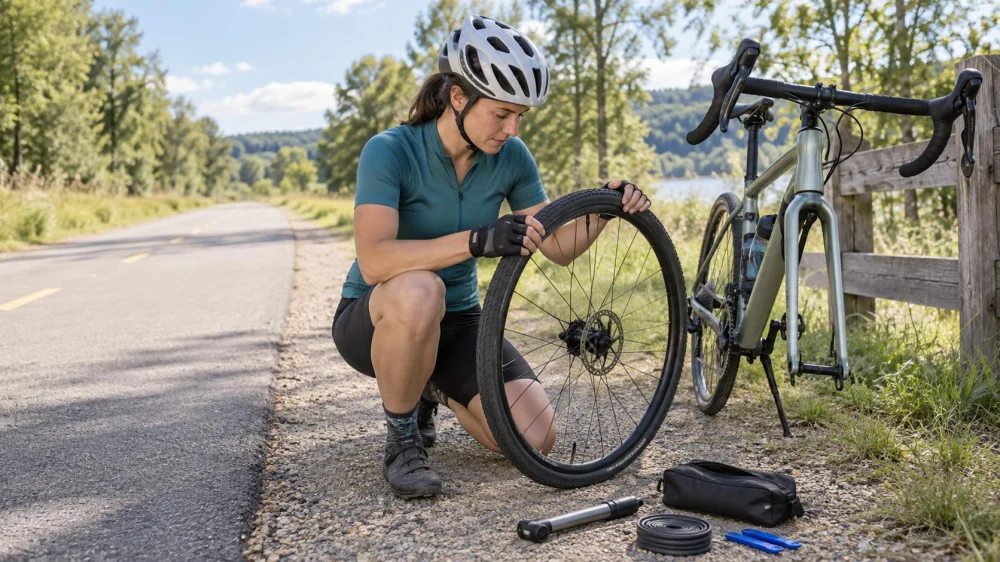
When a bicycle tire goes flat, reduce speed smoothly, avoid hard turns or braking, and stop away from traffic on stable ground. Inspect the tire, rim, valve, and wheel before installing a tube, patch, or tubeless plug approved for your setup. Remove the cause, inflate within the specified range, check that the bead is seated, and end the ride if the tire, rim, or wheel is damaged.
Recognize a flat without losing control
A flat tire is a loss of air that leaves the casing unable to support the bicycle as intended. It may happen suddenly after an impact or slowly after a puncture, valve leak, rim-tape problem, or sealant loss.
This guide is for adult riders handling common clincher or tubeless systems in the United States. Wheel, tire, brake, axle, and inflation procedures vary. Follow the bicycle and component instructions, and use a qualified bicycle technician when damage or fit is uncertain.
Stop in a predictable place
- Hold a straight line and reduce pedaling.
- Shift weight smoothly and avoid abrupt steering or hard braking on the affected wheel.
- Signal when safe and move out of the travel lane or trail line.
- Choose firm, visible ground away from blind corners, steep slopes, and moving traffic.
- Dismount before the tire fully collapses if you can do so safely.
- Walk farther to a safer repair spot rather than working beside traffic.
Do not continue riding on a flat tire; doing so can damage the tire, rim, and wheel and reduce control.
Find the cause before adding air
- Mark the puncture location if sealant or an object makes it visible.
- Inspect the tread and sidewalls for glass, wire, thorns, cuts, bulges, or casing damage.
- Check the rim for dents, cracks, sharp edges, displaced tape, or spoke intrusion.
- Examine the valve for looseness or damage without forcing it sideways.
- Run fingers carefully inside a removed tire only after visible sharp objects are controlled.
Removing a tube without finding the cause can produce an immediate second flat.
Choose the repair that matches the system
For a tube tire, replace the tube or patch it according to the patch instructions. Inflate the tube slightly before installation so it holds shape and is less likely to pinch. For tubeless systems, rotate or add sealant only as approved, or use a compatible plug for an eligible tread puncture.
A temporary tire boot may support a small casing cut when the tire manufacturer or repair product permits it, but sidewall tears, exposed casing, bead damage, and large cuts often require ending the ride and replacing the tire.
Reinstall and check before riding
- Confirm the tube is not trapped under the bead.
- Seat the tire evenly around both sides of the rim.
- Inflate gradually within the limits marked for the tire, rim, and bicycle.
- Watch the bead line for a high or low section and stop if it rises unevenly.
- Install the wheel and axle exactly as specified.
- Reconnect or verify brakes and spin the wheel for clearance.
- Squeeze the brake controls and make a slow controlled test away from traffic.
When to end the ride
Arrange pickup, walk, or another safe transport option if the tire will not hold air, the bead will not seat, the casing or sidewall is torn, the rim is bent or cracked, spokes are broken, the valve is damaged, or the axle and brake cannot be secured and verified.
Also stop if the flat followed a crash or hard impact that may have affected the frame, fork, wheel, or rider. A temporary inflation is not evidence that the system is safe.
Frequently asked questions
Can I ride a short distance on a flat tire?
Walking is usually the safer choice. Riding can reduce control and damage the tire, rim, or wheel, even over a short distance.
Should I remove a nail or thorn immediately?
Move to a safe repair location first. Mark where it entered, then remove it as part of the repair so you can inspect the corresponding tire and tube area.
How much should I inflate after a repair?
Stay within the limits for the tire, rim, bicycle, load, and conditions. Use the manufacturer's guidance rather than automatically inflating to the tire's maximum marking.
Sources and evidence notes
This article follows general bicycle roadside-repair practice: stop predictably, identify the puncture source, use a repair compatible with the tire system, verify bead and wheel installation, and end the ride for structural damage. Component manuals, tire and rim limits, bicycle instructions, and a qualified technician govern a specific setup.
Conclusion and next steps
Before the next ride, practice removing and reinstalling your wheel at home, confirm that your pump fits the valve, and carry a repair method for your tire system. After a roadside repair, inspect the tire again in good light and replace temporary or damaged components before relying on them for another trip.






 Kirk's Bike Shop4.0 (189 reviews)
 Hardin's Bicycle Shop4.0 (61 reviews)
 Greenway 500 Bike Shop5.0 (66 reviews)
 Poynter Brothers Pro Bike and Skate Shop4.0 (75 reviews)
 Buckskin Bikes4.0 (115 reviews)
 STS Bicycles5.0 (2 reviews)
 How to Teach Kids to Ride a Bike: A Step-by-Step Guide for Parents
 Tips for Riding on Busy City Streets: Smart Strategies for Urban Cyclists
 Best US National Parks for Mountain Biking: Ride Epic Trails Across America
 Best Aero Helmets for Time Trials and Racing
 How to Clean and Lubricate Your Bike Chain Like a Pro
 10 Must-Have Items for Long-Distance Cycling Trips