
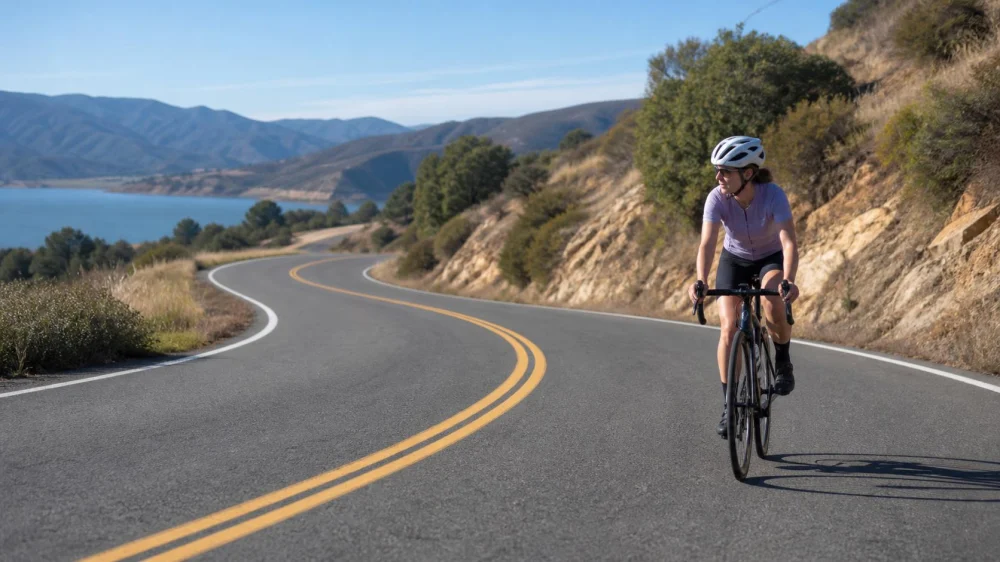
Beginner Bike Descents: Control Speed Before the Turn
On this page
Quick answer
On a bike descent, choose speed before each turn, keep vision through the open path, use both brakes smoothly while upright, and leave a generous margin for traffic, gravel, weather, and limited sight distance. Do not chase faster riders. If braking, handling, visibility, or confidence is uncertain, slow early, stop in a safe place, or choose a less demanding route.
Why it matters
Descending control is the ability to manage speed, line, traction, visibility, and stopping distance on a downhill bicycle route. It depends more on conservative decisions and equipment condition than on copying a fast rider's posture.
This U.S. guide is for newer recreational cyclists on paved roads and paths. It is not technical coaching for racing, mountain-bike drops, or closed-course riding. Traffic laws, surfaces, bicycles, brakes, weather, and rider skills vary.
Practical checklist
- Inspect both brakes, tires, wheels, steering, and secure cargo before a route with sustained descents.
- Review grade, curves, intersections, surface reports, weather, traffic, and bailout options.
- Keep hands in a position that allows strong, controlled access to both brake levers.
- Wear a properly fitted helmet and secure loose clothing, straps, bottles, and bags.
- Increase following distance and avoid overlapping wheels or descending side by side.
- Set a personal speed limit based on visible stopping distance, not the posted vehicle limit or group pace.
- Abort the descent for brake fade, wobble, tire damage, severe crosswind, poor visibility, or loss of control.
Step-by-step plan
- Enter conservatively. Reduce speed before the slope steepens and test brake response on a safe straight section.
- Look where the bicycle should go. Scan surface, traffic, intersections, and the curve exit rather than fixing attention on one obstacle.
- Brake while upright before the turn. Apply both brakes progressively according to the bicycle and conditions; abrupt braking while leaned can exceed traction.
- Choose a lawful predictable line. Stay within the appropriate lane or path position and never cross into opposing traffic to straighten a curve.
- Stay balanced and relaxed. Maintain stable contact with pedals and handlebar without a rigid grip, sudden steering, or an extreme aerodynamic tuck.
- Create space. Let faster riders pass only where legal and safe; do not accelerate to defend position or follow a line you cannot see through.
- Stop safely when needed. Signal, check behind, and move completely out of the travel path before inspecting equipment or recovering.
After the ride, note locations where braking felt weak, the surface surprised you, or sight distance was short. Use that information to adjust maintenance, route choice, and skills practice on easier terrain.
Limits and warning signs
No body position or braking formula works for every bicycle and surface. Rim and disc brakes respond differently to weather, heat, adjustment, and load. Speed that feels controlled on a straight road may be unsafe for the unseen distance around a curve.
Stop riding for a soft or ineffective lever, rubbing or overheated brake, tire cut or bulge, wheel looseness, steering play, persistent wobble, crash damage, or control problem. Have the bicycle inspected by a qualified professional and seek medical care after a concerning crash or symptom.
Frequently asked questions
Should I use the front brake downhill?
Both brakes contribute to control when used progressively, but technique and equipment vary. Practice on easy terrain or obtain qualified instruction rather than avoiding one brake entirely.
Should I brake through the whole turn?
Set most speed while upright before the turn. Some conditions require continued gentle control, but abrupt inputs while leaned reduce margin.
What if riders behind pressure me to go faster?
Hold a predictable lawful line and create a safe passing opportunity when possible. Your speed should match your sight distance and control.
Can I descend with one hand?
Keep both hands available for steering and braking during demanding descents. Drink, signal, or adjust gear only when conditions allow safe control.
Sources and evidence
The article reflects common bicycle skills guidance: inspect equipment, manage speed before curves, use smooth braking, look through the path, preserve traction, and ride within visible stopping distance. Qualified coaching and manufacturer guidance can address a specific bicycle.
Conclusion and next steps
Practice progressive braking and wide, predictable turns on a gentle familiar slope before attempting longer descents. Preview the route, start slower than necessary, and stop when equipment or conditions reduce confidence. A controlled descent leaves room for the unexpected.






 E Life Cycles4.0 (17 reviews)
 Bay Head Bikes5.0 (8 reviews)
 Bicycle Sport Uptown4.0 (122 reviews)
 Mission Hills Bicycle Shop3.0 (86 reviews)
 Last Mile Marin4.0 (45 reviews)
 Loam Roamer5.0 (1 reviews)
 How to Teach Kids to Ride a Bike: A Step-by-Step Guide for Parents
 Tips for Riding on Busy City Streets: Smart Strategies for Urban Cyclists
 Best US National Parks for Mountain Biking: Ride Epic Trails Across America
 Best Aero Helmets for Time Trials and Racing
 How to Clean and Lubricate Your Bike Chain Like a Pro
 10 Must-Have Items for Long-Distance Cycling Trips