
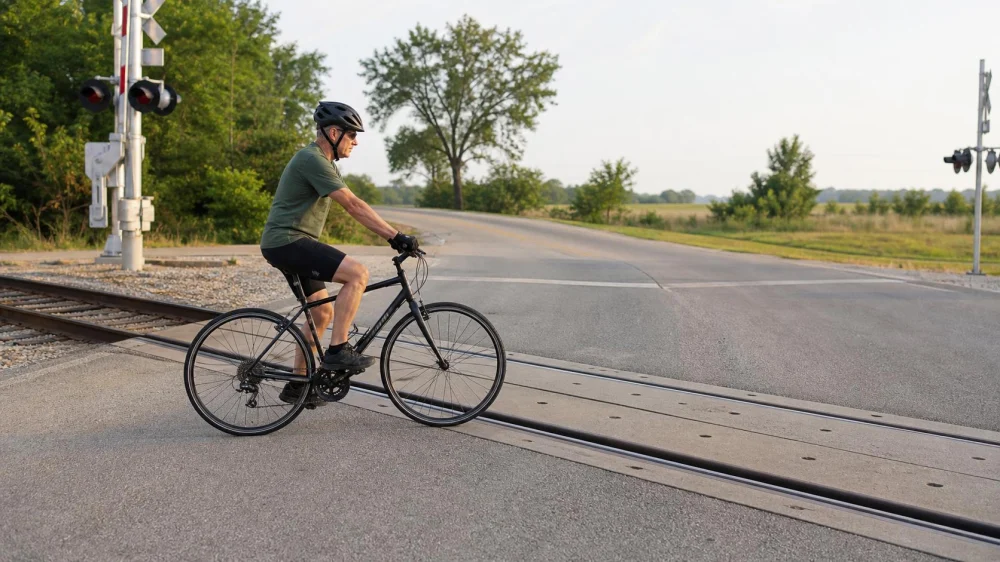
Railroad Track Bike Crossings: Angle, Speed, and Space
On this page
- Quick answer
- Why railroad tracks are difficult for bicycles
- A step-by-step crossing method
- How to manage traffic and space
- Wet, damaged, and unusual crossings
- When walking is the better choice
- Railroad crossing checklist
- Limitations and important notes
- Sources and evidence notes
- Frequently asked questions
- Conclusion and next steps
Quick answer
Slow before a railroad crossing, scan for trains and traffic, and cross each rail at as close to a right angle as conditions safely allow. Keep the bicycle upright, avoid braking or turning on the metal, and leave enough space to set your approach. If traffic, wet rails, deep flangeways, or poor visibility make that impossible, stop in a safe place and walk.
A bicycle railroad crossing is a road or trail intersection where tires must pass over steel rails and the gap beside them. The main control problem is preventing a narrow tire from sliding along the rail or dropping into the flangeway. This guide is for everyday riders in the United States; it does not replace warning devices, railroad rules, local traffic law, or instructions from crossing personnel.
Why railroad tracks are difficult for bicycles
Railroad tracks combine three hazards in a small area: a hard steel surface with different grip from pavement, a channel next to the rail that may catch a tire, and an approach that may force riders to change direction around vehicles. A crossing that feels easy in dry daylight can become difficult when wet, crowded, damaged, or approached at a shallow angle.
Shallow angles can guide the wheel along the rail
When a bicycle tire meets a rail nearly parallel, the tire may fail to climb over it. The wheel can follow the rail or enter the adjacent gap, causing a rapid loss of steering control. A more perpendicular approach shortens the time spent on the rail and gives the tire a clearer path across it.
Steel changes the available grip
Painted markings, metal panels, and rails may be more slippery than nearby pavement, especially when wet or contaminated. Braking, accelerating, or steering sharply while the tire is on metal adds a second demand at the moment grip may be reduced.
The crossing surface may be uneven
Raised rails, broken pavement, loose ballast, rubber panels, debris, and multiple track sets can disturb the bicycle. The safest approach depends on what you can actually see, not on how the crossing looked during a previous ride.
A step-by-step crossing method
- Read the crossing early. Look for warning lights, gates, signs, train movements, multiple tracks, surface damage, traffic behind you, and the direction of the rails. Never ride around a lowered gate or ignore an active warning.
- Choose a legal, visible path. Stay within the part of the roadway or trail available to you. Plan a smooth approach that increases the angle between your front wheel and each rail without entering an opposing lane or another user's path.
- Set speed before the first rail. Slow while still on predictable pavement. Select a gear that lets you roll across without a hard pedal stroke. Avoid stopping on the tracks.
- Check behind before changing your line. A safer crossing angle may require lateral space. Signal when appropriate and only move when the space is clear. If a driver is passing or crowding the approach, do not swerve for a better angle.
- Meet the rail as squarely as practical. Aim for a near-right-angle crossing when the road layout permits. Keep your eyes on the clear path beyond the rail, not directly beneath the front tire.
- Stay upright and quiet on the controls. Keep the handlebar steady, pedals level or in a comfortable stable position, and your weight supported. Roll over the rail without abrupt braking, steering, or acceleration.
- Clear every track before relaxing. Some crossings contain several rails or a second track beyond the first. Maintain the planned line until both wheels are fully beyond the final rail, then resume normal lane position when clear.
There is no single safe speed for every crossing. Choose a speed slow enough to inspect and control the bicycle but steady enough to roll across the surface without stalling. If the required angle conflicts with traffic or lane boundaries, stop and reassess instead of forcing the maneuver.
How to manage traffic and space
Railroad safety and road positioning must be solved together. A rider who suddenly swings outward to cross squarely may enter a driver's path even if the rail angle itself improves. Begin assessing the crossing far enough in advance to communicate and move gradually.
- Before moving laterally: scan behind, judge the speed of approaching traffic, signal where local practice and conditions make it appropriate, and confirm that the space is actually available.
- When the lane is narrow: reduce speed early and avoid a last-second diagonal move. If you cannot create a safe angle within the lane, use a safe stopping point and consider walking.
- In a group: increase spacing before the tracks. Each rider needs a clear view and freedom to choose a line; do not overlap wheels or follow blindly.
- At trail crossings: yield according to posted rules, expect walkers to change pace, and avoid cutting across another user's line.
- At multiple tracks: do not enter unless you can clear the entire crossing. A second train may approach from a different direction or be hidden by the first.
Never stop on the rails to wait for traffic beyond them. If congestion blocks the far side, wait before the crossing until enough room opens to clear all tracks.
Wet, damaged, and unusual crossings
Rain increases the need for an upright bicycle and smooth controls. Slow more than you would in dry conditions, avoid painted or metal surfaces where a safe alternative exists, and cross without sudden brake pressure. Puddles can hide gaps and broken pavement, so do not assume their depth.
Construction zones and industrial crossings may have exposed ballast, temporary plates, wide gaps, hoses, or uneven panels. If the surface cannot be evaluated from the approach, dismount before the hazard at a place clear of traffic. Report serious public-road defects through the responsible transportation or railroad channel when one is posted; do not enter railroad property to inspect or repair anything.
Tracks embedded at an angle in urban streets, including streetcar or light-rail rails, can create a long parallel gap. The same core principle applies: create a larger crossing angle only when the traffic environment permits. Obey the transit system's signs, signals, and lane rules.
When walking is the better choice
Dismounting is a sound decision, not a failed riding technique. Walk when you cannot obtain a safe angle, the surface is wet or visibly damaged, your loaded bicycle is hard to steer, visibility is poor, traffic removes the space you need, or you simply do not feel in control.
Stop before the crossing at a location where you and the bicycle are visible and clear of moving traffic. Walk the bicycle through the designated crossing only when warnings are inactive and the full route is clear. Cross decisively without lingering, and remount after you have left the track area and reached a stable surface.
Walking may be especially suitable for children, new riders, riders using narrow tires, and people carrying cargo or towing a trailer. Wheelchair bicycles, recumbents, tandems, adaptive cycles, and trailers can have different clearances and turning needs; follow the equipment maker's guidance and choose extra space.
Railroad crossing checklist
- Warning lights and gates are inactive, and no train is visible or audible.
- The far side has enough open space for the full bicycle or group to clear.
- The entire set of tracks and the crossing surface are visible.
- Speed is reduced before reaching metal or broken pavement.
- Traffic behind and beside you has been checked before any line change.
- The front wheel will meet each rail at a large, preferably near-right angle.
- The bicycle can stay upright with steady steering across the metal.
- Braking, sharp steering, and hard acceleration can wait until both wheels clear.
- You have a safe place to stop and walk if conditions change.
Limitations and important notes
Do not enter a crossing when gates are lowering or down, warning devices are active, a train is approaching, or a flagger or law-enforcement officer directs you to stop. A train can be wider and faster than it appears and cannot steer around you. Never ride or walk along railroad tracks, take shortcuts on railroad property, or stop to photograph the crossing.
Crossing designs, bicycle rules, and required behavior vary by state, city, rail operator, and trail manager. Follow posted controls and applicable law. If police, transportation authorities, or railroad personnel give instructions, those instructions take priority over this general riding guide.
Before a ride, make sure both brakes work progressively, the steering is secure, and the tires are undamaged and properly inflated within tire and rim limits. After a hard strike or fall at a crossing, stop in a safe location. Seek professional bicycle inspection if a rim is dented, a wheel wobbles, a tire bulges or loses air, the handlebar shifts, or braking changes.
Sources and evidence notes
This article applies broad bicycle-safety and railroad-crossing principles: obey active warnings, confirm the entire crossing is clear, avoid shallow wheel-to-rail angles, reduce speed before the hazard, and keep control inputs smooth on low-grip surfaces. These are general principles rather than a guarantee that a particular crossing is safe.
For a specific route, consult official state or local bicycle guidance, the roadway or trail authority, posted railroad controls, and your bicycle or component manuals. Conditions can change through maintenance, weather, and traffic, so current on-site warnings are the controlling source.
Frequently asked questions
What angle should a bicycle use to cross railroad tracks?
Cross as close to perpendicular, or 90 degrees, as the road layout and traffic safely allow. The practical goal is a clear, large angle that prevents the tire from following the rail. Never leave your legal path or swerve into traffic merely to achieve an exact number.
Should I lift the front wheel over a rail?
Most everyday riders do not need to lift the wheel at a well-maintained crossing. A poorly timed lift can reduce steering control or leave the rear wheel at a shallow angle. Slowing, choosing a square approach, and walking when uncertain are more repeatable options.
Can I brake while crossing wet tracks?
Set most of your speed before the metal. If an emergency requires braking, keep the bicycle as upright as possible and apply the brakes progressively rather than grabbing them. Wet steel may offer less grip, so prevention and early speed control matter.
Are wider tires safe from rail gaps?
Wider tires may handle some gaps better, but they do not remove the risk of sliding, being deflected, or entering a large flangeway. Tire width, profile, pressure, rail geometry, and crossing angle all matter. Use the same cautious approach with any bicycle.
What if a gate begins lowering while I am already crossing?
Continue promptly toward the nearest clear exit without stopping on the tracks. Do not turn along the rails. Once clear, remain outside the gated area. Prevention is critical: never enter unless the full crossing and the far side are open.
Conclusion and next steps
Before your next ride, identify railroad crossings on the route and consider whether a lower-traffic alternative offers a better approach. At the crossing, use the same decision order every time: obey warnings, confirm space beyond the tracks, slow early, check traffic, square the wheel, stay upright, and clear every rail. When any step is uncertain, stop safely and walk.






 71 E-BIKES INC3.0 (15 reviews)
 AAA E-Bike Repair4.0 (21 reviews)
 JC Bicycle4.0 (158 reviews)
 Uniqa Vintage Bikes4.0 (28 reviews)
 Isanti Bicycle4.0 (26 reviews)
 Third Wheel5.0 (23 reviews)
 How to Teach Kids to Ride a Bike: A Step-by-Step Guide for Parents
 Tips for Riding on Busy City Streets: Smart Strategies for Urban Cyclists
 Best US National Parks for Mountain Biking: Ride Epic Trails Across America
 Best Aero Helmets for Time Trials and Racing
 How to Clean and Lubricate Your Bike Chain Like a Pro
 10 Must-Have Items for Long-Distance Cycling Trips