
- -bike repair stand setup - creating a stable home workstation for cycling maintenance
- -home bike maintenance stand - choosing and positioning the right stand
- -bicycle repair tools at home - essential equipment every cyclist should own
- -how to use bike stand - safe clamping and positioning techniques
- -bike repair workstation setup - organizing tools for efficiency
- -cycling maintenance tools USA - recommended gear for American cyclists
- -DIY bike repair guide - fixing common issues at home
- -Cycling Guider - expert resources for cycling maintenance solutions
Why a Proper Bike Repair Stand Changes Everything for Home Cycling Maintenance
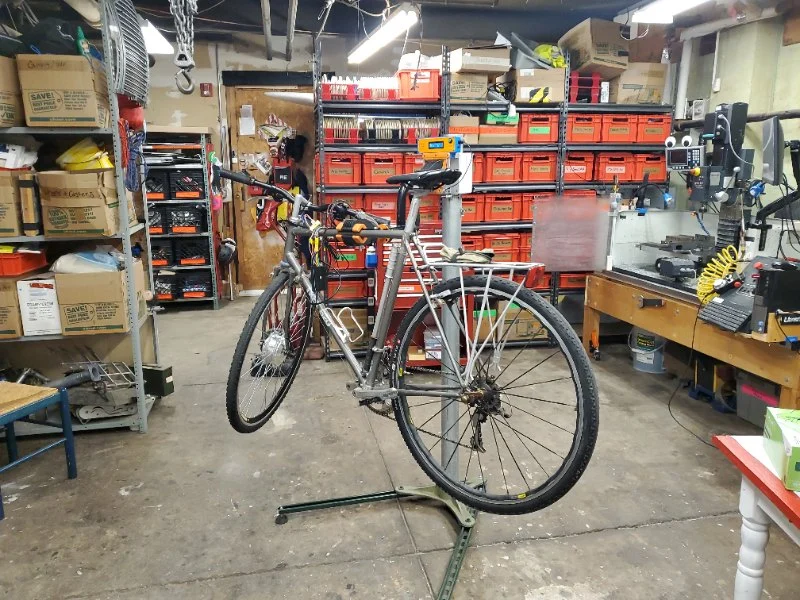
For many cyclists in the United States, home maintenance starts as a simple idea—fix a chain, adjust brakes, or clean a drivetrain. But without the right setup, even basic tasks become frustrating. A properly configured bike repair stand setup transforms this experience entirely, turning a garage corner or backyard space into a functional cycling workshop.
Instead of balancing a bike against a wall or flipping it upside down, a stand holds the frame securely at eye level, allowing precise adjustments and reducing physical strain. This not only improves efficiency but also reduces the risk of damaging delicate components such as derailleurs or hydraulic brake lines.
Choosing the Right Home Bike Maintenance Stand for Your Needs
Understanding different stand types
When selecting a home bike maintenance stand, cyclists usually encounter three common designs: clamp-style, bottom-bracket support stands, and portable tripod systems. Each has strengths depending on usage frequency and bike type.
Stability vs portability trade-offs
Heavy-duty stands offer excellent stability, especially for mountain bikes or e-bikes, but they may take up more space. Portable stands are easier to store but sometimes less stable during aggressive repairs. Choosing the right balance depends on how often maintenance is performed.
Real-life scenario from a weekend cyclist in Colorado
A recreational rider in Denver shared that after switching from a basic floor setup to a professional-grade stand, his maintenance time for brake adjustments dropped by nearly half. More importantly, he stopped making alignment mistakes caused by unstable positioning—an issue he didn’t realize was affecting his rides until later.
Essential Bicycle Repair Tools at Home for Every Cyclist
Core tools for everyday maintenance
A reliable set of bicycle repair tools at home typically includes Allen key sets, chain tools, tire levers, a torque wrench, and lubricants. These tools cover most routine adjustments and emergency fixes.
Advanced tools for deeper maintenance
More experienced cyclists often add cassette removers, cable cutters, and spoke wrenches to their toolkit. These allow for deeper mechanical work, especially when maintaining performance road bikes or long-distance touring bicycles.
Why tool quality matters more than quantity
Cheap tools may seem appealing at first, but they often strip bolts or provide inaccurate torque readings. Investing in quality equipment reduces long-term repair costs and protects bike components from damage.
How to Use Bike Stand Safely and Effectively at Home
Correct mounting and frame positioning
Understanding how to use bike stand correctly begins with proper mounting. The bike should be clamped on the seat post or frame tube depending on manufacturer guidance. Over-tightening can damage carbon frames, while under-tightening may cause slipping during repairs.
Adjusting height for ergonomic comfort
One of the biggest advantages of a stand is adjustable height. Positioning the bike at chest level reduces back strain and allows clear visibility of drivetrain components. This ergonomic setup is essential for longer maintenance sessions.
Balancing weight distribution during repairs
When working on wheels or drivetrain components, weight shifts can destabilize the stand. Ensuring even distribution prevents tipping and keeps the workflow safe and controlled.
Building an Efficient Bike Repair Workstation Setup
Organizing tools for workflow efficiency
A well-designed bike repair workstation setup minimizes wasted movement. Tools should be arranged by frequency of use—commonly used items like Allen keys should be within arm’s reach, while specialty tools can be stored further away.
Lighting and visibility considerations
Good lighting is often overlooked. Bright, focused lighting helps detect chain wear, brake pad alignment issues, and tire damage more effectively. Many home mechanics in the USA install LED strip lighting above their workbench for consistency.
Space optimization in garages and apartments
Not every cyclist has a large garage. In urban apartments, foldable stands and wall-mounted storage systems are increasingly popular. These compact setups allow cyclists to maintain their bikes without sacrificing living space.
Case Study: A Commuter Cyclist in New York City
A daily commuter in Brooklyn began maintaining his own bike after repeated delays at local repair shops. Initially, he used a makeshift setup in his apartment hallway, which led to unstable repairs and frequent mistakes.
After investing in a proper stand and organizing essential tools, his maintenance routine became significantly more reliable. He reported fewer mid-commute breakdowns and improved braking performance during wet weather conditions.
This shift highlights how even small improvements in cycling maintenance tools USA setups can lead to major lifestyle benefits for urban riders.
Common Mistakes When Using a Bike Repair Stand
Over-clamping sensitive frame areas
One of the most common errors is applying too much pressure on carbon frames or thin tubing. This can cause structural damage over time. Always follow manufacturer recommendations.
Ignoring stand stability before repairs
A loose or uneven stand base can lead to accidents. Before starting any repair, ensure the stand is fully locked and positioned on a flat surface.
Neglecting tool maintenance itself
Tools also require care. Dirty or rusted tools can damage bike components, especially when dealing with precision parts like derailleur screws or hydraulic fittings.
Advanced Maintenance Tips for Dedicated Cyclists
Drivetrain cleaning efficiency techniques
With a stand, drivetrain cleaning becomes significantly easier. Pedal rotation can be controlled smoothly, allowing thorough degreasing without missing chain sections.
Brake system fine-tuning
Hydraulic and mechanical brakes require precise alignment. A stable stand allows for micro-adjustments that are nearly impossible when the bike is resting on the ground.
Seasonal maintenance strategies
Cyclists in colder US regions often adjust maintenance routines seasonally, focusing on rust prevention in winter and tire pressure optimization in summer.
How Home Setup Improves Long-Term Cycling Performance
Consistency in maintenance routines
Having a dedicated setup encourages regular maintenance habits. Cyclists are more likely to inspect their bikes frequently when tools and stands are easily accessible.
Cost savings over time
Performing maintenance at home reduces dependency on repair shops. Over time, this can save significant money, especially for frequent riders.
Better riding experience through precision tuning
Small adjustments made in a controlled environment lead to smoother rides, better shifting performance, and improved safety on long-distance routes.
Where Cyclists Can Improve Their Home Repair Setup
Upgrading tools and accessories
Cyclists looking to improve their setup often upgrade to torque-limited tools or professional-grade stands for increased precision.
Learning from experienced cycling communities
Online cycling communities and expert platforms provide valuable insights into efficient repair setups and tool recommendations.
Accessing expert recommendations and equipment guidance
For cyclists looking to refine their home workshop, Cycling Guider offers curated guidance on tools, stands, and maintenance strategies tailored for both beginners and experienced riders. This helps riders build a more efficient and reliable setup over time.


 Fly E-Bike Miami3.0 (86 reviews)
 Leed's Cyclery4.0 (75 reviews)
 Riding 5 Electric Bikes office5.0 (2 reviews)
 Maverick Bikes4.0 (261 reviews)
 EZ RIDERS - NEWPORT BEACH5.0 (12 reviews)
 Valley Stream bicycle4.0 (207 reviews)
 How to Teach Kids to Ride a Bike: A Step-by-Step Guide for Parents
 Tips for Riding on Busy City Streets: Smart Strategies for Urban Cyclists
 Best US National Parks for Mountain Biking: Ride Epic Trails Across America
 Best Aero Helmets for Time Trials and Racing
 How to Clean and Lubricate Your Bike Chain Like a Pro
 10 Must-Have Items for Long-Distance Cycling Trips