
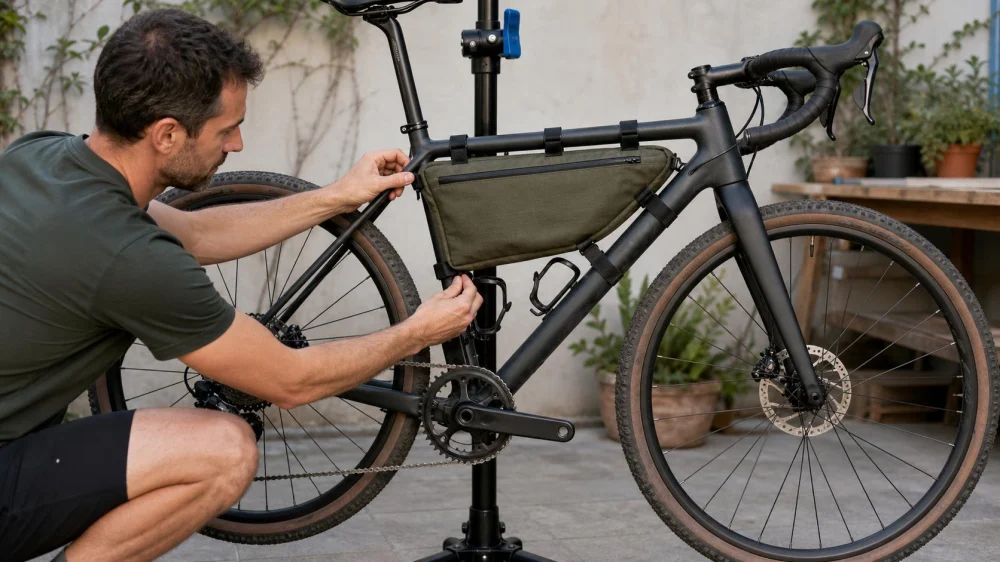
Bike Frame Bags: Check Fit, Strap Rub, and Handling
On this page
Quick answer
A bike frame bag should sit securely inside or along the frame without pressing cables, blocking suspension, rubbing moving parts, or brushing your knees. Measure the actual bicycle, map bottle and cable needs, and inspect every strap contact. Load heavy items low and stable, protect approved frame areas from abrasion, and complete a short test ride with turns, braking, and out-of-saddle pedaling.
Match the bag to the bicycle, not just its volume
A frame bag or frame pack attaches within part or all of the bicycle's main triangle. Its usable fit depends on tube angles, bottle cages, external or internal cable routing, frame material, suspension movement, and the rider's leg path. A large bag can lower cargo position but may remove bottle space or interfere with rear suspension. Universal sizing is approximate; a paper or cardboard template is more informative than a volume number alone.
This guide is for riders fitting a soft frame bag for ordinary road, gravel, commuting, touring, or bikepacking use. It is not approval to clamp, drill, or modify a frame. Carbon, thin-wall metal, painted, externally cabled, and full-suspension bicycles can have specific restrictions; consult the bicycle and bag makers.
Practical checklist
- Measure the available triangle and compare it with the bag's real dimensions, shape, zipper path, and loaded expansion.
- Turn handlebars fully and compress suspension through its safe travel to identify changing cable, tire, shock, and linkage clearance.
- Map bottle cages, frame pumps, locks, batteries, charging ports, and tools that still need access.
- Place straps only where the bicycle maker permits and away from cables, hoses, pivots, sharp edges, and moving parts.
- Use compatible frame protection at clean contact points when approved, and inspect it rather than hiding wear indefinitely.
- Load dense items low and centered, contain hard edges, and prevent contents from sliding or bulging into legs.
- Check zipper access from both sides and make sure pulls cannot reach chainrings, cranks, wheels, or suspension.
- Weigh the load and respect bicycle, frame, bag, wheel, rack, and tire limits.
Step-by-step plan
- Trace the available frame space on paper or cardboard and mark bottle, cable, shock, and knee-clearance zones. Compare the template with the bag before loading it.
- Clean the frame and inspect existing finish wear. Install only maker-approved protective film or pads where straps contact permitted surfaces.
- Attach the empty bag loosely, align it, then tighten straps evenly using the bag instructions. Do not crush cable housing or pull the bag against a derailleur line or brake hose.
- Move the handlebars, cranks, suspension, and any folding or adjustment mechanism through their safe range. Check both empty and loaded bag shapes.
- Pack dense items low and soft items around them. Keep tools and metal edges in sleeves and leave critical repair gear accessible.
- Bounce the bike gently and walk it through full steering. Re-tighten as directed, tuck strap ends, and confirm nothing swings or rattles into moving parts.
- Test ride in a low-traffic area. Include starts, stops, tight turns, bumps, climbing posture, and out-of-saddle pedaling before committing to distance.
Photograph the installed empty and loaded bag, then record strap positions, total load, bottle access, knee clearance, cable contact, handling change, and any movement after the test ride. Recheck the same frame points after the first few rides for dust lines or abrasion.
Limits and important notes
Soft bags can expand beyond their measured shape. Straps can trap grit and wear finishes or materials. Protective film does not make every attachment point safe and can hide damage. A load within the bag's limit can still exceed bicycle or tire limits or change braking and steering. Waterproof fabric does not guarantee waterproof seams or zippers; protect critical contents separately.
Stop riding if the bag contacts a tire, crank, chainring, cable, brake hose, suspension part, or your knees; if a strap loosens repeatedly; or if handling becomes unstable. Remove the bag and seek qualified advice for visible frame wear, carbon damage, crushed housing, leaking brake hose, or uncertain suspension clearance. Do not solve interference by disabling a brake or shifting component.
Frequently asked questions
Will any frame bag fit any bicycle?
No. Frame angles, tube dimensions, cables, bottles, suspension, and rider clearance differ. Compare actual measurements and use a template; universal size labels are only a starting point.
Where should heavy items go in a frame bag?
Generally low and stable near the bicycle's center, within all load limits. Pad hard edges and prevent movement. Test handling because the best arrangement depends on the bicycle and total cargo.
Do I need frame-protection tape?
Contact points can abrade, but protection must be compatible with the frame finish and maker guidance. Clean the surface, apply approved material correctly, and inspect beneath or around it regularly.
Why does the bag touch my knees only when climbing?
Out-of-saddle movement and loaded bag bulge can change clearance. Repeat the fit test in real pedaling positions and reduce or rearrange the load, straps, or bag size rather than tolerating contact.
Sources and evidence
This guide reflects current fit principles in REI bikepacking-bag guidance reviewed in September 2026: a frame pack occupies the bicycle triangle, must align with cables and frame features, should stay secure with minimal movement, and may conflict with bottles or suspension. Bicycle and bag manufacturer instructions control attachment and limits. No specific product, material compatibility, load, or waterproofing claim is made.
Conclusion and next steps
Make a full-size template of the available frame space and mark every moving or access zone. Fit the empty bag, inspect all strap contacts, load it low and stable, and test the bicycle through steering, braking, bumps, and climbing posture. Recheck rub points after the first ride and remove the bag at the first unsafe contact.






 Jay's Cycle Center4.0 (178 reviews)
 Big Stump Bikes5.0 (30 reviews)
 El Frondoso Bicycle Shop4.0 (116 reviews)
 Wheelhouse Detroit4.0 (86 reviews)
 Guthrie Bicycles4.0 (13 reviews)
 BY CYCLE - Bike Shop5.0 (118 reviews)
 How to Teach Kids to Ride a Bike: A Step-by-Step Guide for Parents
 Tips for Riding on Busy City Streets: Smart Strategies for Urban Cyclists
 Best US National Parks for Mountain Biking: Ride Epic Trails Across America
 Best Aero Helmets for Time Trials and Racing
 How to Clean and Lubricate Your Bike Chain Like a Pro
 10 Must-Have Items for Long-Distance Cycling Trips