
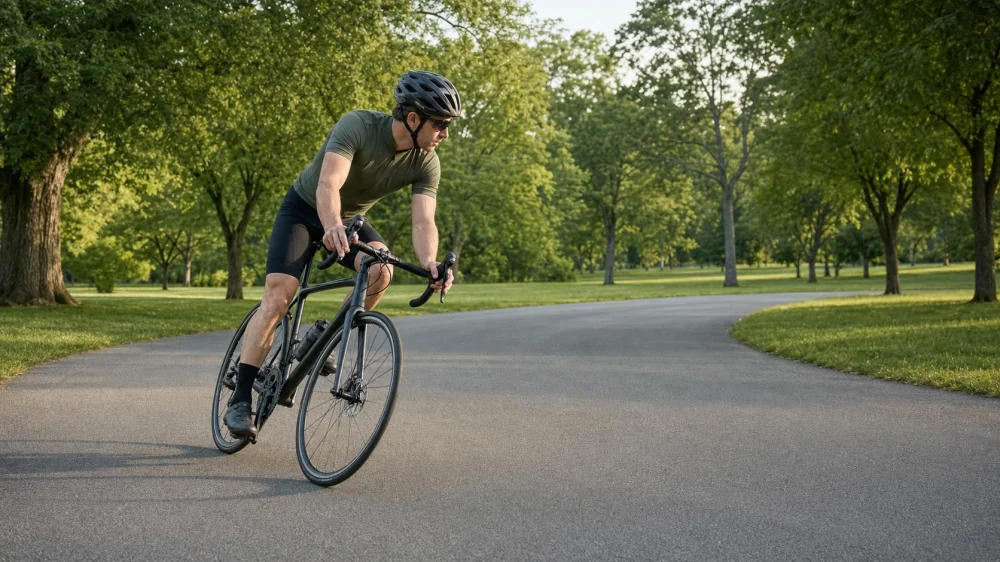
Bike Cornering Basics: Brake, Look, and Choose Your Line
On this page
Quick answer
For a controlled bicycle turn, reduce speed before the corner, look through the exit, choose a smooth path with room for hazards, and keep your movements gradual. Avoid hard braking or sudden steering while leaned over. Start slowly in a low-traffic practice area, then add speed only when you can repeat the same line comfortably.
Bike cornering is the coordinated use of speed control, vision, steering, traction, and body position to guide a bicycle through a change in direction. This guide is for recreational road, gravel, commuter, and mountain-bike riders in the United States who want a repeatable foundation. It is not a substitute for in-person coaching on high-speed descents, technical trails, or racing.
The basic cornering sequence
A useful sequence is scan, slow, look, lean, and exit. The steps overlap, but keeping them in this order helps prevent a rushed correction in the middle of the turn.
- Scan early. Check traffic, surface condition, sight distance, turn sharpness, and where the road or trail continues. Look for gravel, water, leaves, paint, potholes, sand, roots, pedestrians, and vehicles that may enter your path.
- Set speed before turning. Apply both brakes progressively while the bicycle is mostly upright. Release or ease the brakes as you begin the turn so the tires can devote more grip to changing direction.
- Look toward the exit. Turn your eyes and head toward the clear path you want to follow. Keep scanning; do not stare at a curb, rock, or patch of debris.
- Steer and lean smoothly. Use a calm steering input and let the bicycle lean enough to follow the chosen arc. Sudden handlebar movement can demand more traction than the surface provides.
- Finish before accelerating. As the bicycle straightens and the exit opens, return to a neutral position and add pedal pressure gradually if conditions allow.
This sequence is best for a turn you can see and enter at a conservative speed. It is not ideal for blindly copying a faster rider, because that rider may have different tires, skills, sight lines, and risk tolerance.
How to choose a safe line
Your line is the path the tires take through the corner. A good line preserves visibility and gives you room to respond. On a closed course, riders may use all available width. On public roads and shared trails, your usable space is much narrower: remain in your lane, stay away from oncoming traffic, and yield as local rules require.
Prioritize sight distance
Choose an entry that lets you see farther through the corner. If a building, hillside, parked vehicle, or vegetation hides the exit, treat the turn as tighter than it first appears. Slow enough that you can stop within the distance you can see to be clear.
Leave a traction margin
The mathematically shortest or fastest line is rarely the right objective for an everyday ride. Use a broad, smooth arc without crossing lane markings or cutting into another trail user's space. Leave extra margin when the pavement is wet, the surface is loose, the temperature is near freezing, or your tires are contaminated or worn.
Adjust for decreasing-radius turns
A decreasing-radius corner becomes tighter near the exit. Enter more slowly than you would for a constant-radius bend, delay your turn slightly while staying within your legal lane, and preserve room to tighten the line. If you cannot see whether the turn tightens, assume it might.
Body position and bike control
Stay relaxed enough to let the bicycle move beneath you. Keep a secure but light grip, bend your elbows and knees slightly, and avoid locking your shoulders. A rigid upper body can turn a small bump into an unwanted steering input.
- Level terrain and gentle turns: use a balanced position with steady pressure on both contact points and your eyes up.
- Faster paved turns: many riders keep the outside pedal down and place firm, not forceful, pressure through it. Keep the inside pedal high to reduce the chance of a pedal strike.
- Loose or uneven surfaces: keep your limbs mobile and use less lean angle and speed. The best technique varies with the bike, terrain, and available grip.
- Very slow tight turns: keep your torso more upright, turn your head early, and use gentle pedal or brake control rather than a sharp burst of power.
Do not force your knee outward or imitate a racing pose merely because it looks advanced. The useful position is the one that keeps your weight supported, the bicycle stable, and your available path visible.
Practice drills for quiet roads and lots
Choose a flat, clean, dry space that is legally open to cycling and separated from moving vehicles. Wear a properly fitted helmet and check for pedestrians before each attempt. Markers should be soft and visible; never place objects where they could endanger others.
1. Wide circles in both directions
Ride a large circle at walking-to-jogging speed. Look around the circle rather than at the front wheel. Make five calm laps each way, then notice whether one direction feels less natural. Keep the circle large until both sides feel predictable.
2. Progressive braking before the turn
Choose a fixed point where you begin slowing and a second point where you start turning. Brake smoothly before the second marker, release most braking pressure, and roll through a broad arc. The goal is consistent entry speed, not maximum speed.
3. Figure eights
Ride two connected circles to practice changing direction. Keep the path generous and the speed low. Look toward each new exit before the bicycle changes lean. If you wobble or run wide, enlarge the pattern instead of steering more sharply.
4. Stop if the drill becomes messy
End the session when fatigue causes late braking, target fixation, repeated pedal strikes, or inconsistent lines. Ten focused minutes can be more useful than a long session built around recovering from errors.
Pre-ride cornering checklist
- Confirm both brakes engage progressively and the levers do not pull to the handlebar.
- Check that wheels are secure and tires have no visible damage, embedded debris, or abnormal bulges.
- Use tire pressure appropriate for the tire, rider, load, and surface; follow the tire and rim limits.
- Make sure handlebar, stem, and headset feel secure with no unusual play or binding.
- Keep pedals, bags, loose clothing, and cargo clear of the wheel and steering path.
- Reduce speed for rain, loose gravel, fallen leaves, painted lines, metal covers, and poor visibility.
- Choose an exit that stays within your lane or designated trail space.
Limitations and important notes
Grip changes with tire construction, pressure, temperature, surface texture, contamination, bicycle geometry, cargo, and rider input. No written guide can provide a universal safe cornering speed or lean angle. If the surface is unknown, the exit is hidden, or traffic behavior is unpredictable, the conservative choice is to slow down before entering.
Hard braking while leaned over can use traction abruptly and may cause a slide, but an emergency can still require braking. Straighten the bicycle as much as your available path safely permits, apply both brakes progressively, and avoid grabbing a single brake. Actual emergency technique depends on conditions and should be practiced with a qualified cycling instructor.
Stop riding and arrange professional inspection if steering binds or knocks, a wheel shifts, a tire loses pressure, a brake pulses unexpectedly, or the bicycle pulls to one side. After a crash or hard impact, inspect the bicycle before returning to speed. Follow component manufacturer instructions because carbon, suspension, hydraulic brakes, and other systems may need specialized checks.
Sources and evidence notes
The sequence in this guide reflects broad cycling-instruction practice: set an appropriate speed before the turn, direct vision toward the intended path, use smooth control inputs, and preserve traction for changing direction. The equipment checks reflect common manufacturer and professional bicycle-maintenance guidance.
Conditions and traffic laws differ across the United States. Consult your state and local transportation rules, land-manager trail notices, and the instructions supplied with your bicycle, tires, brakes, and helmet. Where those sources conflict with general guidance, follow the applicable rule and product documentation.
Frequently asked questions
Should I brake during a bicycle corner?
Set most of your speed before the corner while the bicycle is upright. If you must slow while turning, use smooth, modest braking rather than a sudden grab, and reduce lean when space and conditions permit. Entering conservatively gives you more options.
Where should I look when turning?
Look through the turn toward the clear exit while continuing to scan the surface and surrounding traffic. Your near vision can monitor the immediate path, but staring at the front wheel or a hazard often delays the next decision.
Why do I run wide on corners?
Common causes include excessive entry speed, looking at the outside edge, starting the turn too early, using a sudden steering correction, or discovering that the corner tightens. Slow earlier, look farther ahead, and practice a repeatable arc in a controlled area.
Should the outside pedal always be down?
It is a useful default for many moderate or faster paved turns because it keeps the inside pedal away from the ground and provides a stable support point. It is not universal: terrain, slow-speed maneuvers, pedaling through a bend, and mountain-bike technique can call for different timing.
How can I corner safely on gravel?
Reduce speed, use a wider and smoother arc, stay relaxed, avoid abrupt braking or steering, and expect less predictable grip. Keep extra distance from other users and practice on an open, low-consequence surface before attempting steep or exposed terrain.
Next steps
Begin with the pre-ride checklist, then practice wide circles, controlled entry braking, and figure eights in a legal traffic-free area. Move to real roads or trails only when your eyes, speed, and line work together without rushed corrections. For descending, racing, group riding, or technical mountain-bike terrain, choose a qualified local instructor who can observe your technique and the actual surface.






 71 E-BIKES INC3.0 (15 reviews)
 AAA E-Bike Repair4.0 (21 reviews)
 JC Bicycle4.0 (158 reviews)
 Uniqa Vintage Bikes4.0 (28 reviews)
 Isanti Bicycle4.0 (26 reviews)
 Third Wheel5.0 (23 reviews)
 How to Teach Kids to Ride a Bike: A Step-by-Step Guide for Parents
 Tips for Riding on Busy City Streets: Smart Strategies for Urban Cyclists
 Best US National Parks for Mountain Biking: Ride Epic Trails Across America
 Best Aero Helmets for Time Trials and Racing
 How to Clean and Lubricate Your Bike Chain Like a Pro
 10 Must-Have Items for Long-Distance Cycling Trips