
Bicycle Tire Valves: Identify, Inflate, and Protect
On this page
Quick answer
Before inflating a bicycle tire, identify the valve and use a pump head or adapter designed for it. A Presta valve has a small threaded tip that must be loosened before inflation; a Schrader valve has a wider stem with a spring-loaded center. Support the pump head, follow the tire and rim pressure limits, remove the connector straight, and check for leakage or stem damage.
Tell Presta, Schrader, and other valve types apart
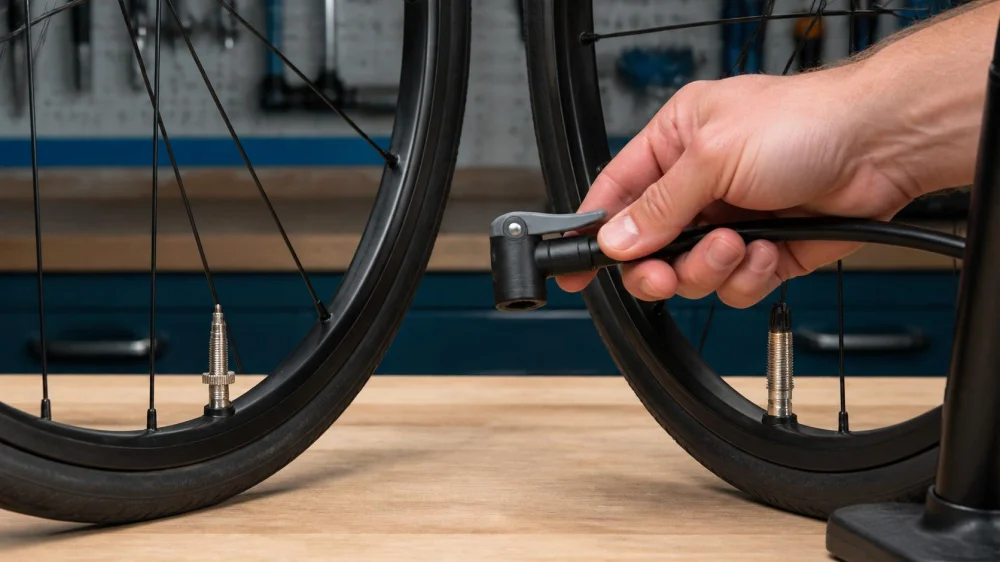
Presta and Schrader are common bicycle valve types in the United States, while Woods or Dunlop valves appear on some bikes. Schrader stems are wider and use an internal spring pin. Presta stems are narrower and usually have a small locknut at the tip that opens for inflation. The valve must fit the rim hole, tube or tubeless system, and pump interface. A universal pump head may adjust automatically; other heads have separate openings or internal parts that must be oriented correctly.
This guide is for riders performing routine inflation on an intact bicycle wheel. It is not a tubeless conversion, valve-core replacement, tire-seating, high-pressure compressor, or wheel-repair procedure. Follow the tire, rim, pump, and bicycle manufacturer's limits and use a shop when compatibility is uncertain.
Practical checklist
- Read the sidewall and rim information and use the lower applicable maximum; do not assume one pressure fits every rider or setup.
- Identify the valve by its actual stem and tip, not by the bike style.
- Choose the correct pump opening, insert, or adapter and check that its seal is clean and undamaged.
- Position the valve where the pump head and hose can connect without side load.
- For Presta, loosen the small tip nut gently and tap it briefly to confirm the valve is not stuck.
- Push or thread the connector on straight using the pump maker's method; avoid levering against the stem.
- Inflate gradually with a reliable gauge and stop for bulging, bead movement, hissing, or an unstable pump connection.
- Remove the head straight, close the Presta tip gently, and replace the dust cap if used.
Step-by-step plan
- Inspect the tire, rim, stem base, and valve before adding air. A cut tire, displaced bead, cracked rim, or stem tearing needs repair first.
- Find the permitted pressure information and choose a starting pressure suited to the tire size, load, surface, and manufacturer guidance.
- Prepare the valve. Remove the cap; on Presta, loosen the tip nut without removing it and briefly press the tip.
- Set the pump head for the valve. If the pump uses reversible parts, follow its diagram rather than guessing from hole size.
- Attach in line with the stem and lock the head as designed. Stabilize the connection so hose movement does not bend the valve.
- Pump in stages and watch the gauge and tire bead. Stop before either tire or rim limit and do not use a gas-station compressor unless the bicycle setup and regulator are suitable.
- Release the head lock and pull straight off. Listen for continuing leakage, check pressure again, and investigate repeated loss instead of simply topping up every ride.
Record valve type, tire size, front and rear starting pressures, rider and cargo context, surface, comfort, grip, and any air loss. Keep the pump-head instructions with the repair kit. A pressure note is a starting point, not a reason to exceed current tire or rim limits.
Limits and important notes
Valve adapters change the pump interface but do not change tire, rim, tube, or tubeless compatibility. Tightening a Presta tip with force can damage it. Removing or tightening a valve core requires the correct tool and procedure; some cores are not removable. Sealant can clog valves and pump heads. A leaking stem base usually requires tube or tubeless service, not external glue.
Do not ride when the tire will not hold safe pressure, the valve stem is cut or leaning from damage, the bead is not seated, the rim is cracked, or inflation creates a bulge. Deflate safely and use a qualified bike shop when valve, rim, tubeless tape, core, or pump compatibility is unclear. Avoid placing face or hands over a distressed tire during inflation.
Frequently asked questions
How can I tell a Presta valve from a Schrader valve?
A Presta stem is narrower and commonly has a small threaded tip nut that opens for inflation. A Schrader stem is wider and has a spring-loaded center pin, similar to many motor-vehicle tire valves.
Why does air escape when I remove the pump?
A brief release from the pump hose can be normal. Continuing leakage may mean the Presta tip is open or damaged, the core is loose, or the valve has another fault. Recheck without overtightening.
Can I use an adapter between valve types?
A compatible adapter can let some pump heads connect, but it does not fix a damaged valve or make the tube fit the rim. Follow adapter and pump instructions and keep the connection straight.
Why is the pump head hard to attach?
The wrong opening, reversed internal insert, closed Presta tip, worn seal, dirt, or side load can prevent a seal. Stop before bending the stem and check the pump instructions.
Sources and evidence
This guide reflects Park Tool technical materials reviewed in September 2026. Those resources distinguish Schrader, Presta, and Woods or Dunlop stems, explain the Presta tip and Schrader center pin, and show that pump-head seals or openings must match the valve. Tire, rim, pump, tube, and tubeless-system instructions remain controlling; no universal pressure or repair method is claimed.
Conclusion and next steps
Identify both bicycle valves and configure the pump before the next ride. Inspect each stem, attach the head without side load, inflate within tire and rim limits, and remove it straight. Record a safe starting pressure for the real load and surface. If pressure loss repeats or the stem moves abnormally, repair the cause before riding.






 Jay's Cycle Center4.0 (178 reviews)
 Big Stump Bikes5.0 (30 reviews)
 El Frondoso Bicycle Shop4.0 (116 reviews)
 Wheelhouse Detroit4.0 (86 reviews)
 Guthrie Bicycles4.0 (13 reviews)
 BY CYCLE - Bike Shop5.0 (118 reviews)
 How to Teach Kids to Ride a Bike: A Step-by-Step Guide for Parents
 Tips for Riding on Busy City Streets: Smart Strategies for Urban Cyclists
 Best US National Parks for Mountain Biking: Ride Epic Trails Across America
 Best Aero Helmets for Time Trials and Racing
 How to Clean and Lubricate Your Bike Chain Like a Pro
 10 Must-Have Items for Long-Distance Cycling Trips