
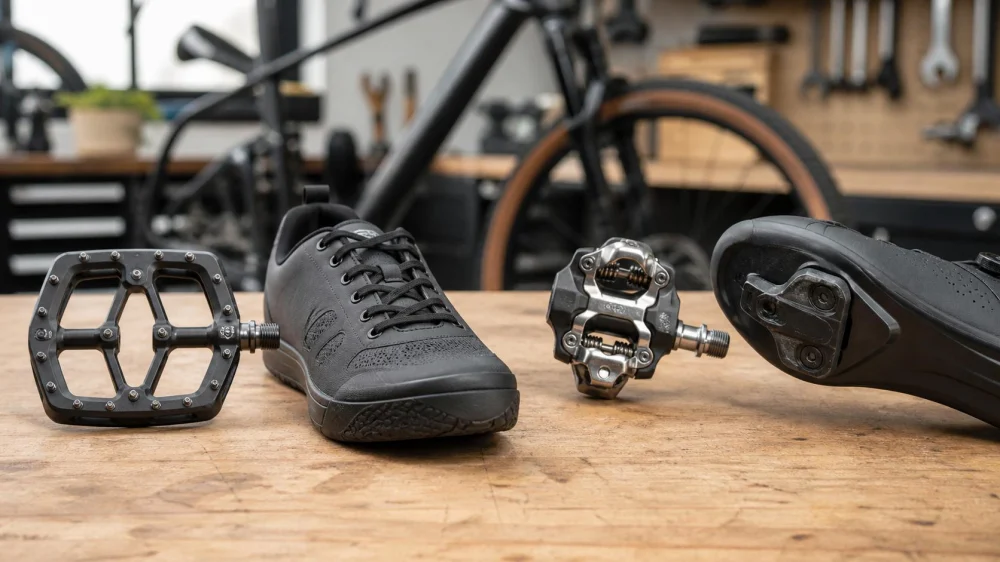
Flat Pedals vs. Clipless: Choose for Your Riding Style
On this page
Quick answer
Choose flat pedals when easy foot removal, ordinary footwear, and simple starts and stops matter most. Choose clipless pedals when you want a consistent foot position and are willing to use compatible shoes, cleats, setup, and release practice. Neither system is automatically better: match grip, platform, terrain, traffic, walking needs, maintenance, and confidence to the rides you actually do.
This guide is for United States riders comparing pedals for road, gravel, mountain, commuting, and recreational cycling. It offers general selection guidance. A qualified bicycle shop or fitter can assess compatibility, installation, cleat position, movement concerns, and damaged parts.
What flat and clipless pedals are
Flat pedals support the shoe on an open platform. Grip comes from surface shape, pins, tread, and contact area. The rider can lift a foot without operating a release mechanism.
Clipless pedals connect a cleat on a cycling shoe to a spring or retention mechanism on the pedal. Despite the name, the shoe clips into the pedal. The rider usually releases by rotating the heel in the direction specified by the system.
Each is a complete system. A flat pedal works with the shoe sole and pin pattern. A clipless setup must combine a compatible pedal, cleat, shoe, mounting hardware, and correct installation.
When flat pedals fit best
Flat pedals are often best for new riders, casual trips, stop-and-go commuting, technical practice, bike sharing, and rides that include substantial walking. They allow quick repositioning and do not require a cleat-equipped shoe.
Look beyond platform size alone. A supportive platform should fit the intended shoe without interfering with the crank or ground. Replaceable pins can restore grip but may damage shoes or skin. Molded composite tread can be gentler but may feel less secure in mud or rain.
Flat pedals are not automatically low-grip. A suitable pedal paired with a flat, grippy shoe can feel secure. However, worn tread, mud, smooth casual soles, loose laces, or inappropriate footwear can reduce control.
When clipless pedals fit best
Clipless pedals are often best for riders who value repeatable foot placement on longer road, gravel, mountain, or indoor-training sessions and who can practice release deliberately. Different systems prioritize walkability, mud clearance, platform support, low weight, or road-shoe stiffness.
The tradeoff is more setup and a required release action. Cleat position affects how the foot and leg move. Retention tension may be adjustable on some pedals, but the lowest setting is not a substitute for correct technique or a compatible cleat.
Clipless is not ideal when frequent dismounts, uncertain balance, footwear changes, injury, or an unpracticed emergency stop makes reliable release difficult. A rider can return to flats at any time; progression does not require one system.
Compare the full system
- Foot release: flats allow lifting; clipless requires the system's release motion.
- Foot position: flats permit frequent repositioning; clipless creates a repeatable position within the cleat's adjustment and float.
- Walking: ordinary flat-pedal shoes are usually easier off the bike. Recessed two-bolt cleats often walk better than exposed road-style cleats, but surfaces remain slippery or awkward.
- Weather and dirt: pin and sole grip can change when wet or muddy. Clipless mechanisms and cleats can clog, wear, or corrode.
- Cost: compare pedals, shoes, cleats, tools or labor, replacement parts, and any fit service.
- Bike use: one bicycle may serve errands and trails. Double-sided flat pedals or combination pedals can add flexibility, though combination designs require finding the correct side.
- Injury and mobility: foot, ankle, knee, hip, or balance concerns deserve individualized professional input rather than a generic pedal claim.
Pedal decision checklist
- List the surfaces, ride length, traffic, stops, and walking expected on most rides.
- Identify the footwear you are willing to wear and carry.
- Check pedal-thread and crank compatibility with the bike.
- Compare platform support or cleat-system compatibility, not marketing categories alone.
- Confirm how grip or release behaves with dirt, rain, and the chosen shoe.
- Include replacement cleats, pins, bearings, and service in the ownership cost.
- Test easy starts, planned stops, tight turns, and walking before a long ride.
- Choose flats when release confidence remains uncertain; changing later is reasonable.
How to change pedal systems safely
Have pedals and cleats installed according to the manufacturers' directions, observing the different thread direction commonly used on the left pedal. Incorrect installation can damage crank threads or allow a pedal to loosen. A bike shop is the right choice when tools, torque guidance, or component condition is uncertain.
For clipless practice, begin away from traffic on a stable indoor trainer with appropriate support or in a large, level, traffic-free area, following qualified instruction. Learn to engage and release one foot repeatedly, then both. Release early before every planned stop and use the same preferred foot until the routine is consistent.
Do not lean against a movable object or another person as the only support. Do not begin in traffic, on a narrow trail, beside a drop-off, or on a slope. If release is inconsistent, stop and inspect compatibility, cleat wear, mounting security, contamination, and tension settings before riding.
Setup and maintenance checks
- Confirm both pedals are correctly tightened and rotate normally without excessive play or binding.
- For flats, inspect platform cracks, bent axles, missing or loose pins, and shoe-sole wear.
- For clipless systems, inspect cleat bolts, cleat wear indicators where provided, retention mechanisms, and release on both sides.
- Keep laces, straps, and loose clothing away from the crank, chain, and pedal axle.
- After a strike or fall, stop and check the pedal, crank, shoe, and cleat before continuing.
- Follow service intervals and lubrication instructions for the exact pedal.
Limitations and important notes
- No pedal prevents a fall, and connection to the bike can affect how a fall develops.
- Ground clearance changes with pedal shape, bike geometry, lean angle, and terrain. Avoid pedaling through obstacles when clearance is uncertain.
- Cleat “float” describes permitted movement within a system; it does not guarantee a good fit or resolve pain.
- Stop riding with new or increasing pain, numbness, hot spots, repeated unintended release, or inability to release.
- Local events, indoor studios, rentals, and bike parks may require or prohibit certain pedal or shoe types.
Frequently asked questions
Are clipless pedals more efficient?
They provide consistent foot retention, but real-world benefit depends on the rider, effort, terrain, fit, and technique. Choose them for the whole riding experience rather than assuming a universal performance gain.
Can beginners use clipless pedals?
Yes, when the rider has stable basic bike handling, compatible equipment, a safe practice area, and reliable release. Flats remain a valid option for beginners and experienced riders.
Do flat pedals need special shoes?
They do not require cleats, but a shoe designed for flat pedals can improve platform contact and grip. The sole should also be secure, comfortable, and suitable for walking.
What are combination pedals?
They usually place a flat platform on one side and a clipless mechanism on the other. They suit mixed use but require rotating or locating the desired side during starts.
When should cleats be replaced?
Follow the system's wear indicators and instructions. Replace cleats that are damaged, excessively worn, loose despite correct hardware, or causing unreliable entry or release.
Evidence notes
This comparison follows common bicycle-fit and equipment practice: evaluate the rider's use, treat shoes and pedals as a system, verify compatibility, install correctly, practice low-risk release, inspect wear, and respond to pain or unreliable operation. Exact requirements belong to the component manufacturers and individual rider assessment.
Next steps
Write down your three most common rides, number of stops, walking distance, and preferred shoes. Test a suitable flat setup and, if interested, a compatible clipless system with shop guidance. Choose the system that supports confident starts, controlled stops, and the real trip—not an identity label.






 Bikesmiths4.0 (36 reviews)
 Last Mile Marin4.0 (45 reviews)
 Bikes Blades & Boards - Bike Shop4.0 (148 reviews)
 Beam eBikes5.0 (1 reviews)
 Rechargeable Power Energy4.0 (76 reviews)
 Bike Life Bicycle Shop4.0 (85 reviews)
 How to Teach Kids to Ride a Bike: A Step-by-Step Guide for Parents
 Tips for Riding on Busy City Streets: Smart Strategies for Urban Cyclists
 Best US National Parks for Mountain Biking: Ride Epic Trails Across America
 Best Aero Helmets for Time Trials and Racing
 How to Clean and Lubricate Your Bike Chain Like a Pro
 10 Must-Have Items for Long-Distance Cycling Trips