
- 1. Understanding Disc Brakes
- 2. Why Do Disc Brakes Become Misaligned?
- 3. Tools Needed to Fix Misaligned Disc Brakes
- 4. Step-by-Step Guide to Fix Misaligned Disc Brakes
- 5. How to Maintain Disc Brakes for Longevity
1. Understanding Disc Brakes
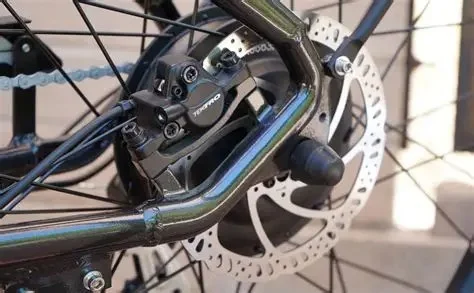
Disc brakes are a critical component of modern bicycles, providing reliable stopping power even in challenging conditions. The system consists of a rotor mounted on the wheel hub and calipers that grip the rotor with brake pads. The friction between the pads and rotor creates the stopping force. Misalignment in disc brakes can reduce braking efficiency, leading to uneven pad wear, noise, and potentially unsafe riding conditions.
2. Why Do Disc Brakes Become Misaligned?
Disc brakes can become misaligned for several reasons, most commonly due to wear and tear, accidents, or improper installation. The rotor itself can bend from impact or general use, and the caliper may shift slightly out of position. If your brakes feel less responsive or make scraping noises, it could be a sign that your disc brakes are misaligned. Misalignment can cause uneven pad wear, affecting performance and safety.
3. Tools Needed to Fix Misaligned Disc Brakes
Before you begin the process of fixing your misaligned disc brakes, it’s important to gather the right tools. Here’s what you’ll need:
- Hex wrenches – To loosen and adjust the calipers and rotor bolts.
- Rotor truing tool – To straighten the rotor if it’s bent.
- Brake pad spacer – To prevent the pistons from moving while working on the brakes.
- Torque wrench – To ensure bolts are tightened to the proper specifications.
- Isopropyl alcohol and a clean rag – For cleaning the brake components.
Once you have all your tools in hand, you're ready to get started on fixing the misalignment.
4. Step-by-Step Guide to Fix Misaligned Disc Brakes
Here’s a simple, step-by-step guide to fixing misaligned disc brakes:
- Step 1: Lift the Bike – Place your bike on a stand or flip it upside down to ensure the wheels are free to spin while you work on the brakes.
- Step 2: Inspect the Rotor – Check the rotor for any obvious bends. If you find any, use the rotor truing tool to gently straighten it. Be careful not to apply too much pressure, as this can cause further damage.
- Step 3: Check Caliper Alignment – Loosen the caliper bolts slightly, just enough to allow the caliper to move. Squeeze the brake lever to center the caliper over the rotor, then tighten the bolts while still holding the brake lever.
- Step 4: Adjust the Brake Pads – If the pads are rubbing against the rotor unevenly, you may need to adjust their position. Most calipers have a small adjustment screw to help align the pads. Adjust until the pads are parallel to the rotor and make no contact when the brake is not engaged.
- Step 5: Test the Brakes – Spin the wheel and engage the brake to ensure it’s functioning properly. If you hear rubbing or feel a lack of braking power, repeat the adjustment steps. It’s important to make small, gradual adjustments for optimal performance.
Once you've completed these steps, your disc brakes should be properly aligned and functioning well. Always remember to test your brakes before going for a ride to ensure they’re working properly and safely.
5. How to Maintain Disc Brakes for Longevity
Proper maintenance of your disc brakes can help prolong their lifespan and keep them in top working condition. Here are a few tips to maintain your disc brakes:
- Clean your brakes regularly – Dust and debris can accumulate on the rotor and pads, affecting performance. Use isopropyl alcohol and a clean rag to wipe down the components.
- Check brake pads for wear – Inspect your brake pads periodically. If they’re worn down too much, replace them immediately to avoid damaging the rotor.
- Ensure proper rotor alignment – Regularly check that the rotor is not bent, as this can cause uneven wear on the brake pads and reduce braking efficiency.
- Avoid over-tightening bolts – Use a torque wrench to ensure all bolts are tightened to the manufacturer’s specifications. Over-tightening can damage components.
By following these simple maintenance steps, you can ensure that your disc brakes remain in great condition, giving you a smooth and safe ride every time. For more tips and recommended products to enhance your bike's performance, check out Cycling Guider for the best items and services available.


 Billet BMX5.0 (2 reviews)
 Far East Children Bicycle Factory1.0 (1 reviews)
 Archer Motorsports, Inc.4.0 (8 reviews)
 YEP Bike Works4.0 (55 reviews)
 Gorham Bike & Ski4.0 (498 reviews)
 Alchemy Bikes4.0 (37 reviews)
 How to Teach Kids to Ride a Bike: A Step-by-Step Guide for Parents
 Tips for Riding on Busy City Streets: Smart Strategies for Urban Cyclists
 Best US National Parks for Mountain Biking: Ride Epic Trails Across America
 Best Aero Helmets for Time Trials and Racing
 How to Clean and Lubricate Your Bike Chain Like a Pro
 10 Must-Have Items for Long-Distance Cycling Trips