
- Introduction
- What is Aero Position?
- Benefits of Aero Position
- How to Implement Aero Position
- Common Mistakes to Avoid
- Additional Tips for Perfecting Your Aero Position
1. Introduction
When it comes to competitive cycling, one of the most important factors in improving speed and efficiency is the rider's position on the bike. The aero position is a specialized riding posture designed to reduce wind resistance and increase cycling performance. Whether you’re training for a time trial, triathlon, or simply trying to improve your overall cycling efficiency, adopting the correct aero position can make a significant difference.
2. What is Aero Position?
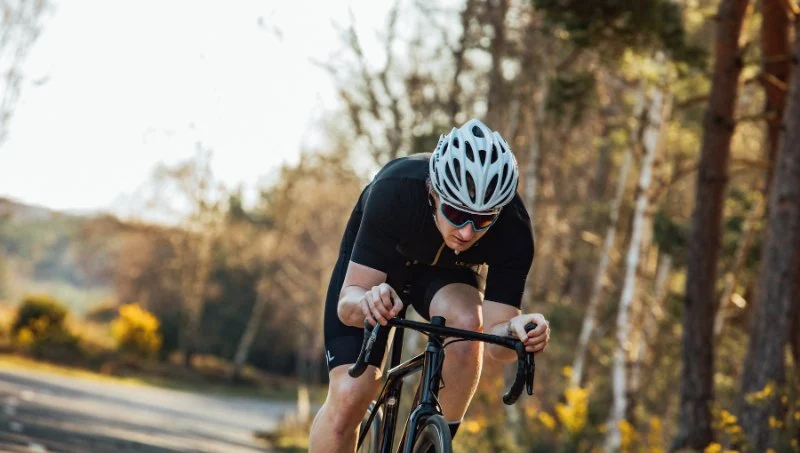
Aero position refers to a posture that reduces the frontal surface area facing the wind, allowing you to cut through the air more efficiently. This position is typically adopted by professional cyclists and triathletes looking to optimize their aerodynamic advantage. It involves adjusting your body so that your torso is lower and more streamlined, keeping your head, neck, and arms in alignment with the bike frame.
Components of the Aero Position:
- Lowered torso: Keeping your body low and close to the handlebars helps minimize drag.
- Elbows bent: Bending your elbows while keeping your upper body stable reduces the wind's impact on your chest.
- Hands on aero bars: Using aero bars allows you to position your forearms parallel to the ground, optimizing your aero position.
- Neutral head and neck position: Maintaining a neutral head position ensures you’re not creating unnecessary resistance.
3. Benefits of Aero Position
Adopting the aero position has several advantages for cyclists of all levels. Here’s how it can benefit you:
1. Reduced Wind Resistance
Wind resistance accounts for a significant portion of the effort required to cycle at high speeds. By lowering your body and reducing the surface area that faces the wind, you can significantly reduce drag and increase your speed.
2. Improved Speed and Efficiency
With less resistance, you’ll expend less energy maintaining the same speed, leading to greater efficiency on long rides or during time trials.
3. Better Performance in Time Trials and Triathlons
In events like time trials or triathlons, where speed is paramount, the aero position can make all the difference. By using less energy to overcome wind resistance, athletes can conserve more power for the rest of their performance.
4. Enhanced Comfort for Long Rides
When done correctly, the aero position can also reduce strain on the lower back and shoulders by evenly distributing your weight across your body. This can enhance comfort during long cycling sessions.
4. How to Implement Aero Position
Adopting the aero position requires making specific adjustments to your riding posture and bike setup. Here’s how you can implement the aero position effectively:
1. Adjust Your Handlebars
Start by adjusting your handlebars or adding aero bars to your bike. Aero bars are designed to allow you to rest your forearms and maintain a more aerodynamic position. Ensure the bars are positioned comfortably so you can easily reach them without straining.
2. Lower Your Torso
To optimize your aero position, you need to lower your torso while keeping your back straight. This may require adjusting the height of your saddle or handlebars. Avoid over-reaching or slumping, as this can cause discomfort and increase drag.
3. Keep Elbows Bent
Bend your elbows slightly while riding in the aero position. This helps to keep your upper body stable and minimizes the impact of wind resistance on your chest. Avoid locking your elbows, as this can reduce control and comfort.
4. Maintain a Neutral Head Position
Ensure your head is aligned with your body and the bike frame. Avoid looking up too high or down too low, as both positions can increase drag. A neutral head position will help you maintain control and reduce unnecessary wind resistance.
5. Common Mistakes to Avoid
While the aero position is effective, it can be tricky to master. Here are some common mistakes to avoid when trying to get into the proper position:
1. Overextending Your Arms
One of the most common mistakes is reaching too far forward, which can put excessive strain on your arms and shoulders. Ensure your arms are comfortably bent at a 90-degree angle.
2. Neglecting to Maintain Proper Form
It’s crucial to maintain a neutral spine and avoid slumping forward. Poor posture can not only increase drag but also lead to discomfort and injuries.
3. Not Using Proper Bike Fit
Make sure your bike is properly fitted to your body size and riding style. An incorrect bike setup can make it difficult to maintain a comfortable and effective aero position.
6. Additional Tips for Perfecting Your Aero Position
Here are some additional tips to help you perfect your aero position:
1. Practice on Flat Terrain
Start practicing your aero position on flat terrain before trying it on hills or during high-speed rides. This will allow you to get comfortable with the position and build up endurance.
2. Strengthen Your Core
A strong core is essential for maintaining a stable and effective aero position. Incorporate core exercises into your workout routine to help you hold the position for longer periods without fatigue.
3. Use a Bike Fit Specialist
If you’re struggling to find the right position, consider visiting a bike fit specialist. They can help adjust your bike setup and provide personalized recommendations to optimize your aero position.
For more expert tips and products to improve your cycling, check out Cycling Guider for the best cycling gear and advice.


 Billet BMX5.0 (2 reviews)
 Far East Children Bicycle Factory1.0 (1 reviews)
 Archer Motorsports, Inc.4.0 (8 reviews)
 YEP Bike Works4.0 (55 reviews)
 Gorham Bike & Ski4.0 (498 reviews)
 Alchemy Bikes4.0 (37 reviews)
 How to Teach Kids to Ride a Bike: A Step-by-Step Guide for Parents
 Tips for Riding on Busy City Streets: Smart Strategies for Urban Cyclists
 Best US National Parks for Mountain Biking: Ride Epic Trails Across America
 Best Aero Helmets for Time Trials and Racing
 How to Clean and Lubricate Your Bike Chain Like a Pro
 10 Must-Have Items for Long-Distance Cycling Trips