
- Understanding Trail Maps
- Key Symbols on Trail Maps
- How to Read Contour Lines
- Elevation Gain and Its Significance
- Practical Tips for Using Trail Maps
1. Understanding Trail Maps
Trail maps are essential tools for anyone exploring nature trails, whether you're hiking, biking, or cross-country skiing. These maps offer vital information about the terrain, the location of trailheads, and the distances between different points of interest. Reading a trail map correctly can make the difference between a fun, safe adventure and a stressful, disorienting experience.
1.1. The Importance of Trail Maps
Knowing how to read a trail map allows you to navigate trails with confidence. It can help you understand where the trail leads, how difficult the terrain is, and what you might encounter along the way. Whether you're a beginner or an experienced adventurer, understanding trail maps enhances your outdoor experience and ensures your safety.
1.2. Types of Trail Maps
There are different types of trail maps available, such as topographic maps, online interactive maps, and paper maps. While the specific features of these maps may vary, the basic principles of reading them remain the same. For this article, we'll focus on the traditional paper trail maps commonly used for hiking and other outdoor activities.
2. Key Symbols on Trail Maps
One of the most critical aspects of reading a trail map is understanding the various symbols used to represent different features of the landscape. These symbols help you identify important points such as trailheads, water sources, and rest stops. Learning to recognize these symbols will improve your navigation skills and make your hiking or biking experience much more enjoyable.
2.1. Common Symbols Found on Trail Maps
Trail maps use standardized symbols to indicate various features. Here are a few common symbols you may encounter:
- Trailheads: These are usually marked with a simple triangle or circle symbol and represent the starting point of a trail.
- Water Sources: Rivers, streams, and lakes are often shown using blue lines or shaded areas, indicating accessible water.
- Rest Areas: Look for benches or shaded trees symbols to find rest areas or picnic spots along the trail.
- Difficulty Levels: Trails are sometimes color-coded by difficulty, with green for easy, blue for moderate, and black for difficult.
2.2. How to Use These Symbols
Once you’re familiar with the symbols, you can use them to plot your route and make informed decisions about your hike. For example, if you’re looking for a rest stop, check the map for the relevant symbols. If you’re planning to cross a river, be aware of water crossings marked on the map and consider if you need extra gear.
3. How to Read Contour Lines
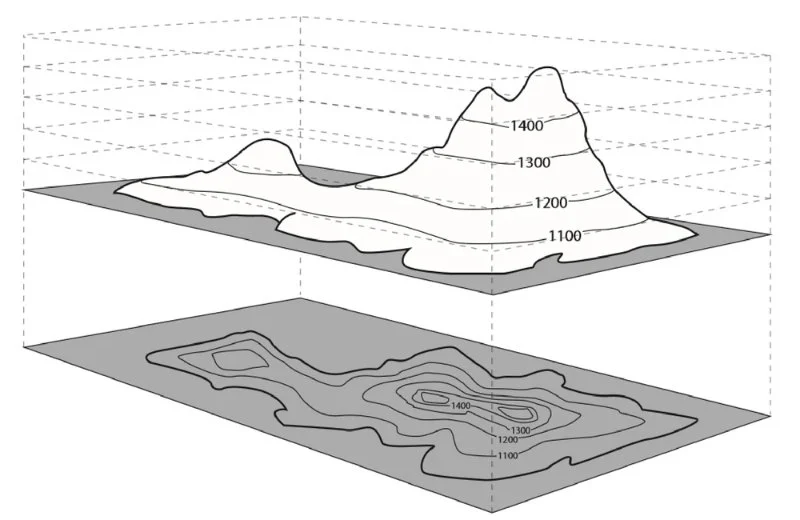
Contour lines are a fundamental feature of topographic maps, helping you understand the elevation changes along a trail. These lines connect points of equal elevation, providing a 2D representation of the terrain's shape and steepness. Understanding contour lines is key to determining the difficulty of a trail and planning your ascent or descent.
3.1. Interpreting the Spacing of Contour Lines
The spacing between contour lines indicates the steepness of the terrain. When contour lines are close together, it means the terrain is steep. Conversely, when the lines are farther apart, the land is relatively flat. This information allows you to gauge the effort required for different parts of your hike.
3.2. Identifying Hills, Valleys, and Ridges
Contour lines form specific patterns that represent different land features. A series of concentric circles indicates a hill or mountain peak, while U-shaped or V-shaped lines often represent valleys or ridges. By understanding these patterns, you can visualize the elevation changes ahead and prepare accordingly.
3.3. Using Contour Lines to Plan Your Route
When reading a trail map with contour lines, you can assess whether the trail has steep climbs or gentle slopes. If you’re preparing for a strenuous hike, look for areas where the lines are closely packed to identify challenging sections. Conversely, look for flatter sections where the lines are more spread out for easier terrain.
4. Elevation Gain and Its Significance
Elevation gain refers to the total vertical distance you’ll ascend during your hike. This number is essential to understand, as it helps you gauge the difficulty of your route. A trail with a significant elevation gain will be much more challenging than one that stays close to flat ground.
4.1. How to Calculate Elevation Gain
To calculate the total elevation gain, subtract the starting elevation from the highest point on the trail. Trail maps often include this information, but if not, you can calculate it based on the contour lines and your understanding of the map. Generally, a trail with over 1,000 feet of elevation gain is considered moderate to strenuous, depending on the distance.
4.2. Why Elevation Gain Matters
Understanding elevation gain is crucial for preparing physically. It helps you estimate how difficult the hike will be and gives you an idea of how much stamina you’ll need to complete the trail. Hikes with significant elevation gains require more energy, and you’ll need to pace yourself accordingly.
5. Practical Tips for Using Trail Maps
To get the most out of your trail map and ensure a safe and enjoyable hike, here are some practical tips:
5.1. Always Carry a Paper Map
Even if you plan to use your phone or GPS for navigation, always bring a paper map as a backup. Batteries can die, and cell service might not be available on some trails. A paper map ensures that you’re never completely lost.
5.2. Study the Map Before You Go
Before setting off on your hike, spend time studying the trail map. Pay attention to trailhead locations, water sources, potential hazards, and areas with significant elevation gain. This will help you anticipate what to expect and make your hike more enjoyable.
5.3. Familiarize Yourself with Key Landmarks
Identify key landmarks on the map, such as peaks, rivers, or unique rock formations. These landmarks can be helpful in orienting yourself while on the trail and help you track your progress toward your destination.
By understanding trail maps and learning how to read symbols, contour lines, and elevation gain, you’ll be better prepared for your next outdoor adventure. For more hiking tips and gear recommendations, visit Cycling Guider for expert advice and high-quality products to enhance your experience.


 Cycle Logic4.0 (243 reviews)
 Independent Bicycle Shop4.0 (21 reviews)
 Linus at Luft4.0 (26 reviews)
 Bicycles Etc.4.0 (334 reviews)
 Palo Alto Bicycles4.0 (384 reviews)
 Trek Bicycle Pontiac4.0 (469 reviews)
 How to Teach Kids to Ride a Bike: A Step-by-Step Guide for Parents
 Tips for Riding on Busy City Streets: Smart Strategies for Urban Cyclists
 Best US National Parks for Mountain Biking: Ride Epic Trails Across America
 Best Aero Helmets for Time Trials and Racing
 How to Clean and Lubricate Your Bike Chain Like a Pro
 10 Must-Have Items for Long-Distance Cycling Trips