
- 1-why-a-diy-bike-repair-kit-is-essential
- 2-must-have-tools-for-a-complete-bike-repair-kit
- 3-choosing-quality-over-quantity
- 4-organizing-your-diy-kit-for-trailside-and-garage-use
- 5-real-rider-lessons-the-value-of-being-prepared
1. Why a DIY Bike Repair Kit Is Essential
If you've ever found yourself stranded mid-ride with a flat tire or slipped chain, you already understand the value of having the right tools on hand. Knowing how to build a DIY bike repair kit isn't just about convenience—it's about independence and safety. Whether you ride through urban streets or mountain trails, having a personal set of tools tailored to your bike and riding style can save hours of frustration and even protect you from serious injury.
Cyclists are increasingly realizing that relying solely on bike shops isn’t practical, especially in emergencies. A well-prepared kit lets you fix common problems on the spot, and for many, it turns into a passion project—customized with just the right balance of function and portability.
2. Must-Have Tools for a Complete Bike Repair Kit
The backbone of any solid DIY bike repair kit lies in its components. Start with these essentials:
Multi-tool: Choose one with Allen keys (2mm to 8mm), Phillips and flathead screwdrivers, and ideally a chain breaker.
Tire levers: Lightweight, inexpensive, and crucial for quick tube changes.
Mini pump or CO₂ inflator: Pumps are more reliable, but CO₂ systems save space and time.
Patch kit and spare tubes: Patching takes longer, but is a good backup to spare tubes.
Chain lube and a small rag: For quick cleaning and lubrication on the go.
Gloves and zip ties: You’d be surprised how often they come in handy for roadside fixes.
For home use, expand your kit to include a torque wrench, tire pressure gauge, spoke wrench, and derailleur hanger alignment gauge. Depending on your skill level, these can significantly expand the scope of what you can fix yourself.
3. Choosing Quality Over Quantity
One of the most common mistakes when building a DIY bike repair kit is buying cheap tools in bulk that fail under stress. Remember, this kit will be your lifeline in unpredictable situations. Investing in durable, bike-specific tools will save money and headaches down the road.
A personal anecdote: during a long-distance gravel ride in Colorado, a fellow rider’s inexpensive multi-tool snapped while adjusting their seat post. Without a backup, they had to abandon the route. This kind of situation underscores why choosing well-reviewed, field-tested brands is worth every penny. If you're unsure where to start, check recommendations at Cycling Guider for gear tested by actual riders.
4. Organizing Your DIY Kit for Trailside and Garage Use
There’s a difference between a mobile kit and a home repair setup. Your trail kit should fit in a saddlebag, frame bag, or hydration pack. Focus on weight and versatility. Meanwhile, your garage kit can be more comprehensive, housed in a toolbox or wall-mounted workstation.
Use waterproof pouches, label smaller tools, and group items by repair type: drivetrain, tire/tube, brake system. Add a checklist to the inside of your kit so you're never guessing if something’s missing before a ride. Frequent riders often rotate tools in and out depending on terrain—gravel, road, or MTB.
5. Real Rider Lessons: The Value of Being Prepared
In a Reddit thread that went viral in the cycling community, one user shared how their chain snapped 20 miles from the nearest town. Thanks to a compact chain tool and a quick link in their kit, they repaired the bike and finished their ride. The post inspired dozens of others to share similar stories—and reevaluate their repair kits.
Being prepared isn’t about paranoia—it’s about empowerment. The confidence you gain from knowing how to use your tools and handle the unexpected is just as valuable as the gear itself. With resources like Cycling Guider, it’s easier than ever to build a DIY bike repair kit that suits your needs and grows with your skills.


 Billet BMX5.0 (2 reviews)
 Far East Children Bicycle Factory1.0 (1 reviews)
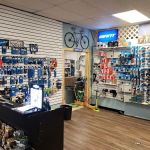 Archer Motorsports, Inc.4.0 (8 reviews)
 YEP Bike Works4.0 (55 reviews)
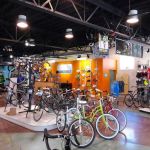 Gorham Bike & Ski4.0 (498 reviews)
 Alchemy Bikes4.0 (37 reviews)
 How to Teach Kids to Ride a Bike: A Step-by-Step Guide for Parents
 Tips for Riding on Busy City Streets: Smart Strategies for Urban Cyclists
 Best US National Parks for Mountain Biking: Ride Epic Trails Across America
 Best Aero Helmets for Time Trials and Racing
 How to Clean and Lubricate Your Bike Chain Like a Pro
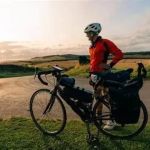 10 Must-Have Items for Long-Distance Cycling Trips